Перейти к основному содержанию
Присоединяйся к сообществу ремонтников - Создай аккаунт

MacBook Pro 13" Unibody Mid 2012 Heat Sink Replacement

Выберете то, что вам нужно

  1. MacBook Pro 13" Unibody Mid 2012 Heat Sink Replacement, Lower Case: шаг 1, изображение 1 из 1
    • Remove the following ten screws:

    • Three 14.4 mm Phillips #00 screws

    • Three 3.5 mm Phillips #00 screws

    • Four 3.5 mm shouldered Phillips #00 screws

    • When replacing the small screws, align them perpendicular to the slight curvature of the case (they don't go straight down).

    Спросите у FixBot

    Добавить комментарий

  2. MacBook Pro 13" Unibody Mid 2012 Heat Sink Replacement: шаг 2, изображение 1 из 2 MacBook Pro 13" Unibody Mid 2012 Heat Sink Replacement: шаг 2, изображение 2 из 2
    • Use your fingers to pry the lower case away from the body of the MacBook near the vent.

    • Remove the lower case.

    Спросите у FixBot

    Добавить комментарий

  3. MacBook Pro 13" Unibody Mid 2012 Heat Sink Replacement, Battery Connection: шаг 3, изображение 1 из 2 MacBook Pro 13" Unibody Mid 2012 Heat Sink Replacement, Battery Connection: шаг 3, изображение 2 из 2
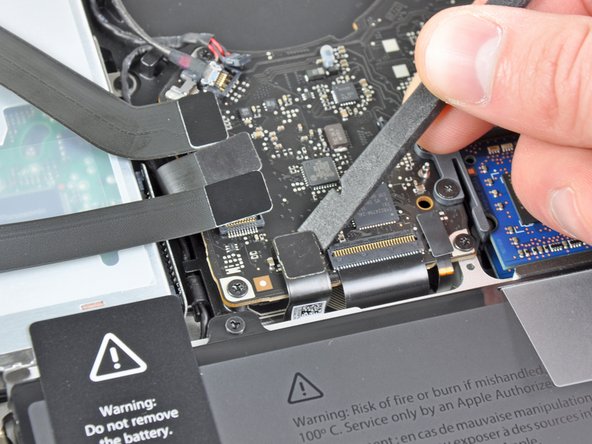
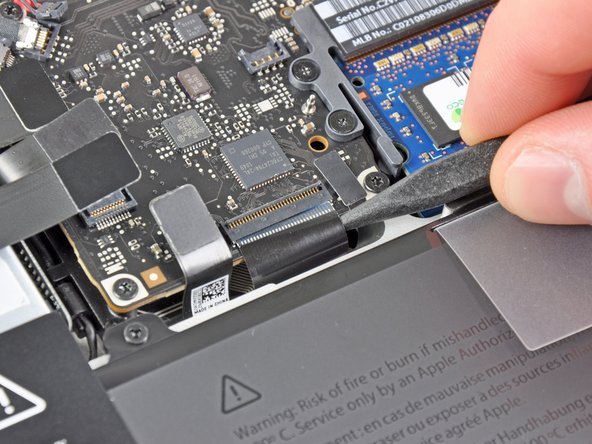
    • Use the edge of a spudger to pry the battery connector upwards from its socket on the logic board.

    • It is useful to pry upward on both short sides of the connector to "walk" it out of its socket. Be careful with the corners of the connectors, they can be easily broken off.

    Спросите у FixBot

    Добавить комментарий

  4. MacBook Pro 13" Unibody Mid 2012 Heat Sink Replacement: шаг 4, изображение 1 из 1
    • Bend the battery cable slightly away from its socket on the logic board so it does not accidentally connect itself while you work.

    Спросите у FixBot

    Добавить комментарий

  5. MacBook Pro 13" Unibody Mid 2012 Heat Sink Replacement, Fan: шаг 5, изображение 1 из 3 MacBook Pro 13" Unibody Mid 2012 Heat Sink Replacement, Fan: шаг 5, изображение 2 из 3 MacBook Pro 13" Unibody Mid 2012 Heat Sink Replacement, Fan: шаг 5, изображение 3 из 3
    • Use the edge of a spudger to gently pry the fan connector up and out of its socket on the logic board.

    • It is useful to twist the spudger axially from beneath the fan cable wires to release the connector.

    • The fan socket and the fan connector can be seen in the second and third pictures. Be careful not to break the plastic fan socket off the logic board as you use your spudger to lift the fan connector straight up and out of its socket. The layout of the logic board shown in the second picture may look slightly different than your machine but the fan socket is the same.

    Спросите у FixBot

    Добавить комментарий

  6. MacBook Pro 13" Unibody Mid 2012 Heat Sink Replacement: шаг 6, изображение 1 из 1
    • Remove the following three screws securing the fan to the logic board:

    • One 7.2 mm T6 Torx screw

    • Two 5.3 mm T6 Torx screws

    Спросите у FixBot

    Добавить комментарий

  7. MacBook Pro 13" Unibody Mid 2012 Heat Sink Replacement: шаг 7, изображение 1 из 1
    • Lift the fan out of its recess in the logic board, minding its cable that may get caught.

    Спросите у FixBot

    Добавить комментарий

  8. MacBook Pro 13" Unibody Mid 2012 Heat Sink Replacement, Logic Board: шаг 8, изображение 1 из 2 MacBook Pro 13" Unibody Mid 2012 Heat Sink Replacement, Logic Board: шаг 8, изображение 2 из 2
    • Use the tip of a spudger to pull the right speaker/subwoofer cable out from under the retaining finger molded into the upper case.

    • Pull the right speaker/subwoofer cable upward to lift the connector out of its socket on the logic board.

    Спросите у FixBot

    Добавить комментарий

  9. MacBook Pro 13" Unibody Mid 2012 Heat Sink Replacement: шаг 9, изображение 1 из 1
    • Disconnect the camera cable from the logic board.

    • The camera cable slides out from its logic board connector. If your cable feels fragile, use a spudger to walk the cable out from the metal tabs on each side of the connector head.

    Спросите у FixBot

    Добавить комментарий

  10. MacBook Pro 13" Unibody Mid 2012 Heat Sink Replacement: шаг 10, изображение 1 из 2 MacBook Pro 13" Unibody Mid 2012 Heat Sink Replacement: шаг 10, изображение 2 из 2
    • Disconnect the following four cables:

    • AirPort/Bluetooth cable

    • Optical drive cable

    • Hard drive cable

    • Trackpad cable

    • To disconnect the cables, use the flat end of a spudger to pry their connectors up from the sockets on the logic board.

    Спросите у FixBot

    Добавить комментарий

  11. MacBook Pro 13" Unibody Mid 2012 Heat Sink Replacement: шаг 11, изображение 1 из 3 MacBook Pro 13" Unibody Mid 2012 Heat Sink Replacement: шаг 11, изображение 2 из 3 MacBook Pro 13" Unibody Mid 2012 Heat Sink Replacement: шаг 11, изображение 3 из 3
    • Use your fingernail to flip up the retaining flap on the keyboard ribbon cable ZIF socket.

    • Be sure you are prying up on the hinged retaining flap, not the socket itself.

    • Use the tip of a spudger to pull the keyboard ribbon cable out of its socket.

    • The cable may be difficult to insert. If you are having trouble, temporarily attach a piece of tape to the cable to help you guide the cable into the socket.

    Спросите у FixBot

    Добавить комментарий

  12. MacBook Pro 13" Unibody Mid 2012 Heat Sink Replacement: шаг 12, изображение 1 из 1
    • If present, remove the small strip of black tape covering the keyboard backlight cable socket.

    Спросите у FixBot

    Добавить комментарий

  13. MacBook Pro 13" Unibody Mid 2012 Heat Sink Replacement: шаг 13, изображение 1 из 3 MacBook Pro 13" Unibody Mid 2012 Heat Sink Replacement: шаг 13, изображение 2 из 3 MacBook Pro 13" Unibody Mid 2012 Heat Sink Replacement: шаг 13, изображение 3 из 3
    • Use the tip of a spudger or your fingernail to flip up the retaining flap on the keyboard backlight ribbon cable ZIF socket.

    • Be sure you are prying up on the hinged retaining flap, not the socket itself.

    • Pull the keyboard backlight ribbon cable out of its socket.

    Спросите у FixBot

    Добавить комментарий

  14. MacBook Pro 13" Unibody Mid 2012 Heat Sink Replacement: шаг 14, изображение 1 из 1
    • Use the flat end of a spudger to pry the sleep sensor/battery indicator connector up from its socket on the logic board.

    Спросите у FixBot

    Добавить комментарий

  15. MacBook Pro 13" Unibody Mid 2012 Heat Sink Replacement: шаг 15, изображение 1 из 3 MacBook Pro 13" Unibody Mid 2012 Heat Sink Replacement: шаг 15, изображение 2 из 3 MacBook Pro 13" Unibody Mid 2012 Heat Sink Replacement: шаг 15, изображение 3 из 3
    • Grab the plastic pull tab secured to the display data cable lock and rotate it toward the DC-In side of the computer.

    • Pull the display data cable straight out of its socket on the logic board.

    • Do not lift up on the display data cable, as its socket is very fragile. Pull the cable parallel to the face of the logic board.

    Спросите у FixBot

    Добавить комментарий

  16. MacBook Pro 13" Unibody Mid 2012 Heat Sink Replacement: шаг 16, изображение 1 из 1
    • Remove the following nine screws:

    • Five 3.6 mm T6 Torx screws

    • Two 4.3 mm T6 Torx screws

    • Two 7.2 mm T6 Torx screws

    • In some models the screws may be slightly shorter as follows:

    • Five 3.0 mm T6 screws

    • Two 3.6 mm T6 screws

    • Two 6.7 mm T6 screws

    Спросите у FixBot

    Добавить комментарий

  17. MacBook Pro 13" Unibody Mid 2012 Heat Sink Replacement: шаг 17, изображение 1 из 2 MacBook Pro 13" Unibody Mid 2012 Heat Sink Replacement: шаг 17, изображение 2 из 2
    • Remove the following two screws:

    • One 8.6 mm Phillips screw

    • One 5.5 mm Phillips screw

    • Remove the display data cable retainer from the upper case.

    Спросите у FixBot

    Добавить комментарий

  18. MacBook Pro 13" Unibody Mid 2012 Heat Sink Replacement: шаг 18, изображение 1 из 1
    • Use the tip of a spudger to gently peel the microphone off the adhesive securing it to the upper case.

    Спросите у FixBot

    Добавить комментарий

  19. MacBook Pro 13" Unibody Mid 2012 Heat Sink Replacement: шаг 19, изображение 1 из 1
    • Minding the many connectors near its edges, lift the logic board from the end nearest the optical drive.

    • Without flexing the board, maneuver it out of the upper case, minding the flexible connection to the DC-In board that may get caught in the upper case.

    • Remove the logic board.

    Спросите у FixBot

    Добавить комментарий

  20. MacBook Pro 13" Unibody Mid 2012 Heat Sink Replacement, Heat Sink: шаг 20, изображение 1 из 1
    • Remove the three 8.4 mm #1 Phillips screws securing the heat sink to the logic board.

    • Don't lose the springs held under each of the screws.

    Спросите у FixBot

    Добавить комментарий

  21. MacBook Pro 13" Unibody Mid 2012 Heat Sink Replacement: шаг 21, изображение 1 из 1
    • Carefully remove the heat sink from the processor.

    • If the heat sink seems to be stuck, it may be helpful to gently pry it off the processor with a plastic spudger. Be careful not to break any surface mount components on the processor while prying.

    • Be sure to clean off the old thermal paste and apply a new layer before you reinstall the heat sink. We have a guide that makes it easy.

    Спросите у FixBot

    Добавить комментарий

Заключение

To reassemble your device, follow these instructions in reverse order.

Отменить: Я не выполнил это руководство.

174 человек успешно провели ремонт по этому руководству.

Andrew Optimus Goldheart

Участник с: 10/17/09

515 266 Репутация

Автор 407 руководств

Команда

iFixit Участник iFixit

Staff

122 членов

Автор 27 514 руководств

12 Комментарии к руководству

Thanks, you’re a lifesaver! It’s much easier than I imagined. Used this to replace the old thermal past with some Arctic Silver 5. Temperature differences are surprising. During the break in period it went from 60 degrees Celsius idle to 50 degrees and from max 105 degrees Celsius under heavy load to about max 90 degrees. Now after a 24 hour break-in period it went down to 45 degrees idle and 85 max under heavy load. Will update if there’s any changes after the full 200 hour break-in period specified by the manufacturer.

Rob Kruit - Ответить Поделиться

Reporting back. Temperatures now @ 41 degrees Celsius idle and under full load between 81 and 85 degrees. System is stable again like before. This really solved a lot of problems for me!

Rob Kruit - Ответить Поделиться

Seems I’m facing with same issue. I’m testing temperature with “Intel Power Gadget“ application. Idle temperature is about 65-70 degree and during high load is about 100. Hope changing old thermal past will help me.

dmitrybalabka - Ответить Поделиться

After I have changed the thermal paste now it is possible to see 100% process utilisation and stable 3.4 GHz usage (Macbook Pro 2012 Mid i7). I’m still getting 100 degrees but seems it is ok now. To see the difference I suggest to check “Intel Power Gadget” application charts before and after thermal paste change. I did not run any special benchmarks just run some heavy task which utilise all cores (e.g. IDE code indexing)

dmitrybalabka - Ответить Поделиться

Andrew, thanks a lot for this guide!! In my machine the fan was spinning a whole lot, even with a load of only 10%. After replacing the thermal paste the machine is now completely quiet. Thanks again for this great and detailed instruction, I appreciate it.

Oliver - Ответить Поделиться

Добавить комментарий

Статистика просмотров:

За последние 24 часов: 33

За последние 7 дней: 164

За последние 30 дней: 825

За всё время: 131,966