Эта версия возможно содержит некорректные исправления. Переключить на последнюю проверенную версию.
Выберете то, что вам нужно
-
Этот шаг не переведен. Помогите перевести
-
First be sure to turn the power switch to the off position.
-
Do this by turning the leftmost knob counter-clockwise as until the line points to "off."
-
-
Этот шаг не переведен. Помогите перевести
-
Now remove the battery.
-
On the back of the device locate the battery cover.
-
Remove it by pushing down on the clip.
-
Then pull the piece of fabric until the battery comes out.
-
-
Этот шаг не переведен. Помогите перевести
-
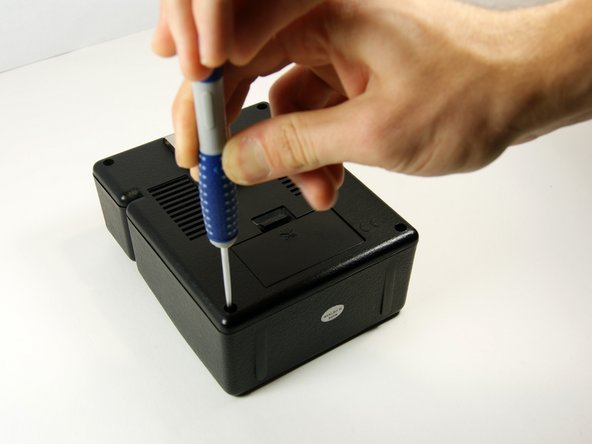
Use the long, skinny phillips head screwdriver to remove the 4 7/16" screws on the back of the device in the four corners.
-
-
-
Этот шаг не переведен. Помогите перевести
-
Now pull the back panel off and place it down as shown. Pull the panel straight up so you do not lose the screws.
-
-
Этот шаг не переведен. Помогите перевести
-
Remove the volume, tone and power knobs by pulling them straight away from the front of the device. If they do not come off easily use the wedge tool to pry them up.
-
-
Этот шаг не переведен. Помогите перевести
-
Use a 10mm socket to remove the nuts from the volume and tone potentiometers.
-
Use a 11mm socket on the power switch nuts.
-
Use a 9/16" socket to remove the nut from the input jack.
-
-
Этот шаг не переведен. Помогите перевести
-
Now you must remove the LED from the circuit board.
-
To do this you will need to use a soldering iron to detach to two pins of the LED from the board. They are the two pins in the lowest leftmost corner of the board.
-
Once detached, pull the board straight up to remove.
-


Отменить: Я не выполнил это руководство.
4 участников успешно повторили данное руководство.
Команда

University of Maryland, Team 1-1, Shastany Fall 2013 Участник University of Maryland, Team 1-1, Shastany Fall 2013
UMD-SHASTANY-F13S1G1
3 членов
Автор 5 руководств