Введение
If you have diagnosed your problematic power window operation in your W123 as being caused by the regulator itself, or the regulator motor, the regulator will need to be removed from the door for inspection and testing. The regulators on the rear doors cannot even be seen easily when the panel is removed so it can be puzzling to figure out how they are removed. This guide will show the process for their removal.
Выберете то, что вам нужно
-
-
Before you can begin with the removal of your rear window regulator you will need to remove the door panel. Click here to review the door panel removal technique guide.
-
-
-
After following the door panel removal guide, including the extra steps for the rear door panel, the plug for the rear window switch will look like this.
-
Gently remove the switch from the door panel and plug it back in this plug.
-
-
-
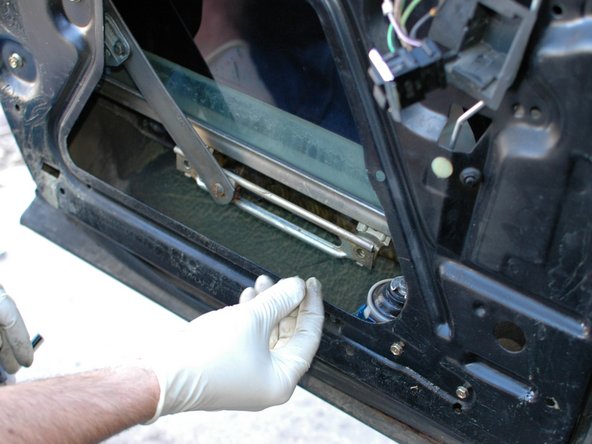
Use the switch to move the power window down until the bottom rail of the glass is exposed. Notice that the switch is installed in the plug as mentioned in the previous step.
-
Remove the two 10mm bolts that hold the bottom rail of the glass to the window regulator.
-
If your power window does not move up and down due to power or motor issues, you may need to reach up inside the door opening to remove the two 10mm bolts. It's possible, just more challenging.
-
-
-
Separate the window regulator arm from the bottom rail on the glass and then slowly push the glass up in to the door.
-
When the glass reaches the top of the door, secure it with strong tape that will not leave a residue on the glass. Several large pieces of blue painters tape works well. Secure it by using long pieces that go over the top of the door and attaches to the glass on both sides.
-
-
-
-
If you window is hard to move up and down by hand you can consider greasing the felt slides within the side window rails with a synthetic grease such as silicone. The bottom end is shown; it goes all the way up in to the door.
-
-
-
With the glass disconnected from the regulator and secured properly the regulator can now be removed.
-
Start by removing the switch from the plug.
-
Then use a flat blade screwdriver to pop the back of the plug off. This will reveal the individual connector ends inside the plug.
-
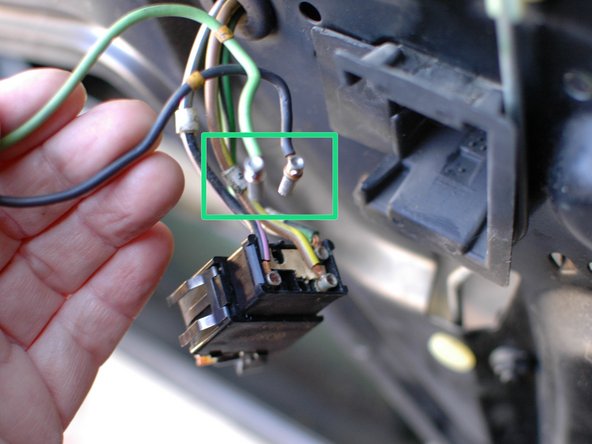
Take a picture or make careful notes of where each wire goes. While the wires and the holes in the plug are typically numbered for easy reassembly it's better to be safe than sorry.
-
Pull the solid green and solid black wires, which are the ones that are connected to the regulator motor, from the plug. Leave the rest of the wires in place and re-install the black plastic back on the plug for now.
-
-
-
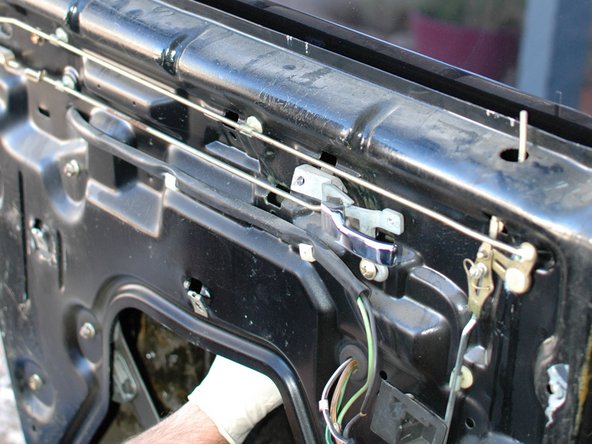
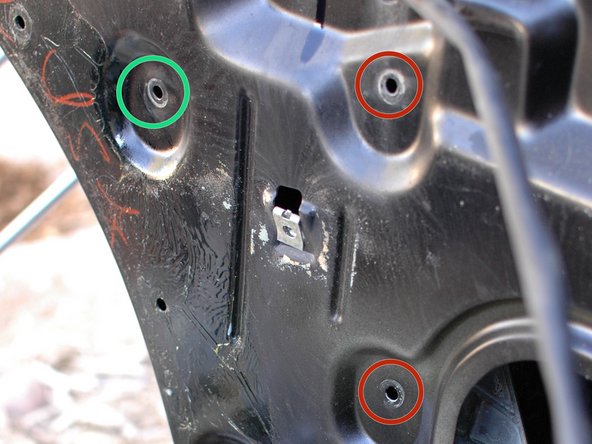
Loosen and remove the two 10mm nuts that hold the regulator's pegs in to the door shell.
-
Loosen and remove the 10mm bolt that holds the final connection point of the regulator to the door shell.
-
With these nuts and bolts removed the regulator is now loose from the door but more needs to be done before it can be removed fully.
-
-
-
The window regulator motor is too large to be removed from the rear doors without a few more steps. This is because there are rails on each side of the window glass that the window rides in as it moves up and down. This outside rail blocks the removal of the regulator.
-
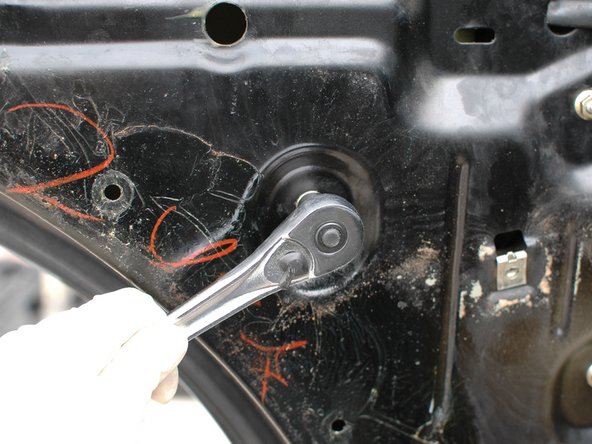
Remove the lower 10mm bolt that holds this window rail in place. Consider taking pictures or marking on the door the exact position of this lower bolt as it has some adjustment room and the best bet is most likely to return it to where it was before removal.
-
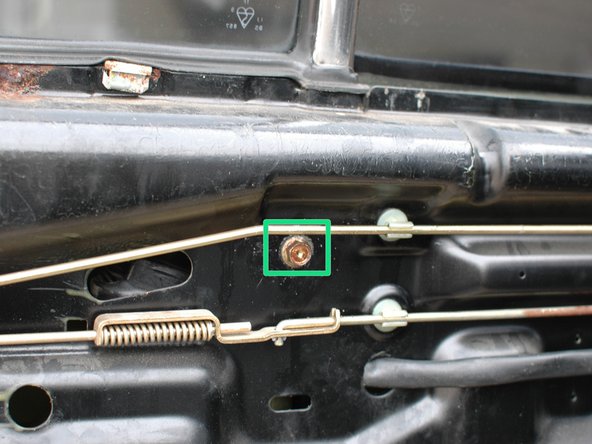
Straight up from this bolt, near the very top of the door, is a second 10mm bolt that holds the top of the rail. Loosen but do not remove this bolt.
-
-
-
The outside window rail can now be rotated inside the door, towards the car, to make room for the window regulator and motor to pass it and come out of the opening in the door shell. Be sure to make note of how the rail and regulator are positioned so you can re-install them in the correct order/orientation.
-
If you want you may choose to tie the window rail to the door shell to free your second hand.
-
Take your time when removing the regulator. Rotate it a bit, jiggle it, move it backward and forward; there is no specific way to remove it, it's simply by feel. There is plenty of room to remove it so do not get discouraged.
-
-
-
Once you have the regulator removed you can inspect it.
-
This regulator was removed because the window was moving very slowly. After removal it became obvious that it was bent, and it seems like the motor is weak as well. It will need to be repaired or replaced.
-
If you find your regulator is in similar shape, click here to review the rear power regulator repair guide.
-
If you removed your regulator to service the motor see the motor removal/replacement guide here.
-


To reassemble your device, follow these instructions in reverse order.
To reassemble your device, follow these instructions in reverse order.
Отменить: Я не выполнил это руководство.
15 участников успешно повторили данное руководство.

Команда

5 Комментариев
I need the front passenger 1983 300sd 123 rail at bottom of glass everything else is ok bottom of glass is just rusted out thanks
Great guide... The hardest part is that dang side window rail that goes all the way up. Now I just have to figure out why my motor will only operate clockwise. It's won't go the opposite direction to close the window.
Good evening Nicolas and happy new year,
I have used your advice and many tricks on my 1984 300tdt. Your site is wonderful and helped me on most of my repairs. Thank you.
One of them was repair of the rear window regulator. It was bent and did not
operate at all. As per your instructions, I straightened the bent metal parts in a vice and after installation it worked. However, when it closes
the motor does not stop unless I release the button. The motor stops when it reaches the bottom position, even if the button is actuated. Is
there an adjustment that I have to do to accomplish the same when the window closes?
Many thanks for your time. Please email me on: marianoalobo@gmail.com
Mariano Lobo
God bless you Saint Nicolas