Перейти к основному содержанию

Motorola Droid LCD Replacement

Выберете то, что вам нужно

  1. Motorola Droid LCD Replacement, Battery: шаг 1, изображение 1 из 3 Motorola Droid LCD Replacement, Battery: шаг 1, изображение 2 из 3 Motorola Droid LCD Replacement, Battery: шаг 1, изображение 3 из 3
    • Slide the battery cover downwards while applying pressure to the center of the battery cover with your thumb.

    • Lift and remove the battery cover out from the phone.

  2. Motorola Droid LCD Replacement: шаг 2, изображение 1 из 1
    • Grasp the upper left corner of the battery and lift it out of its housing.

  3. Motorola Droid LCD Replacement, Rear Case: шаг 3, изображение 1 из 1
    • Use a spudger to lift and remove the black plastic screw cover at the top of the phone near the camera.

    • The cover is attached by adhesive, so some force may be required.

  4. Motorola Droid LCD Replacement: шаг 4, изображение 1 из 2 Motorola Droid LCD Replacement: шаг 4, изображение 2 из 2
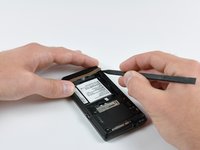
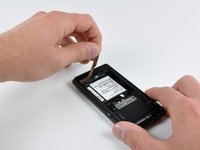
    • Using the tip of a spudger, peel up one corner of the gold ribbon beneath the battery compartment.

    • Peel the ribbon up off the phone.

  5. Motorola Droid LCD Replacement: шаг 5, изображение 1 из 2 Motorola Droid LCD Replacement: шаг 5, изображение 2 из 2
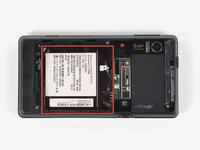
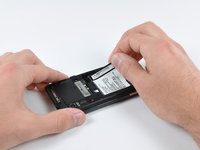
    • Carefully peel the device information label that covers the motherboard EMI shields.

    • This label contains important information specific to the phone. Remove it with care and keep it in a safe place.

  6. Motorola Droid LCD Replacement: шаг 6, изображение 1 из 1
    • Insert the flat end of a spudger and pry the plastic camera cover up off the phone.

    • The thin plastic cover is attached to the phone with an adhesive. Work slowly and carefully.

  7. Motorola Droid LCD Replacement: шаг 7, изображение 1 из 1
    • Remove the seven 5.5 mm T5 Torx screws securing the rear case to the inner case.

  8. Motorola Droid LCD Replacement: шаг 8, изображение 1 из 1
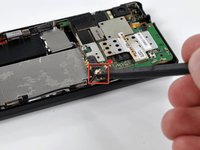
    • Insert the flat end of a spudger and pry downwards to release the plastic tab holding the rear case to the motherboard screw.

  9. Motorola Droid LCD Replacement: шаг 9, изображение 1 из 1
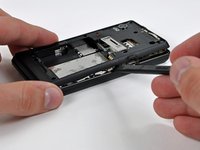
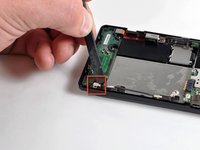
    • Gently insert a spudger between the rear case and front case at the top of the phone, near the audio jack.

    • Carefully pry the top edge of the rear case up from the rest of the phone.

  10. Motorola Droid LCD Replacement: шаг 10, изображение 1 из 2 Motorola Droid LCD Replacement: шаг 10, изображение 2 из 2
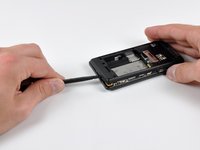
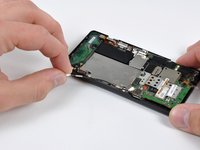
    • With the spudger still inserted between the rear case and front case, slide the spudger along the right edge of the device, moving toward the bottom, prying as you go.

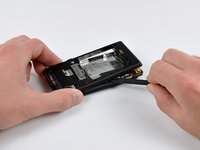
    • Continue prying along the bottom edge of the device from right to left, freeing it from the front panel.

  11. Motorola Droid LCD Replacement: шаг 11, изображение 1 из 2 Motorola Droid LCD Replacement: шаг 11, изображение 2 из 2
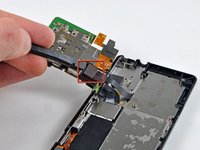
    • Continue prying the rear case from the front case along the left side, moving from bottom to top.

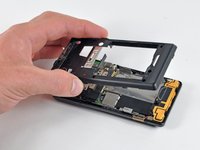
    • Lift the rear case up out of the phone.

  12. Motorola Droid LCD Replacement, Speaker: шаг 12, изображение 1 из 1
    • Carefully lift and remove the speaker assembly up out of the phone.

  13. Motorola Droid LCD Replacement, Motherboard: шаг 13, изображение 1 из 3 Motorola Droid LCD Replacement, Motherboard: шаг 13, изображение 2 из 3 Motorola Droid LCD Replacement, Motherboard: шаг 13, изображение 3 из 3
    • Use a spudger to pry the antenna cable connectors from their respective sockets on the motherboard and the speaker/antenna board.

    • De-route the antenna cable by pulling it out of the metal clips along the side of the front case.

  14. Motorola Droid LCD Replacement: шаг 14, изображение 1 из 1
    • Peel the black tape covering the side button and display ribbon connectors on the motherboard.

  15. Motorola Droid LCD Replacement: шаг 15, изображение 1 из 1
    • Disconnect the power button/volume button connector from its socket on the motherboard using the flat end of a spudger.

  16. Motorola Droid LCD Replacement: шаг 16, изображение 1 из 1
    • Disconnect the display ribbon connector from its socket on the motherboard using the flat end of a spudger.

  17. Motorola Droid LCD Replacement: шаг 17, изображение 1 из 1
    • Remove three 3.8 mm T5 Torx screws securing the motherboard to the front case.

    • Don't attempt to remove the motherboard yet, it is still attached by the keypad ribbon connector.

  18. Motorola Droid LCD Replacement: шаг 18, изображение 1 из 2 Motorola Droid LCD Replacement: шаг 18, изображение 2 из 2
    • Carefully lift the motherboard from the front case and lay it next to the Droid, minding the keypad connector that is still attached.

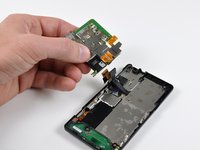
    • Disconnect the keypad connector by prying it straight up off its socket on the motherboard.

    • Remove the motherboard from the phone.

  19. Motorola Droid LCD Replacement, Front Panel: шаг 19, изображение 1 из 1
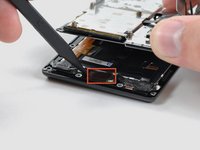
    • Disconnect the camera button/vibrator connector by prying it straight up off its socket on the speaker board with a spudger.

  20. Motorola Droid LCD Replacement: шаг 20, изображение 1 из 2 Motorola Droid LCD Replacement: шаг 20, изображение 2 из 2
    • Slide the phone open.

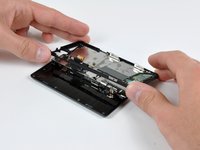
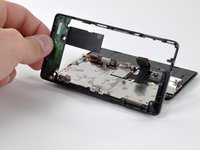
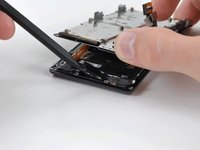
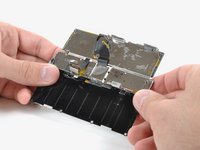
    • Lift up the edge of the black plastic rim that includes the speaker board from the side closest to the keypad.

    • Continue lifting the side of the rim until it is almost vertical, and wiggle it free from the back of the LCD assembly.

  21. Motorola Droid LCD Replacement: шаг 21, изображение 1 из 1
    • Remove the EMI shield by releasing the clips shown with the tip of a spudger.

  22. Motorola Droid LCD Replacement: шаг 22, изображение 1 из 1
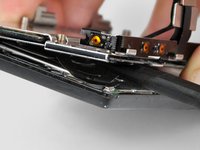
    • Remove the five 2.5 mm Phillips screws.

    • It's either a 2.5 MM Phillips or a T4 Torx. Motorola changed it on later models of the A956.

  23. Motorola Droid LCD Replacement: шаг 23, изображение 1 из 1
    • Slide the phone until a sixth screw is visible, as shown.

    • Remove the single 2.5 mm Phillips screw.

  24. Motorola Droid LCD Replacement: шаг 24, изображение 1 из 1
    • Continue sliding the phone in the same direction, past its "closed" position, until four more screws are revealed. You will need to lift the slider slightly to get it passed the "closed" position.

    • Remove the four 2.5 mm Phillips screws.

  25. Motorola Droid LCD Replacement: шаг 25, изображение 1 из 1
    • Return the phone to its normal "closed" position.

    • Peel the display ribbon up from the keypad's metal backing.

    • The ribbon cannot be completely removed yet, because it is attached to the back of the LCD.

  26. Motorola Droid LCD Replacement: шаг 26, изображение 1 из 2 Motorola Droid LCD Replacement: шаг 26, изображение 2 из 2
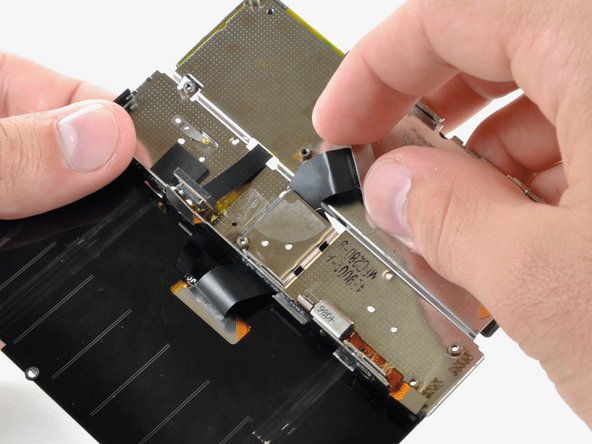
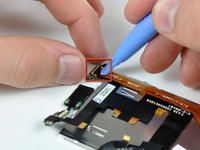
    • Insert a spudger between the back and front case of the display assembly, and peel the two ribbon cables off the two adhesive pads along the back case of the display assembly.

    • The location of the pads on the back case is shown. The top left corner of the case is the corner of the phone shown in the first picture.

  27. Motorola Droid LCD Replacement: шаг 27, изображение 1 из 1
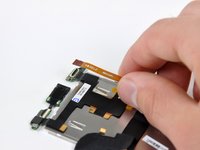
    • Use the flat end of a spudger to lift the board that contains the ambient light sensor and display data cable connector out of the screen housing.

  28. Motorola Droid LCD Replacement: шаг 28, изображение 1 из 2 Motorola Droid LCD Replacement: шаг 28, изображение 2 из 2
    • Use the tip of a spudger to lift the speaker out of the screen housing.

  29. Motorola Droid LCD Replacement: шаг 29, изображение 1 из 1
    • Peel off the black tape to reveal the front panel connector.

  30. Motorola Droid LCD Replacement: шаг 30, изображение 1 из 1
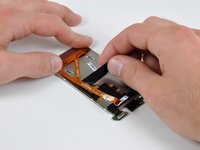
    • Use the flat end of a spudger or your fingernail to flip up the retaining flap on the front panel ribbon cable ZIF socket.

    • Be sure you are prying up on the hinged retaining flap, not the socket itself.

    • Disconnect the front panel ribbon cable.

  31. Motorola Droid LCD Replacement: шаг 31, изображение 1 из 1
    • Flip the phone over and remove the front panel.

  32. Motorola Droid LCD Replacement, LCD: шаг 32, изображение 1 из 2 Motorola Droid LCD Replacement, LCD: шаг 32, изображение 2 из 2
    • Slide the phone open.

    • While feeding the display ribbon cable through the slot in the metal keypad backing, slowly continue to slide the phone open past its normal allowed point.

    • Continue feeding the display ribbon cable through and sliding the phone until the LCD assembly is separated from the keypad.

  33. Motorola Droid LCD Replacement: шаг 33, изображение 1 из 1
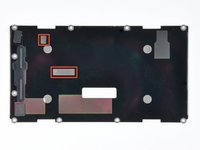
    • Lift the back cover off the display assembly, feeding the ribbon cable through the slit as you go.

  34. Motorola Droid LCD Replacement: шаг 34, изображение 1 из 1
    • Peel away the black tape to reveal the display data cable connector.

  35. Motorola Droid LCD Replacement: шаг 35, изображение 1 из 2 Motorola Droid LCD Replacement: шаг 35, изображение 2 из 2
    • Use an iPod opening tool or fingernail to flip up the black lever on the ZIF connector.

    • Pull the orange display data cable from the ZIF connector.

  36. Motorola Droid LCD Replacement: шаг 36, изображение 1 из 2 Motorola Droid LCD Replacement: шаг 36, изображение 2 из 2
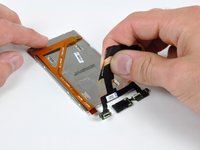
    • Peel the display ribbon cable from the back of the LCD. The ribbon cable is attached with adhesive, so work slowly to avoid damaging it.

    • Remove the display ribbon from the back of the LCD.

Заключение

To reassemble your device, follow these instructions in reverse order.

15 участников успешно повторили данное руководство.

David Hodson

Участник с: 04/13/10

150 318 Репутация

Автор 127 руководств

0 Комментариев

Добавить комментарий

Просмотр статистики:

За последние 24часов: 0

За последние 7 дней: 2

За последние 30 дней: 23

За всё время: 45,621