Перейти к основному содержанию

Motorola Moto E4 Plus Charging Board Replacement

Выберете то, что вам нужно

  1. Motorola Moto E4 Plus Charging Board Replacement, Remove the back cover: шаг 1, изображение 1 из 3 Motorola Moto E4 Plus Charging Board Replacement, Remove the back cover: шаг 1, изображение 2 из 3 Motorola Moto E4 Plus Charging Board Replacement, Remove the back cover: шаг 1, изображение 3 из 3
    • Power off your phone before beginning disassembly.

    • Insert the edge of the spudger into the notch on the bottom right corner of the phone.

    • Twist the spudger to start releasing the back cover from the phone.

    • Slide the spudger along the bottom edge to separate the back cover from the phone.

  2. Motorola Moto E4 Plus Charging Board Replacement: шаг 2, изображение 1 из 2 Motorola Moto E4 Plus Charging Board Replacement: шаг 2, изображение 2 из 2
    • Lift the phone unit out of the back cover.

  3. Motorola Moto E4 Plus Charging Board Replacement, Midframe: шаг 3, изображение 1 из 1
    • Remove the eighteen 3.3 mm Phillips screws securing the midframe assembly.

  4. Motorola Moto E4 Plus Charging Board Replacement: шаг 4, изображение 1 из 2 Motorola Moto E4 Plus Charging Board Replacement: шаг 4, изображение 2 из 2
    • Remove the charging board cover.

  5. Motorola Moto E4 Plus Charging Board Replacement: шаг 5, изображение 1 из 3 Motorola Moto E4 Plus Charging Board Replacement: шаг 5, изображение 2 из 3 Motorola Moto E4 Plus Charging Board Replacement: шаг 5, изображение 3 из 3
    • Remove the battery cover.

  6. Motorola Moto E4 Plus Charging Board Replacement: шаг 6, изображение 1 из 2 Motorola Moto E4 Plus Charging Board Replacement: шаг 6, изображение 2 из 2
    • Insert an opening pick underneath the bottom left corner of the motherboard cover.

    • Slide the opening pick between the cover and the second SIM tray to release the plastic clip.

  7. Motorola Moto E4 Plus Charging Board Replacement: шаг 7, изображение 1 из 2 Motorola Moto E4 Plus Charging Board Replacement: шаг 7, изображение 2 из 2
    • Insert an opening pick underneath the bottom right corner of the motherboard cover.

    • Use the opening pick to pry up the motherboard cover.

  8. Motorola Moto E4 Plus Charging Board Replacement: шаг 8, изображение 1 из 2 Motorola Moto E4 Plus Charging Board Replacement: шаг 8, изображение 2 из 2
    • Remove the motherboard cover.

  9. Motorola Moto E4 Plus Charging Board Replacement, Battery Disconnect: шаг 9, изображение 1 из 2 Motorola Moto E4 Plus Charging Board Replacement, Battery Disconnect: шаг 9, изображение 2 из 2
    • Use the edge of a spudger to pry up and disconnect the battery flex cable from the motherboard.

  10. Motorola Moto E4 Plus Charging Board Replacement, Charging Board: шаг 10, изображение 1 из 1
    • Remove the single 2.9 mm Phillips screw holding the charging board to the frame.

  11. Motorola Moto E4 Plus Charging Board Replacement: шаг 11, изображение 1 из 2 Motorola Moto E4 Plus Charging Board Replacement: шаг 11, изображение 2 из 2
    Инструмент, используемый на этом этапе:
    Tweezers
    $4.99
    Купить
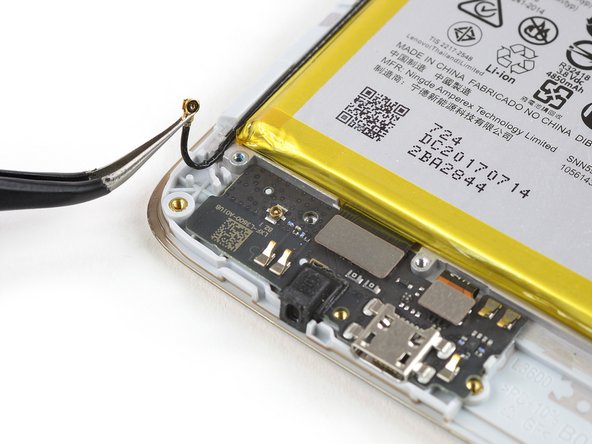
    • Use a pair of tweezers to pry up and disconnect the antenna cable.

  12. Motorola Moto E4 Plus Charging Board Replacement: шаг 12, изображение 1 из 2 Motorola Moto E4 Plus Charging Board Replacement: шаг 12, изображение 2 из 2
    • Use the edge of a spudger to pry up and disconnect the interconnect flex cable.

  13. Motorola Moto E4 Plus Charging Board Replacement: шаг 13, изображение 1 из 2 Motorola Moto E4 Plus Charging Board Replacement: шаг 13, изображение 2 из 2
    • Use the edge of a spudger to pry up and disconnect the fingerprint sensor flex cable.

  14. Motorola Moto E4 Plus Charging Board Replacement: шаг 14, изображение 1 из 2 Motorola Moto E4 Plus Charging Board Replacement: шаг 14, изображение 2 из 2
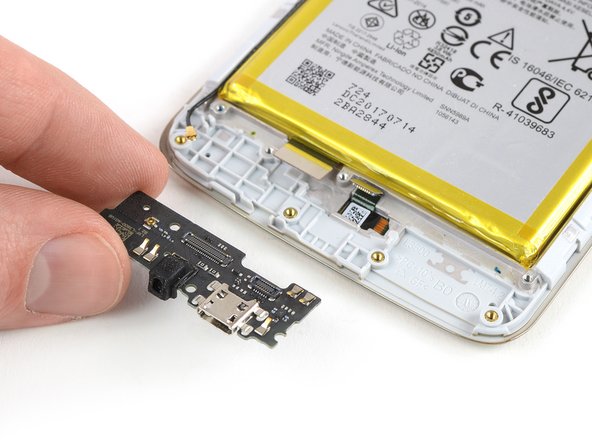
    • Insert the tip of a spudger underneath the bottom edge of the charging board and pry upwards.

    • Remove the charging board.

    • Before reassembly check your new part for any components that might need to be transferred from the old one (e.g. microphone rubber gasket).

Заключение

To reassemble your device, follow these instructions in reverse order.

2 участников успешно повторили данное руководство.

Dominik Schnabelrauch

Участник с: 11/23/16

205 254 Репутация

Автор 682 руководств

Команда

iFixit Участник iFixit

Staff

136 членов

Автор 17 438 руководств

0 Комментариев

Добавить комментарий

Просмотр статистики:

За последние 24часов: 1

За последние 7 дней: 4

За последние 30 дней: 13

За всё время: 2,068