Перейти к основному содержанию

Motorola RAZR2 v9m Battery Replacement

  1. Motorola RAZR2 v9m Battery Replacement, Battery: шаг 1, изображение 1 из 2 Motorola RAZR2 v9m Battery Replacement, Battery: шаг 1, изображение 2 из 2
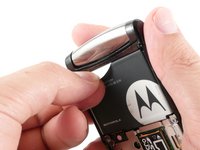
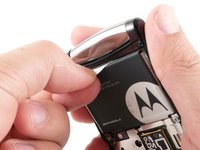
    • Push the rear cover toward the hinge of the RAZR2. The panel will slide about 3 mm.

  2. Motorola RAZR2 v9m Battery Replacement: шаг 2, изображение 1 из 3 Motorola RAZR2 v9m Battery Replacement: шаг 2, изображение 2 из 3 Motorola RAZR2 v9m Battery Replacement: шаг 2, изображение 3 из 3
    • Pinch the top and bottom edges of the panel and pull it away from the RAZR2.

    • The rear panel uses four small hooks to hold it in place. If the panel will not easily pull away, slide the panel more toward the hinge.

  3. Motorola RAZR2 v9m Battery Replacement: шаг 3, изображение 1 из 2 Motorola RAZR2 v9m Battery Replacement: шаг 3, изображение 2 из 2
    • Gently pull the white plastic tab to lift the battery away from the RAZR2.

    • The white plastic tab is attached to the phone. Only pull it enough to expose the edges of the battery.

  4. Motorola RAZR2 v9m Battery Replacement: шаг 4, изображение 1 из 2 Motorola RAZR2 v9m Battery Replacement: шаг 4, изображение 2 из 2
    • To remove the battery, grasp its edges pull away from the phone.

    • When installing a new battery, be sure the metal contacts on the phone line up with the ones on the battery.

Заключение

To reassemble your device, follow these instructions in reverse order.

4 участников успешно повторили данное руководство.

John T Roller

Участник с: 06/04/13

800 Репутация

Автор 6 руководств

Команда

University of Kentucky Louisville, Team 1-2, Chamberlain Spring 2013 Участник University of Kentucky Louisville, Team 1-2, Chamberlain Spring 2013

LOUISVILLE-CHAMBERLAIN-S13S1G2

2 членов

Автор 7 руководств

0 Комментариев

Добавить комментарий

Просмотр статистики:

За последние 24часов: 2

За последние 7 дней: 8

За последние 30 дней: 17

За всё время: 1,822