Введение
Replace the brains of your 3DS with a new motherboard.
Выберете то, что вам нужно
-
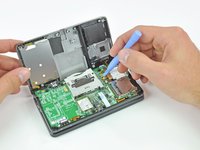
Инструмент, используемый на этом этапе:Phillips #00 Screwdriver$5.49
-
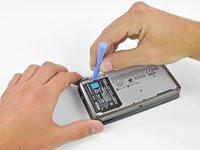
Use a Phillips PH00 screwdriver to loosen the four screws along the top of the back cover.
-
-
-
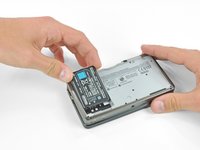
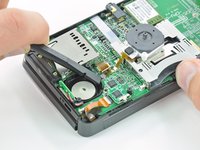
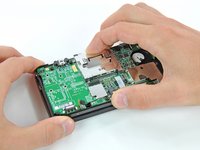
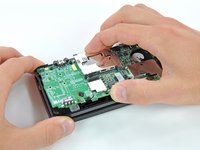
Grab the top edge of the back cover with your opposite hand so that the cover does not fall back into place.
-
Pull the back cover up and away from the rest of the device to remove it.
-
-
-
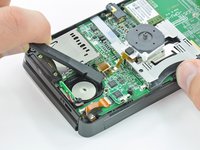
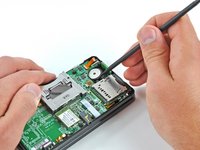
Insert a plastic opening tool into the notch in the lower case above the battery.
-
Pry the battery up with the plastic opening tool.
-
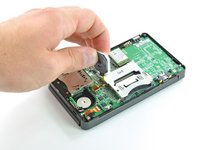
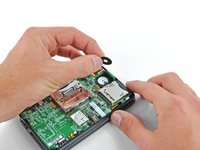
Grab the top edge of the battery and lift it out of the lower case.
-
-
-
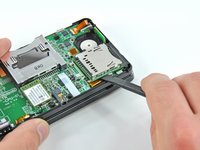
Use a JIS #00 screwdriver to remove the nine 6.3 mm black screws from the lower case.
-
Use a JIS #00 screwdriver to remove the 2.4 mm silver screw above the game cartridge slot.
-
-
-
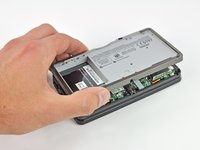
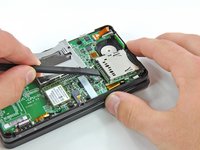
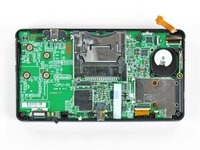
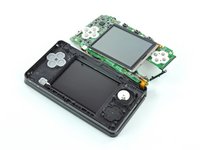
Lift the bottom edge of the lower case off the rest of the 3DS.
-
Use a plastic opening tool to pry the shoulder button ribbon cables off their sockets on the motherboard.
-
Remove the lower case from the device.
-
-
-
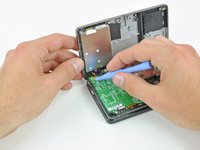
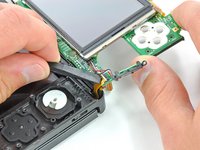
Remove the two 7.7 mm Phillips screws securing the back of the Circle Pad to the motherboard.
-
-
-
Use the flat end of a spudger to pry the back of the Circle Pad off the motherboard.
-
Lift the Circle Pad joystick off the motherboard and lay it on its back so that the ribbon cable connector is accessible.
-
-
-
Use the flat end of a spudger or your fingernail to flip up the retaining flap on the Circle Pad ribbon cable ZIF socket.
-
Lift the Circle Pad joystick off the motherboard.
-
-
-
Use a spudger or screwdriver to lift the pads up and remove them from the device.
-
-
-
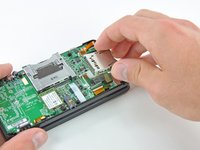
Remove the two 4.5 mm Phillips screws securing the SD board to the motherboard.
-
-
-
-
Use the flat end of a spudger to pry the SD board ribbon cable connector off its socket on the motherboard.
-
-
-
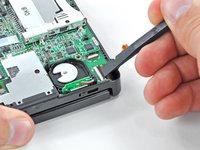
Insert the flat end of a spudger between the SD board and the motherboard.
-
Pry up slowly to loosen the SD board from the RF shield underneath it. If you pry too quickly, you may tear the shield or break its solder points.
-
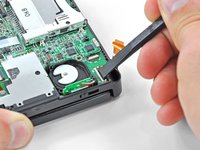
Run the spudger along the sides of the SD board to free it from the adhesive holding it in place.
-
Once completely freed, lift the SD board straight off the motherboard.
-
-
-
Slide the flat end of a spudger under the corner of the Wi-Fi board, and lift it away from the motherboard.
-
-
-
Use the flat end of a spudger to pry the Wi-Fi antenna cable connector off its socket on the Wi-Fi board.
-
Remove the Wi-Fi board from the device.
-
-
Инструмент, используемый на этом этапе:Tweezers$4.99
-
Grasp the microphone ribbon cable near the microphone with a pair of tweezers.
-
Pull the microphone straight up out of the upper case.
-
-
-
Use the flat end of a spudger or your fingernail to flip up the retaining flap on the speaker assembly ribbon cable ZIF socket.
-
Disconnect the speaker assembly ribbon cable with a pair of tweezers.
-
-
-
Use the flat end of a spudger or your fingernail to flip up the retaining flap on the camera ribbon cable ZIF socket.
-
-
-
Remove seven Phillips screws securing the motherboard to the upper case:
-
Four 2.5 mm gold screws
-
Two 3.5 mm black screws
-
One 2.5 mm silver screw
-
Lift the side of the motherboard that sits along the bottom edge of the 3DS.
-
-
-
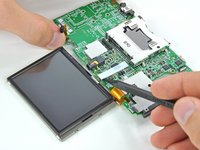
Use the flat end of a spudger or your fingernail to flip up the retaining flap on the LCD ribbon cable ZIF socket.
-
-
-
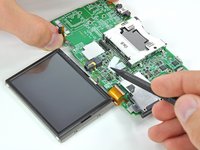
Use the tip of a spudger or your fingers to peel back the white tape covering the touchscreen ribbon cable connector.
-
-
-
Use the flat end of a spudger or your fingernail to flip up the retaining flap on the touchscreen ribbon cable ZIF socket.
-
-
Инструмент, используемый на этом этапе:Tweezers$4.99
-
Use the flat end of a spudger or your fingernail to flip up the retaining flap on the lower LCD power ribbon cable ZIF socket.
-
Pull the ribbon cable out of the connector with a pair of tweezers.
-
-
-
Use the flat end of a spudger or your fingernail to flip up the retaining flap on the lower LCD data ribbon cable ZIF socket.
-
-
-
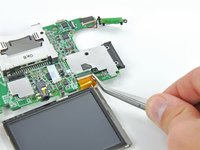
Grasp the lower display assembly and pull it directly away from the motherboard.
-
-
-
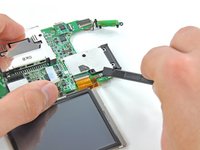
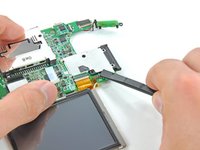
Use the flat end of a spudger or your fingernail to flip up the retaining flap on the microphone ribbon cable ZIF socket.
-
-
-
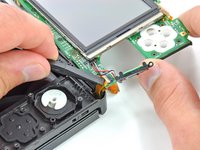
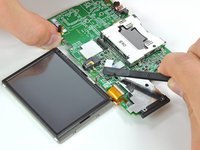
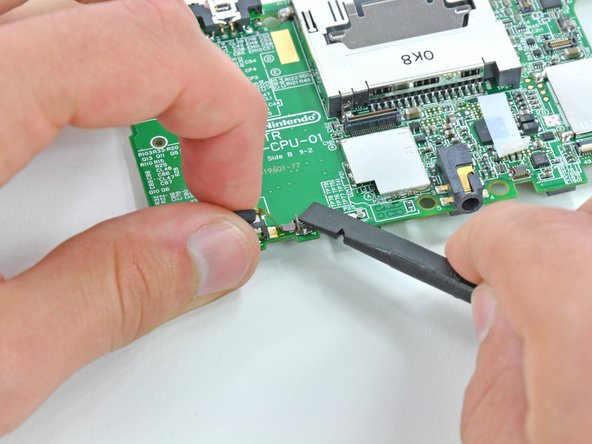
Use the flat end of a spudger to pry the volume switch connector out of its socket on the motherboard.
-


To reassemble your device, follow these instructions in reverse order.
To reassemble your device, follow these instructions in reverse order.
Отменить: Я не выполнил это руководство.
38 человек успешно провели ремонт по этому руководству.

12 Комментариев
This guide seriously helped me get a broken 3DS and replace the motherboard to make it a working one. Thank you for doing this guide, you are awesome. :)
I can't thank you enough for this guide! My 3 year old submerged my 8yr olds coveted 3DS in the toilet yesterday...I frantically took it apart as soon as I found it (knew not to turn it on) and wisely took pics on my phone as I frantically took apart each piece to get it dried....was however up all night dreading my ability to put it back together again...until I found this awesome step by step guide. Won't try to put it back together for another few days, but I will update my post and let you know if I got it working again:) Thanks so much!
I need help!
My 3DS is acting alone directional up!
I opened the device and realized that there is a short between TP85 and ground !
I need to know what CI is responsible for the control functions !
Thanks!
The control functions are on the back of the motherboard facing the lower screen. It is the 4 white buttons right below the huge gap where the circular pad goes
Excellent guide. This is an incredibly frustrating device to take apart and get back together.
Probably the toughest part is the ribbon cables. They're positively tiny and some of them force you to insert them without much space to work. The best strategy I've found is to use a small poking tool like a pen cap clip to nudge them very patiently into place. First one corner in the socket so it doesn't fly back out, then nudge it along and get the other corner. Then straighten it out to line up perfectly. Being extremely patient and gentle are key -- if you even slightly bend a corner without damaging the wires, it becomes infinitely harder to get it in successfully. Most of the ribbons have small notches you can use to help you push them in and judge how far in they are.
Also if the wifi antenna wire gets loose when you're putting it back together, you'll have to undo everything to get it back into the right spot.