Перейти к основному содержанию

Nintendo NES Advantage Joystick Panel Replacement

Выберете то, что вам нужно

  1. Nintendo NES Advantage Joystick Panel Replacement, Back Panel: шаг 1, изображение 1 из 1
    • Remove the four sticky pads from the bottom of the device.

    • If the pads are stuck, use a spudger to remove them.

  2. Nintendo NES Advantage Joystick Panel Replacement: шаг 2, изображение 1 из 2 Nintendo NES Advantage Joystick Panel Replacement: шаг 2, изображение 2 из 2
    • Remove the six 8 mm screws from the bottom of the device with a Phillips #0 screwdriver.

    • Use your hands to pull the back panel away from the controller.

  3. Nintendo NES Advantage Joystick Panel Replacement, Joystick Panel: шаг 3, изображение 1 из 1
    • Remove the four 12 mm screws from the small square panel on the right with a Phillips #0 screwdriver.

    • While removing the last (fourth) screw, apply downward pressure on the panel. This will make it easier to remove the last screw because of the joystick spring on the other side of this panel.

  4. Nintendo NES Advantage Joystick Panel Replacement: шаг 4, изображение 1 из 2 Nintendo NES Advantage Joystick Panel Replacement: шаг 4, изображение 2 из 2
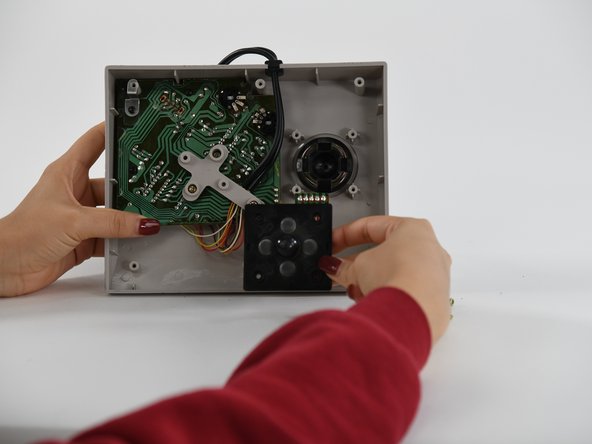
    • Remove the small square panel.

    • This panel is connected with wires to the main circuit board. To replace the joystick panel, you will need to desolder the wires. To learn more about soldering, refer to our How To Solder and Desolder Connections guide.

Заключение

To reassemble your device, follow these instructions in reverse order.

Alex E. Parker

Участник с: 09/01/22

100 Репутация

1 руководство автора

Команда

University of Colorado Denver, Team 1-2, Campeau Fall 2022 Участник University of Colorado Denver, Team 1-2, Campeau Fall 2022

UCDENVER-CAMPEAU-F22S1G2

5 членов

Автор 7 руководств

0 Комментариев

Добавить комментарий

Просмотр статистики:

За последние 24часов: 0

За последние 7 дней: 1

За последние 30 дней: 4

За всё время: 297