Эта версия возможно содержит некорректные исправления. Переключить на последнюю проверенную версию.
Выберете то, что вам нужно
-
Этот шаг не переведен. Помогите перевести
-
Insert a SIM card eject tool, bit, or a straightened paperclip into the small hole below the SIM card tray, located near the rear cameras on the edge of the phone.
-
Press firmly to eject the tray.
-
-
Этот шаг не переведен. Помогите перевести
-
Remove the two 2.6 mm T2 screws straddling the USB-C port on the bottom edge of the phone.
-
-
Этот шаг не переведен. Помогите перевести
-
Display panel seam: This seam is part of the display assembly. Do not pry at this seam, or you will separate and damage the display panel.
-
Frame seam: This is where the plastic frame meets the back cover. Only pry at this seam.
-
There are twelve clips that hold the frame against the rear case. Be aware of their location as you pry the back cover off in the following steps.
-
-
Этот шаг не переведен. Помогите перевести
-
Place a suction cup near the bottom edge of the display.
-
Pull on the suction cup with strong steady force.
-
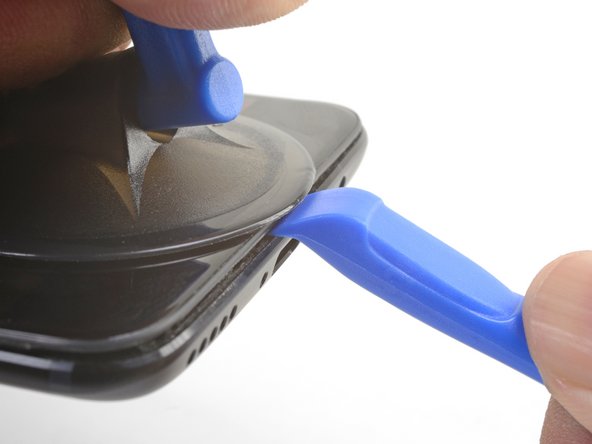
Press the edge of an opening tool straight into the frame seam near the suction cup until the edge wedges between the plastic frame and the back cover's lip.
-
-
Этот шаг не переведен. Помогите перевести
-
Once the opening tool's edge is wedged in position, carefully slide the tool along the bottom edge of the phone.
-
Carefully guide the opening tool around the left corner of the phone while keeping the tool's edge within the seam.
-
-
Этот шаг не переведен. Помогите перевести
-
Lever the opening tool to release the first clip from the frame.
-
-
Этот шаг не переведен. Помогите перевести
-
Continue sliding the opening tool along the long edge, releasing the clips along the way.
-
-
-
Этот шаг не переведен. Помогите перевести
-
With the bottom and left edge of the phone freed, gently wiggle the frame to release the top and right edge clips.
-
Align the top edge of the frame to the back cover and ensure that the top clips slip into place.
-
Squeeze along the long edges of the phone to snap the remaining clips into place.
-
-
Этот шаг не переведен. Помогите перевести
-
With all the clips released, flip the phone over so that the display is face-down.
-
Swing the back cover around and rest it on top of the exposed frame.
-
-
Этот шаг не переведен. Помогите перевести
-
Remove the 2.6 mm Phillips screw holding the cable bracket above the battery in place.
-
Lift up and remove the cable bracket.
-
-
Этот шаг не переведен. Помогите перевести
-
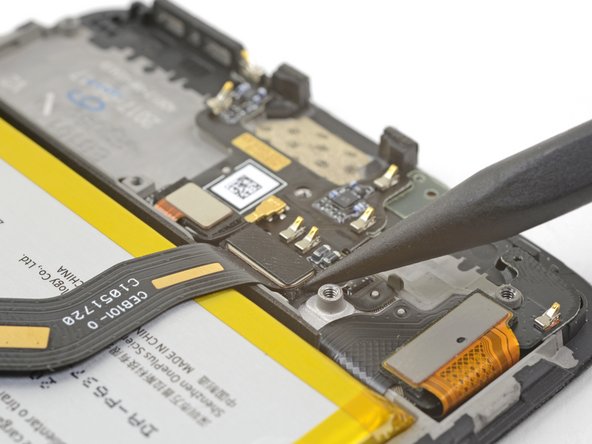
Use the point of a spudger to pry up and disconnect the back cover flex cable from its socket.
-
-
Этот шаг не переведен. Помогите перевести
-
Use the point of a spudger to pry up and disconnect the battery connector from its socket.
-
-
Этот шаг не переведен. Помогите перевести
-
Remove the six 2.6 mm Phillips screws securing the loudspeaker to the frame.
-
-
Этот шаг не переведен. Помогите перевести
-
Insert the flat end of a spudger into the corner of the loudspeaker assembly and pry slightly, loosening the loudspeaker from its recess.
-
-
Этот шаг не переведен. Помогите перевести
-
Use the point of a spudger to pry up and disconnect the interconnect flex cable from the socket.
-
-
Этот шаг не переведен. Помогите перевести
-
Brace the phone frame against the table.
-
Using a strong, steady force, pull the green pull tab upwards until the battery loosens from its recess.
-
Swing the battery completely out of its recess and pull it off of the plastic liner.
-


Отменить: Я не выполнил это руководство.
90 участников успешно повторили данное руководство.


27 Комментариев
Thanks a lot for your contribution! It worked perfectly.
I follow the instructions but it said the battery is too slow
Charge the battery for at least a few hours. If the battery does not charge, double-check all connectors, especially the interconnect cable. Does the phone react to a charging cable? If not, something may be broken between the USB port and the motherboard.
It honestly took an hour to get the back cover off, and then another hour to take the rest apart and put it back together. But this guide was useful.
Thanks so much for this guide. Worked out great!