Перейти к основному содержанию

OnePlus 5 Volume and Power Button Replacement

Выберете то, что вам нужно

  1. OnePlus 5 Volume and Power Button Replacement, SIM Card Tray: шаг 1, изображение 1 из 3 OnePlus 5 Volume and Power Button Replacement, SIM Card Tray: шаг 1, изображение 2 из 3 OnePlus 5 Volume and Power Button Replacement, SIM Card Tray: шаг 1, изображение 3 из 3
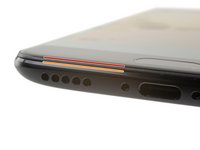
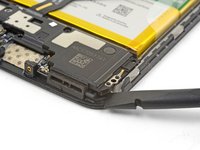
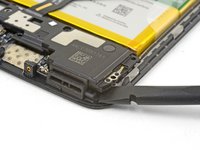
    • Insert a SIM card eject tool, bit, or a straightened paperclip into the small hole below the SIM card tray, located near the rear cameras on the edge of the phone.

    • Press firmly to eject the tray.

    • During reassembly, be sure to properly orient the SIM tray you you insert it.

  2. OnePlus 5 Volume and Power Button Replacement, Back Cover: шаг 2, изображение 1 из 1
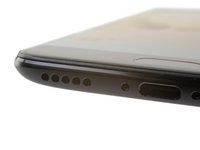
    • Remove the two 2.6 mm T2 screws straddling the USB-C port on the bottom edge of the phone.

  3. OnePlus 5 Volume and Power Button Replacement: шаг 3, изображение 1 из 3 OnePlus 5 Volume and Power Button Replacement: шаг 3, изображение 2 из 3 OnePlus 5 Volume and Power Button Replacement: шаг 3, изображение 3 из 3
    • There is a high risk of damaging the display panel if this opening procedure is improperly followed.

    • The following four steps show how to pry the rear case from the plastic frame. Read through the steps first before attempting the procedure.

    • There are two different seams between the body and the screen of the phone:

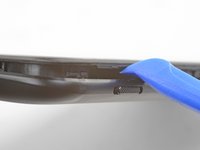
    • Display panel seam: This seam is part of the display assembly. Do not pry at this seam, or you will separate and damage the display panel.

    • Frame seam: This is where the plastic frame meets the back cover. Only pry at this seam.

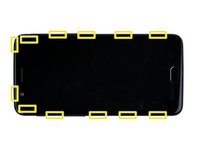
    • There are twelve clips that hold the frame against the rear case. Be aware of their location as you pry the back cover off in the following steps.

  4. OnePlus 5 Volume and Power Button Replacement: шаг 4, изображение 1 из 2 OnePlus 5 Volume and Power Button Replacement: шаг 4, изображение 2 из 2
    • As you work, try not to accidentally power on the phone. If you do, turn the phone off before resuming disassembly.

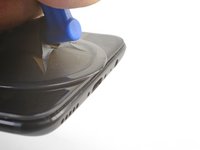
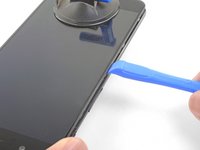
    • Place a suction cup near the bottom edge of the display.

    • Pull on the suction cup with strong steady force.

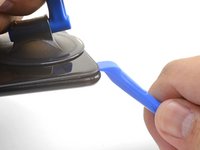
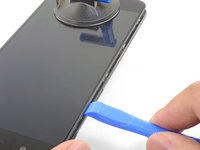
    • Press the edge of an opening tool straight into the frame seam near the suction cup until the edge wedges between the plastic frame and the back cover's lip.

    • Due to tight tolerances, this will take substantial force. Using a new opening tool with an unmarred edge will help with this step.

  5. OnePlus 5 Volume and Power Button Replacement: шаг 5, изображение 1 из 3 OnePlus 5 Volume and Power Button Replacement: шаг 5, изображение 2 из 3 OnePlus 5 Volume and Power Button Replacement: шаг 5, изображение 3 из 3
    • Once the opening tool's edge is wedged in position, carefully slide the tool along the bottom edge of the phone.

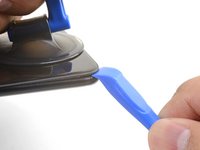
    • Carefully guide the opening tool around the left corner of the phone while keeping the tool's edge within the seam.

  6. OnePlus 5 Volume and Power Button Replacement: шаг 6, изображение 1 из 2 OnePlus 5 Volume and Power Button Replacement: шаг 6, изображение 2 из 2
    • Lever the opening tool to release the first clip from the frame.

  7. OnePlus 5 Volume and Power Button Replacement: шаг 7, изображение 1 из 3 OnePlus 5 Volume and Power Button Replacement: шаг 7, изображение 2 из 3 OnePlus 5 Volume and Power Button Replacement: шаг 7, изображение 3 из 3
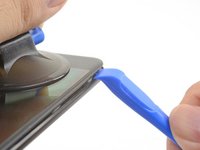
    • Continue sliding the opening tool along the long edge, releasing the clips along the way.

    • The last clip in the top-left corner near the front-facing camera is recessed and can be difficult to release. Take your time and use the flat end of a spudger or an opening pick to help.

  8. OnePlus 5 Volume and Power Button Replacement: шаг 8, изображение 1 из 1
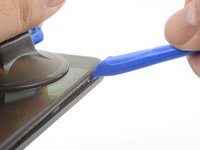
    • With the bottom and left edge of the phone freed, gently wiggle the frame to release the top and right edge clips.

    • The frame is still connected to the back cover by a long flex cable. Do not remove the back cover.

    • During reassembly, pause here to test your phone's functionality before securing the back cover.

    • To reinstall the back cover:

    • Align the top edge of the frame to the back cover and ensure that the top clips slip into place.

    • Squeeze along the long edges of the phone to snap the remaining clips into place.

  9. OnePlus 5 Volume and Power Button Replacement: шаг 9, изображение 1 из 3 OnePlus 5 Volume and Power Button Replacement: шаг 9, изображение 2 из 3 OnePlus 5 Volume and Power Button Replacement: шаг 9, изображение 3 из 3
    • With all the clips released, flip the phone over so that the display is face-down.

    • Swing the back cover around and rest it on top of the exposed frame.

    • Be careful not to stress the flex cable connecting the back cover and the frame.

  10. OnePlus 5 Volume and Power Button Replacement: шаг 10, изображение 1 из 2 OnePlus 5 Volume and Power Button Replacement: шаг 10, изображение 2 из 2
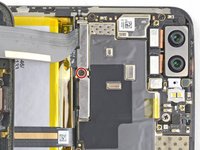
    • Remove the 2.6 mm Phillips screw holding the cable bracket above the battery in place.

    • Lift up and remove the cable bracket.

    • To reinstall the bracket, position one end into place, and bend the bracket slightly to spring the other end into place.

  11. OnePlus 5 Volume and Power Button Replacement: шаг 11, изображение 1 из 2 OnePlus 5 Volume and Power Button Replacement: шаг 11, изображение 2 из 2
    • Use the point of a spudger to pry up and disconnect the back cover flex cable from its socket.

    • To re-attach press connectors like this one, carefully align and press down on one side until it clicks into place, then repeat on the other side. Do not press down on the middle. If the connector is misaligned, the pins can bend, causing permanent damage.

  12. OnePlus 5 Volume and Power Button Replacement: шаг 12, изображение 1 из 1
    • Remove the back cover.

  13. OnePlus 5 Volume and Power Button Replacement, OnePlus 5 Battery Disconnect: шаг 13, изображение 1 из 2 OnePlus 5 Volume and Power Button Replacement, OnePlus 5 Battery Disconnect: шаг 13, изображение 2 из 2
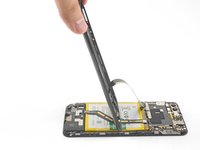
    • Use the point of a spudger to pry up and disconnect the battery connector from its socket.

  14. OnePlus 5 Volume and Power Button Replacement, Loudspeaker: шаг 14, изображение 1 из 1
    • Remove the six 2.6 mm Phillips screws securing the loudspeaker to the frame.

  15. OnePlus 5 Volume and Power Button Replacement: шаг 15, изображение 1 из 2 OnePlus 5 Volume and Power Button Replacement: шаг 15, изображение 2 из 2
    • Insert the flat end of a spudger into the corner of the loudspeaker assembly and pry slightly, loosening the loudspeaker from its recess.

  16. OnePlus 5 Volume and Power Button Replacement: шаг 16, изображение 1 из 1
    • Remove the loudspeaker.

    • To reinstall the loudspeaker, align the loudspeaker's bottom edge to the frame, then press the assembly into place.

    • During reinstallation, make sure that the display cable connector under the loudspeaker assembly is still securely fastened.

  17. OnePlus 5 Volume and Power Button Replacement, OnePlus 5 Interconnect Cable Disconnect: шаг 17, изображение 1 из 3 OnePlus 5 Volume and Power Button Replacement, OnePlus 5 Interconnect Cable Disconnect: шаг 17, изображение 2 из 3 OnePlus 5 Volume and Power Button Replacement, OnePlus 5 Interconnect Cable Disconnect: шаг 17, изображение 3 из 3
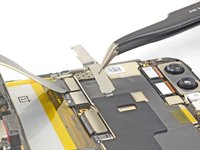
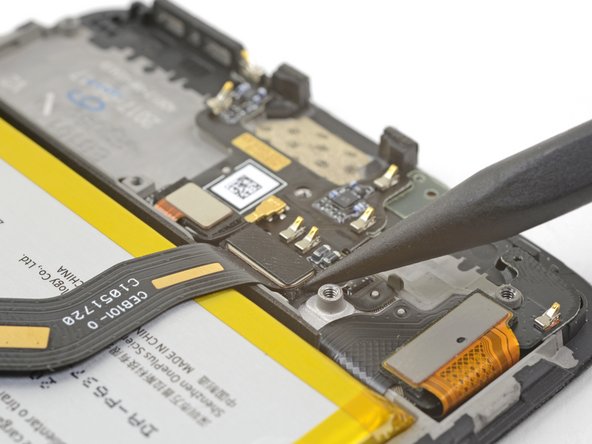
    • Use the point of a spudger to pry up and disconnect the interconnect flex cable from the socket.

    • If you are replacing the battery, bend the interconnect flex cable away from the phone and secure it out of the way with a rubber band or tape.

  18. OnePlus 5 Volume and Power Button Replacement, Motherboard: шаг 18, изображение 1 из 2 OnePlus 5 Volume and Power Button Replacement, Motherboard: шаг 18, изображение 2 из 2
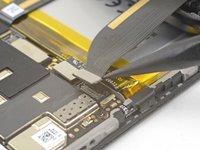
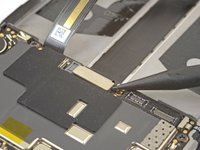
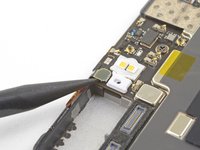
    • Use the point of a spudger to pry up and disconnect the display interconnect cable from its socket near the bottom edge of the motherboard.

  19. OnePlus 5 Volume and Power Button Replacement: шаг 19, изображение 1 из 2 OnePlus 5 Volume and Power Button Replacement: шаг 19, изображение 2 из 2
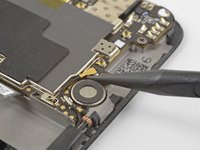
    • Slide the point of a spudger underneath the antenna interconnect cable that is connected to the motherboard above the vibration motor.

    • Pry up to disconnect the cable from its socket.

    • De-route the cable out of its motherboard grounding clip and move it out of the way.

  20. OnePlus 5 Volume and Power Button Replacement: шаг 20, изображение 1 из 2 OnePlus 5 Volume and Power Button Replacement: шаг 20, изображение 2 из 2
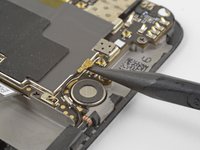
    • Slide the point of a spudger under the small square antenna connector connected to the motherboard near the top edge.

    • Pry up to disconnect the antenna connector from its socket.

  21. OnePlus 5 Volume and Power Button Replacement: шаг 21, изображение 1 из 1
    • Remove the following seven 2.6 mm Phillips screws securing the motherboard:

    • Some screws may be hidden under stickers. Remove the stickers to access the screws.

  22. OnePlus 5 Volume and Power Button Replacement: шаг 22, изображение 1 из 3 OnePlus 5 Volume and Power Button Replacement: шаг 22, изображение 2 из 3 OnePlus 5 Volume and Power Button Replacement: шаг 22, изображение 3 из 3
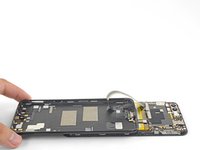
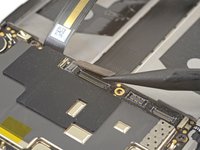
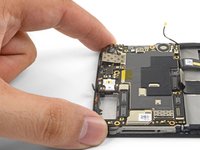
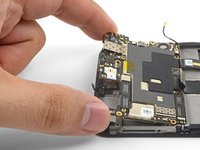
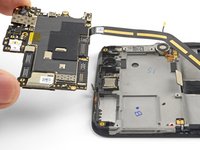
    • Use your fingers to lift up the top edge of the motherboard.

    • Lift the motherboard out of its recess and remove it.

  23. OnePlus 5 Volume and Power Button Replacement, Volume and Power Button: шаг 23, изображение 1 из 2 OnePlus 5 Volume and Power Button Replacement, Volume and Power Button: шаг 23, изображение 2 из 2
    Инструмент, используемый на этом этапе:
    Electrical Tape in 6 Assorted Colors
    $7.99
    Купить
    • Try not to tear the black tape pieces in this step so that you can reuse them during re-assembly. If you do tear the tape, replace them with pieces of electrical tape.

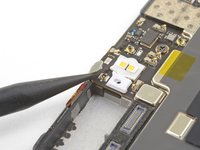
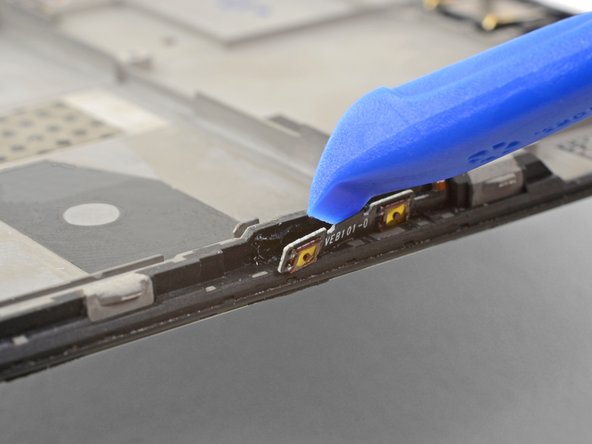
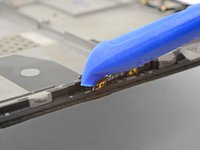
    • Use tweezers or the point of a spudger to pry up and remove the black tape covering the volume buttons on the right edge of the phone.

    • Repeat the process with the black tape covering the power button on the left edge of the phone.

  24. OnePlus 5 Volume and Power Button Replacement: шаг 24, изображение 1 из 3 OnePlus 5 Volume and Power Button Replacement: шаг 24, изображение 2 из 3 OnePlus 5 Volume and Power Button Replacement: шаг 24, изображение 3 из 3
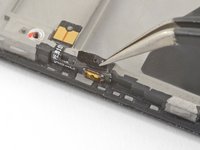
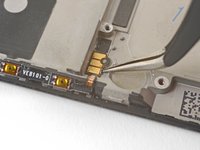
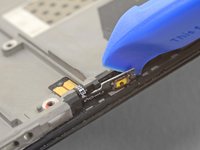
    • Use the edge of an opening tool to gently pry the volume button board away from the frame.

    • If the volume button board begins to bend significantly, stop and pry from a different angle.

    • Continue prying until you loosen the volume button board from the frame.

  25. OnePlus 5 Volume and Power Button Replacement: шаг 25, изображение 1 из 3 OnePlus 5 Volume and Power Button Replacement: шаг 25, изображение 2 из 3 OnePlus 5 Volume and Power Button Replacement: шаг 25, изображение 3 из 3
    Инструмент, используемый на этом этапе:
    Tesa 61395 Tape
    $5.99
    Купить
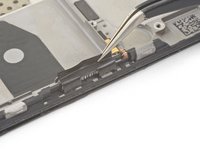
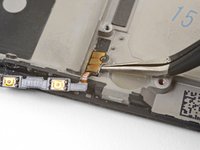
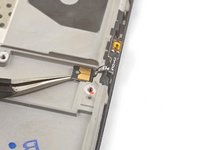
    • Squeeze the tweezer tips together and insert the point underneath the volume button board's contact pad near the top right edge of the frame.

    • Pry upwards to loosen the contact pad from the frame.

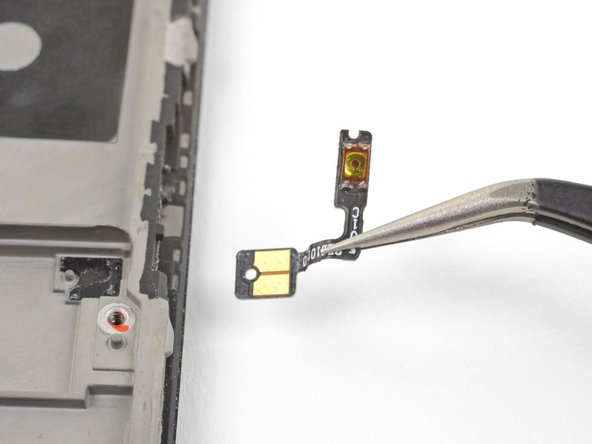
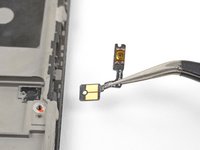
    • Remove the volume buttons.

    • To install the volume button board onto a used frame, cut a small piece of adhesive from the pre-cut adhesive card or a roll of Tesa tape, and use it to stick the volume button board back onto the frame.

    • To install the volume button board onto a new replacement frame, peel the blue liner on the right edge of the frame to expose the adhesive. Then, stick the board onto the edge of the frame.

  26. OnePlus 5 Volume and Power Button Replacement: шаг 26, изображение 1 из 3 OnePlus 5 Volume and Power Button Replacement: шаг 26, изображение 2 из 3 OnePlus 5 Volume and Power Button Replacement: шаг 26, изображение 3 из 3
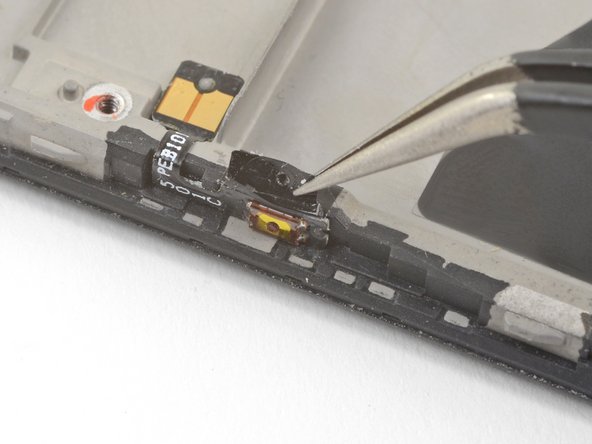
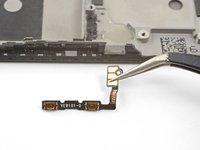
    • Repeat the previous two steps to remove the power button from the left edge of the frame.

    • If you are transferring the power button onto a replacement frame, peel the blue liner on the left edge of the frame to expose the adhesive. Then, stick the button onto the edge of the frame.

Заключение

To reassemble your device, follow these instructions in reverse order.

Repair didn’t go as planned? Check out our OnePlus 5 Answers Community for troubleshooting help.

5 участников успешно повторили данное руководство.

Arthur Shi

Участник с: 01/03/18

248 445 Репутация

Автор 503 руководств

Команда

iFixit Участник iFixit

Staff

136 членов

Автор 16 573 руководств

Один комментарий

I’ve just spent the afternoon migrating to a new frame, and the power button seating lugs were just a tiny bit mislocated. The result was permanent press on the power button when the back was fitted. I resolved this by trimming the power button circuit board with some sharp sidecutters. Charging now and seems ok. Would have been much harder without my ifixit toolkit.

Michael Collins - Ответить

Добавить комментарий

Просмотр статистики:

За последние 24часов: 2

За последние 7 дней: 17

За последние 30 дней: 100

За всё время: 11,806