Перейти к основному содержанию

PlayStation 3 Fan Replacement

Выберете то, что вам нужно

  1. PlayStation 3 Fan Replacement, Smart Plate: шаг 1, изображение 1 из 2 PlayStation 3 Fan Replacement, Smart Plate: шаг 1, изображение 2 из 2
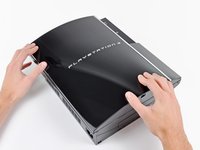
    • Use the tip of a spudger to remove the black rubber screw cover from the side of the PS3.

    • The screw cover may be underneath a warranty sticker. This sticker will change appearance, and show "VOID" after it has been removed.

  2. PlayStation 3 Fan Replacement: шаг 2, изображение 1 из 1
    • Remove the single 8.5 mm T10 Security Torx screw from the smart plate.

  3. PlayStation 3 Fan Replacement: шаг 3, изображение 1 из 3 PlayStation 3 Fan Replacement: шаг 3, изображение 2 из 3 PlayStation 3 Fan Replacement: шаг 3, изображение 3 из 3
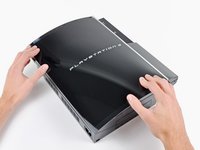
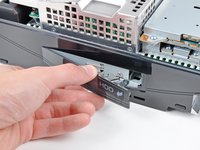
    • Pull the smart plate toward the hard drive bay, then lift it off the body of the PS3.

  4. PlayStation 3 Fan Replacement: шаг 4, изображение 1 из 1
    • Be sure to keep track of the small metal bracket loosely held in the top cover, if equipped.

  5. PlayStation 3 Fan Replacement, Top Cover: шаг 5, изображение 1 из 1
    • Remove the following seven screws:

    • Six 52 mm Phillips screws

    • One 30 mm Phillips screw

  6. PlayStation 3 Fan Replacement: шаг 6, изображение 1 из 1
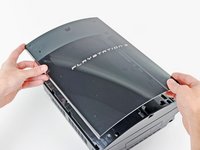
    • Lift the top cover from its rear edge and rotate it toward the front of the PS3.

    • Remove the top cover.

    • There is a plastic hook located in a hole on the top back right hand side corner. Carefully push the plastic hook a bit from the rear of the machine with a spudger to release the rear right of the casing.

  7. PlayStation 3 Fan Replacement, Blu-ray Disc Drive: шаг 7, изображение 1 из 1
    • Disconnect the Blu-ray power cable from the motherboard.

    • Pull the connector straight up and out of its socket.

  8. PlayStation 3 Fan Replacement: шаг 8, изображение 1 из 1
    • Lift the Blu-ray drive from the edge nearest the power supply and rotate it away from the chassis enough to access its ribbon cable.

  9. PlayStation 3 Fan Replacement: шаг 9, изображение 1 из 3 PlayStation 3 Fan Replacement: шаг 9, изображение 2 из 3 PlayStation 3 Fan Replacement: шаг 9, изображение 3 из 3
    • Use your fingernail to flip up the retaining flap on the Blu-ray ribbon cable socket.

    • Be sure you are prying up on the retaining flap, not the socket itself.

    • Pull the ribbon cable out of its socket.

    • Remove the Blu-ray drive from the PS3.

    • If replacing the Blu-ray drive, transfer the power cable to your new drive.

  10. PlayStation 3 Fan Replacement, Motherboard Assembly: шаг 10, изображение 1 из 1
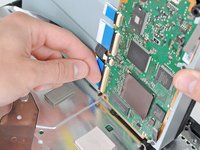
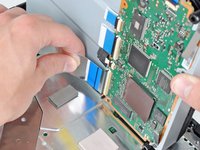
    • Pull the control board ribbon cable straight up and out of its socket on the motherboard.

  11. PlayStation 3 Fan Replacement: шаг 11, изображение 1 из 2 PlayStation 3 Fan Replacement: шаг 11, изображение 2 из 2
    • Remove the two 12 mm Phillips screws securing the control board to the lower case.

    • Remove the control board and its attached cable from the PS3.

  12. PlayStation 3 Fan Replacement: шаг 12, изображение 1 из 1
    • Remove the following eight screws securing the motherboard assembly to the lower case:

    • Seven 12 mm Phillips screws (ph2)

    • One 30 mm Phillips screw

  13. PlayStation 3 Fan Replacement: шаг 13, изображение 1 из 1
    • Remove the control board bracket.

  14. PlayStation 3 Fan Replacement: шаг 14, изображение 1 из 2 PlayStation 3 Fan Replacement: шаг 14, изображение 2 из 2
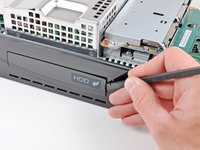
    • Use the flat end of a spudger to pry the hard drive bay cover away from the lower case.

    • Remove the hard drive bay cover.

  15. PlayStation 3 Fan Replacement: шаг 15, изображение 1 из 1
    • Lift the motherboard assembly out of the lower case.

  16. PlayStation 3 Fan Replacement, Fan: шаг 16, изображение 1 из 1
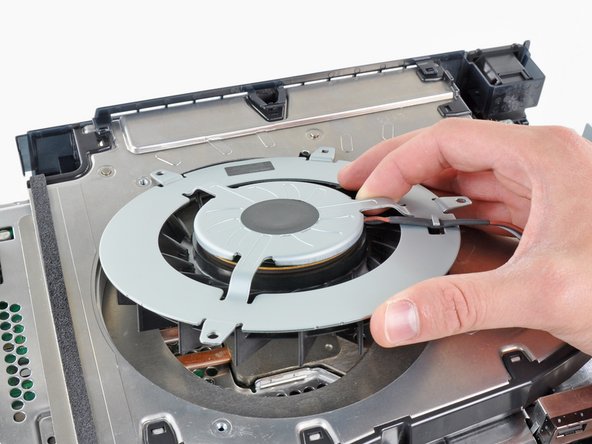
    • De-route the fan cables from under the plastic finger molded into the heat sink.

  17. PlayStation 3 Fan Replacement: шаг 17, изображение 1 из 1
    • Disconnect the fan from the motherboard.

    • Pull the connector straight up and out of its socket on the motherboard.

  18. PlayStation 3 Fan Replacement: шаг 18, изображение 1 из 1
    • Remove the three 5.7 mm #0 Phillips screws securing the fan to the heat sink.

  19. PlayStation 3 Fan Replacement: шаг 19, изображение 1 из 1
    • Remove the fan from the heat sink, minding its cables that may get caught.

Заключение

To reassemble your device, follow these instructions in reverse order.

56 участников успешно повторили данное руководство.

5 Комментариев

Im guessing its not possible to flip the device over in order to get to the fan... Im genuinely asking this.

anthony - Ответить

Super tutorial but my ps3 fat look a little bit different inside but after all I was able to replace the 12v fan inside to an third part one which was definetly very quite even if I set it up to 100% (using a web exploit)

Michal S. - Ответить

Remember fellas - the PS3 shown in this tutorial is most likely (almost 100%) the launch backwards compatible model. Meaning, the later FAT models without backwards compatibility WILL LOOK DIFFERENT INSIDE.

Be aware of that as to not wrongly disassemble your precious old PS3.

Paulo - Ответить

I'm quite happy to have found this guide and would give the author the +30 points if the suggested changes to the orange/red circles on the photos had been made - its been three years since the original comment and I, too, have trouble discerning those two colors.

Palfrus Wyrmrest - Ответить

Che tipo di ventola va inserita?

David - Ответить

Добавить комментарий

Просмотр статистики:

За последние 24часов: 14

За последние 7 дней: 133

За последние 30 дней: 493

За всё время: 130,308