Эта версия возможно содержит некорректные исправления. Переключить на последнюю проверенную версию.
Выберете то, что вам нужно
-
Этот шаг не переведен. Помогите перевести
-
Remove the side HDD bay cover by sliding the panel towards the back of the device.
-
-
Этот шаг не переведен. Помогите перевести
-
Remove all three black 9.8mm long screws with a T-8 security screwdriver.
-
Remove the blue 7.9mm long screw with a Phillips #1 screwdriver.
-
-
Этот шаг не переведен. Помогите перевести
-
On the bottom of the device, pry out the three rubber feet covers with the metal spudger.
-
Remove the four black 36.3mm long screws underneath with a Phillips #1 screwdriver.
-
-
Этот шаг не переведен. Помогите перевести
-
On the top of the device, unlatch the hook on the furthest right beneath the front panel, lift the panel slightly and apply pressure.
-
Unlatch the second right-side hook by sliding a plastic opening tool in the marked area.
-
Slide the panel to the left to unlatch the rest of the hooks.
-
-
Этот шаг не переведен. Помогите перевести
-
Remove the back panel by pressing down the tab on the right side of the device, and sliding the panel to the left.
-
-
-
Этот шаг не переведен. Помогите перевести
-
Remove the five silver 20.8mm long screws with a Phillips #1 screwdriver.
-
Remove the two black 9.9mm long screws in the disc reader with a T-8 security screwdriver.
-
Remove the top black plastic shell.
-
-
Этот шаг не переведен. Помогите перевести
-
Move the optical drive to the side to reveal one of the silver 8.8mm long screws.
-
Remove the two silver 8.8mm long screws on either side with a Phillips #1 screwdriver.
-
-
Этот шаг не переведен. Помогите перевести
-
Remove the cable from the plug and remove the wires from the two plastic hooks.
-
Remove the power supply unit.
-
-
Этот шаг не переведен. Помогите перевести
-
Remove the front white flex-ribbon cable by pulling upward from its base.
-
Remove the black and blue flex-ribbon cable behind it by pulling upward on the black tab, then pulling out the cable.
-
-
Этот шаг не переведен. Помогите перевести
-
Rotate the device 180 degrees.
-
Remove the back white flex-ribbon cable by pulling upward from its base.
-
Remove the optical drive.
-
-
Этот шаг не переведен. Помогите перевести
-
Locate the white flex ribbon cable that connects the power button to the motherboard. Pull this cable out from the motherboard end.
-
Remove the five black 8.3mm long screws with a Phillips #1 screwdriver.
-
Remove the two silver 12.8mm long screws with a Phillips #1 screwdriver.
-
Remove the device from the bottom shell casing.
-
-
Этот шаг не переведен. Помогите перевести
-
Remove the two black 8.3mm long screws with a Phillips #1 screwdriver from the Wi-Fi antennas.
-
Lift the Wi-Fi antennas off their mount.
-
-
Этот шаг не переведен. Помогите перевести
-
Use a plastic opening tool to remove the Wi-Fi wires from their sockets on the motherboard.
-
Remove the wires from the hooks around the motherboard and fan cover to completely remove the antennas.
-
-
Этот шаг не переведен. Помогите перевести
-
Remove the two black 14.5mm long screws with a Phillips #1 screwdriver from the center of the bottom metal casing.
-
Remove the four silver 8.7mm long screws with a Phillips #1 screwdriver around the edges of the bottom metal casing.
-
Remove the bottom metal casing.
-
-
Этот шаг не переведен. Помогите перевести
-
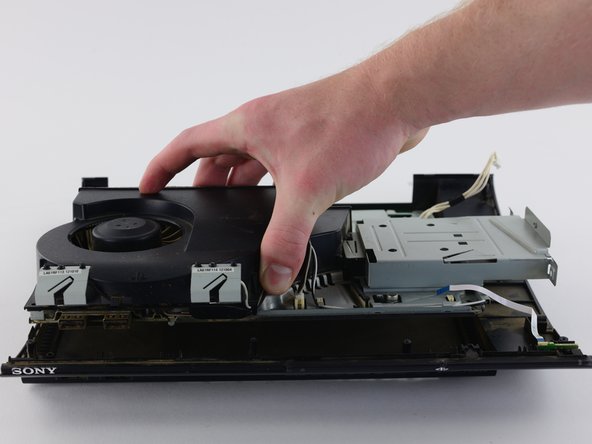
Remove the fan wire from its plug on the top metal casing.
-
Remove the motherboard from the top metal casing. Lift from the side with the two USB plugs to avoid damaging the four back ports.
-
-
Этот шаг не переведен. Помогите перевести
-
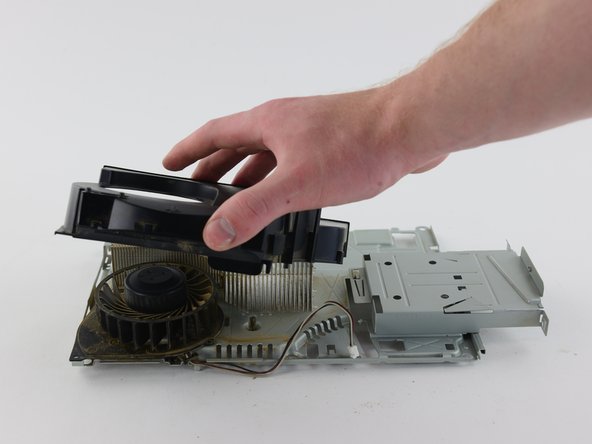
On the bottom of the top metal casing, remove the three black 8.0mm long screws with a Phillips #1 screwdriver.
-
Remove the fan from the plastic cover.
-


Отменить: Я не выполнил это руководство.
42 участников успешно повторили данное руководство.
Команда

Cal Poly, Team 34-13, Maness Spring 2016 Участник Cal Poly, Team 34-13, Maness Spring 2016
CPSU-MANESS-S16S34G13
4 членов
Автор 21 руководств
Один комментарий
Thanks for this fan tutorial I have not been able to find any on YouTube about taking apart the fan for cleaning the heat sync's and fan blades it self. So thank you so very much.