Введение
The chuck on a drill is often the first part to wear out or break. Luckily, replacing it is a fairly easy process that does not normally require disassembly of the drill.
Even if the spindle or gearbox of your drill needs replacing - which does require disassembly - it's best to remove the chuck before disassembling the housing.
This guide should help you to replace the chuck on almost any corded or cordless drill, as drill chucks are almost always attached to the spindle by a screw thread. By far the most common thread size is 1/2" x 20tpi UNF, but smaller drills can have a 3/8" or even smaller thread.
In some rare cases such as angle drills, very old models or large machines, the chuck may be mounted on a tapered shank or it may even have a proprietary fitting requiring disassembly of the housing. In those cases, this guide is not applicable. When in doubt, refer to the technical documentation for your make and model.
Выберете то, что вам нужно
-
-
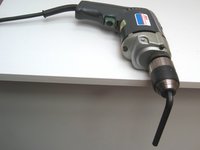
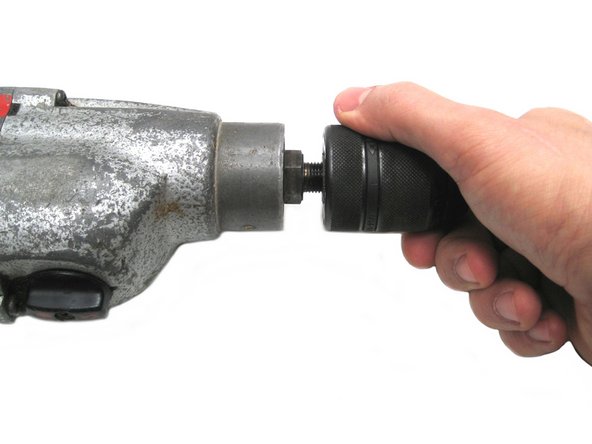
Whenever performing repair or maintenance, make sure to unplug the tool first.
-
The last thing you want is for the drill to start spinning a wrench around at 3000 RPM in case you inadvertently pull the trigger!
-
-
-
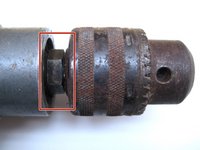
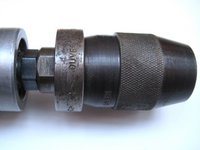
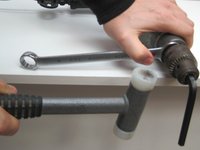
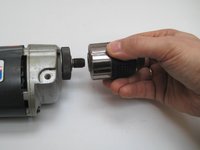
Open up the jaws all the way and look for a retaining screw at the bottom of the chuck. If a screw is present, you will need to remove it before you can unscrew the chuck.
-
These retaining screws always have a left hand thread, so you'll have to turn clockwise to remove it.
-
Closing the jaws until they just touch the screwdriver can help to keep it centered (especially on slotted screws) and perpendicular.
-
The screw can be stubborn to come loose, especially if it has threadlocking compound on it or if it is rusty. An impact driver can work wonders here. And remember - clockwise!
-
-
-
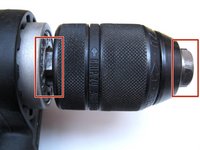
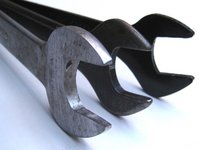
Depending on the specific make and model of your drill and chuck, it may be possible to grip either or both with a regular open end wrench.
-
Some spindles have a hexagon-shaped portion, some have flats machined on two sides. Some chucks also have two flats or a hex shape machined either at the front or back end.
-
Depending on which portions you can fit a wrench to, you'll be using the Twin Wrench, Single Wrench or No Wrench Method.
-
Use the Twin Wrench Method whenever possible as this is more civilized and allows you to apply more controlled force.
-
-
-
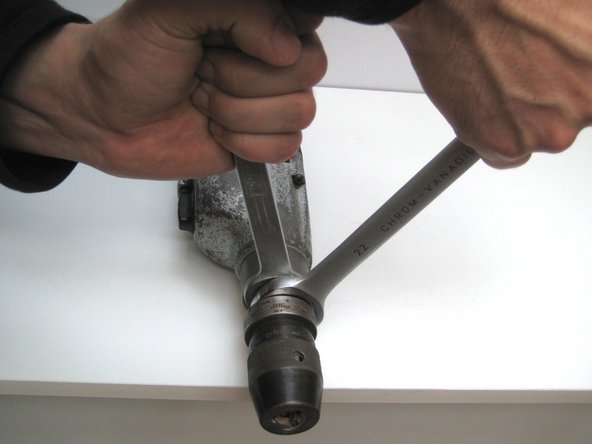
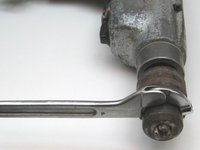
If both the spindle and the chuck have some provision that allows the use of a wrench, it's your lucky day!
-
In some cases, you may need to use a thin wrench (or grind down a regular one) as there may not be sufficient space to fit a regular size wrench.
-
Unlike the retaining screw, the chuck is held on with a regular right-hand thread. Turn counter-clockwise to remove.
-
With the opposing action of two wrenches, even the most stubborn of chucks should come loose.
-
-
-
-
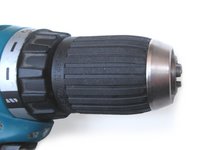
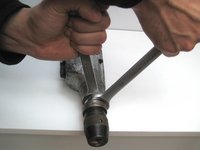
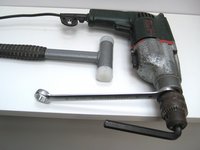
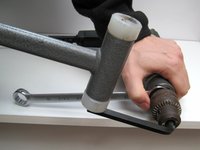
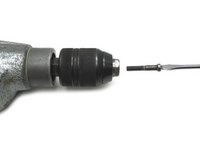
If the chuck has no provision for a wrench, the easiest way to turn it forcefully is by means of a hex key gripped in the chuck jaws by its short end.
-
If a wrench can be fitted to the spindle, lay the drill flat on the edge of a workbench or sturdy table, with the wrench resting on the table, the chuck overhanging the edge and the hex key pointing slightly upwards from horizontal.
-
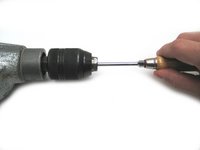
It won't hurt to try if you can release the chuck by pushing down on the hex key by hand - though this will rarely work.
-
If hand force isn't sufficient, firmly hold down the drill and give the end of the hex wrench a solid whack, preferably with a wooden or plastic hammer. A sharp blow should loosen the chuck instantly.
-
-
-
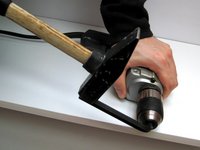
Even if the spindle cannot be gripped by any means, the hex key method described in the previous step will usually work on both corded and cordless models.
-
Many cordless drills have an automatic spindle lock.
-
On mains powered drills, inertia of motor and gears usually offers sufficient resistance to free the chuck from the spindle.
-
If you're relying solely on inertia, you need a sudden jolt to loosen the chuck. Press down hard on the drill to keep it from moving and hit the hex key with a particularly sharp blow.
-
This will take a steel hammer - much as you may hate to mistreat your beloved hex wrench like that - as a plastic or wooden hammer would cushion the impact.
-
-
-
For cordless drills and low speed/high torque corded models, an alternative to the No Wrench Method is to grip the hex key in a vise, put the drill in reverse, hold it tightly with both hands and squeeze the trigger.
-
However this method is not for beginners as it is not without risk: the reaction torque could hurt your wrist and the locked rotor current could burn out the drill motor.
-
If the drill has a mechanical speed selector and/or clutch, make sure to set the gear to the lowest speed and/or the clutch to the highest setting.
-
-
-
If the chuck is completely broken, you may not be able to tighten its jaws on a hex key. In those cases, the Single Wrench or No Wrench Method won't work.
-
On keyed chucks, if no other provision for gripping is present, you can use a hook spanner by locating the pin in one of the holes for the chuck key.
-
If you were born under a very lucky star, you might get away with fitting a chuck key and hitting that with a hammer at just the right angle. I did not tell you to do that.
-
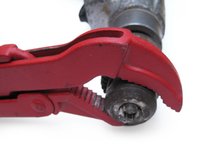
A pipe wrench will grip just about any chuck, but at the risk of damaging it.
-
If all else fails, it is often possible to disassemble the drill, clamp either the chuck or the spindle in a vise and grip the other part with a pipe wrench or other gripping tool. This is very likely to damage the spindle and/or chuck though.
-
-
-
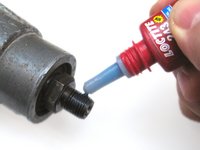
If there's no retaining screw and you anticipate forceful counterclockwise action (as when unscrewing), apply a small amount of threadlocking compound to the spindle thread.
-
Use a medium-strength variety, not the kind you'll have to heat with a blowtorch if you need to take off the chuck again at a later stage!
-
Screw the chuck onto the spindle as far as it will go. You don't need to tighten it with excessive force, it will tighten itself with normal use.
-
-
-
Insert and tighten the retaining screw if applicable (not all chucks are counterbored to accept a retaining screw).
-
Counter-clockwise of course!
-
If the screw is damaged, use a fresh one to spare yourself some aggravation down the road.
-
It doesn't hurt to also treat these threads to a dab of threadlocker.
-
-
-
Presto - your new chuck should provide you with years of drilling joy!
Well put together article.
@traur Ik weet niet of ik je vraag goed begrijp. De bevestigingsschroef gaat in principe gewoon door een boring in de boorkop, dus die zou er vlot uit moeten komen langs voren. Je moet daarvoor wel de spanbekken van de boorkop helemaal openzetten om plaats te maken voor de kop van de schroef.
Nee, schroef blijft hangen in de kop, ook na voorzichtig aantikken aan de achterkant
Hmmm ik begrijp het niet goed. Normaal komt de schroef helemaal uit de boorkop nog voor je de boorkop van de spindel schroeft. Ik zie niet goed wat de schroef verder zou kunnen vasthouden, maar misschien maak ik me geen juiste voorstelling van de situatie waar jij mee zit. Kan je eventueel je vraag met foto's posten op https://www.ifixit.com/Answers/Ask?
Sorry, je hebt helemaal gelijk, maar ik moest het spanbekken echt max maximaal openzetten, want anders bleef ie er achter hangen. Dank!
Blij dat ik kon helpen. Succes verder!
-


Отменить: Я не выполнил это руководство.
16 человек успешно провели ремонт по этому руководству.

Команду

17 Комментариев
Very well explained guide!
Thanks.
What if it is corroded chuck
@Abdulrahmon idris You mean if the threads in spindle and chuck are rusted solid? You could try spraying penetrating oil into the joint and letting it soak in for a few hours before trying to loosen the chuck. Heat can also help on solid metal-body chucks: heating the chuck with a blowtorch will cause it to expand, which may free up the threads. Be aware though that this could damage seals or other non-metal parts in the chuck, if present; and I would definitely remove the spindle from the drill before doing this, if possible (some spindles slide in from the inside of the gear case meaning they can't be removed unless the chuck comes off). If all else fails, you may need to resort to an angle grinder to grind through the chuck...
Yeah I burned up a Makita cordless hammer drill using in the vise method to me it looks like they had red Loctite not blue used on the threads but anyway my mistake was i didn’t adjust the clutch first. It didn’t take much for it to sizzle I can tell you that. It was done and over with before I could react
@joshuastang Sorry to hear that. Stuff like that happens to us all. You win some, you learn some...
My cordless makita drill chuck wont come loose at all. I tried the hammer and allen key but all it does is turn on the gear assembly. I can actually grab hold of the allen key and turn the chuck and you can hear it turning on the gear assembly. Its in first gear, on the drill selector and clutch is at the highest. Any thoughts from anyone please?
@warrenjashman Hi Warren, can you share the precise model of your drill? That might give some insight in how best to proceed. Did you check for a retaining screw and remove it if present? Note that even if the gear assembly can be rotated by turning the chuck, the allen key method can still work if you hit the key sharply enough - it's all about inertia. It may take a few attempts though.
@pauls40812 Hi Paul, since you wouldn't be using a small drill like that for forceful anti-clockwise rotation (such as when removing screws), you should actually be fine without the retaining screw. The chuck will tighten itself onto the spindle with use and should not loosen when reversing occasionally (as you might do to back the drill bit out of a hole more easily). If you have some threadlocking compound at hand, this will help to make sure the chuck stays put.
Should you wish to source a longer retaining screw anyway, you'll first need to identify the screw size (diameter and thread pitch). The diameter is easily measured with vernier calipers whereas a comb-type thread pitch gauge would be the easiest way to identify pitch. In metric, M6x1mm would be the most common size for these screws; in imperial it might be 1/4"x20tpi for instance. Lastly, identify how much longer the screw should be than the current one to determine the total length (obviously as long as you get a long enough screw, you can always file it down a bit if needed). An internet search for "chuck retaining screw" accompanied by the dimensions you need should lead you to a number of sources where you can purchase them. Remember you need a left hand thread screw!
expering electricshock when operating pistoldrill
when switching on pistol drill electric shock from chuck end ?
@royheppenstall This means the double insulation of the drill is compromised. Some current carrying part is making electrical contact with a metal part inside the drill, and the voltage is conducted through the gear train to the spindle and chuck. That drill is definitely unsafe to use until the problem is sorted out! If you disassemble the drill, you will likely be able to visually identify the location of the current leak.
Thanks for this excellent write-up! You provided much superior explanations than those "Youtwit" videos, not to mention several different approaches. Saved me time & headaches, much appreciated!
Hi, I have a Silverline Tools SS 1010-HD drill and want to change the chuck. I have loosened the chuck on the shaft and can unscrew it a short way but then it stops and will not go further. I cannot see a retaining screw (and if there was one I wouldn't expect to be able to unscrew the check at all!). There is a 'cross' arrangement that on first glance could be mistaken for a retaining screw but is not. The 'item' spins freely if a crosshead screwdriver is inserted ... it behaves more like maybe a 'collet' arrangement would but if it is I cannot see how (or what) to insert down the chuck to compress the collars. Any thoughts please.
Hi firlandsfarm, I would suggest that you post this question in the answers forum along with some pictures if you manage. See https://www.ifixit.com/Answers.
De elektromannen van ons repaicafé gaan altijd zitten op de stekker van het apparaat waar ze mee bezig zijn. Zo voorkomen ze dat een ander iets stoms doet.
Jim Pansee - Ответить