Перейти к основному содержанию

RCA RCT6378W2 Screen Replacement

Архивированное руководство
Это руководство сохранено для исторических целей. Используйте его обновлённую версию, чтобы выполнить ремонт.

Выберете то, что вам нужно

  1. RCA RCT6378W2 Screen Replacement, Screen Replacement: шаг 1, изображение 1 из 1
    • Remove two 2.4mm x 4mm screws from bottom of the tablet with Phillips #00 Screwdriver.

  2. RCA RCT6378W2 Screen Replacement: шаг 2, изображение 1 из 2 RCA RCT6378W2 Screen Replacement: шаг 2, изображение 2 из 2
    • Remove back cover with lever tool, exposing the battery and motherboard.

  3. RCA RCT6378W2 Screen Replacement: шаг 3, изображение 1 из 2 RCA RCT6378W2 Screen Replacement: шаг 3, изображение 2 из 2
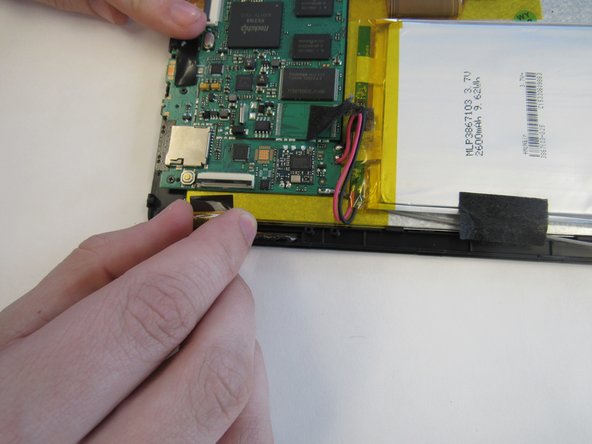
    • Using the tweezers, remove the black tape connecting the screen to the motherboard.

  4. RCA RCT6378W2 Screen Replacement: шаг 4, изображение 1 из 2 RCA RCT6378W2 Screen Replacement: шаг 4, изображение 2 из 2
    • Pull up the switch to remove the input connector.

  5. RCA RCT6378W2 Screen Replacement: шаг 5, изображение 1 из 1
    • Heat the iOpener in the microwave, following the instructions provided with the tool. Lay the heated iOpener on the front screen for two minutes to soften the connection of the screen to the tablet.

  6. RCA RCT6378W2 Screen Replacement: шаг 6, изображение 1 из 2 RCA RCT6378W2 Screen Replacement: шаг 6, изображение 2 из 2
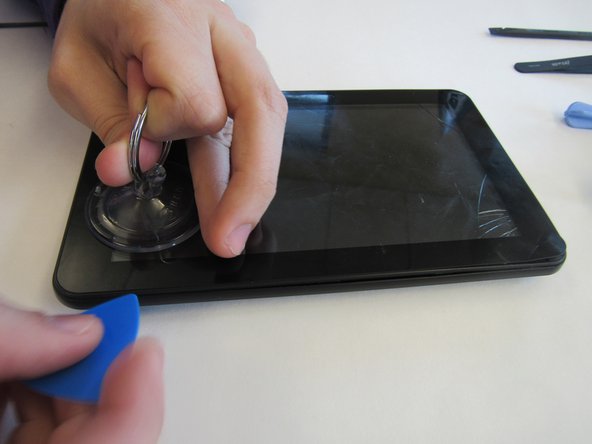
    • Use the suction cup and lever tool tool to pry the front screen from the tablet.

Заключение

To reassemble your device, follow these instructions in reverse order.

2 участников успешно повторили данное руководство.

mikayla

Участник с: 01/29/15

408 Репутация

Автор 2 руководств

Команда

Clemson, Team 14-4, Shirley Spring 2015 Участник Clemson, Team 14-4, Shirley Spring 2015

CLEM-SHIRLEY-S15S14G4

6 членов

Автор 15 руководств

0 Комментариев

Добавить комментарий

Просмотр статистики:

За последние 24часов: 1

За последние 7 дней: 1

За последние 30 дней: 1

За всё время: 1,190