Введение
Vous devez déconnecter ou remplacer la batterie de votre Dell XPS 13 9380, ce guide est alors fait pour vous !
Выберете то, что вам нужно
-
-
Dévisser les huit vis (Torx M2x3) qui fixent le panneau arrière.
-
Retournez l’ordinateur, puis ouvrez-le en l’inclinant.
-
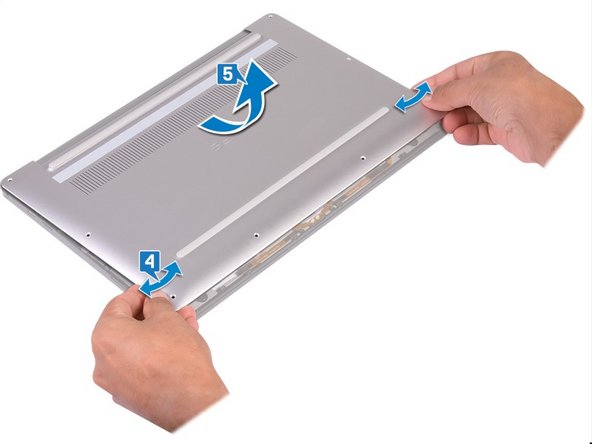
À l'aide d'un Spudger, faites levier sur le panneau arrière.
-
En faisant glisser le panneau arrière de gauche à droite, libérez les clips qui le fixent. Vous pouvez ainsi le retirer.
-
-
-
-
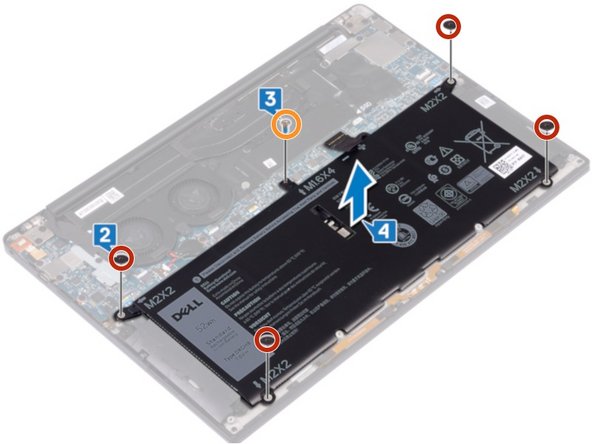
1- Déconnecter le câble de la batterie.
-
2- Retirer les quatre vis (M2 x 2) qui fixent la batterie
-
3- Retirer la vis (M1,6 x 4) qui fixe la batterie.
-
4- Retirer la batterie de son emplacement.
-


Pour réassembler votre appareil, suivez les instructions dans l'ordre inverse.
Pour réassembler votre appareil, suivez les instructions dans l'ordre inverse.
Отменить: Я не выполнил это руководство.
17 человек успешно провели ремонт по этому руководству.

Команду

3 Комментариев
The backpanel is a bit tricky to remove, but it can be managed.
The "Essential Electronics Toolkit" is very useful! I recommend to order it with the battery.
I am confused because according to dell.com the battery for the XPS 13 9380 is the G7GV0, not the G8VCF (DXGH8) which you are selling here:
https://www.dell.com/en-uk/shop/dell-4-c...
vs.
The hole for the M1.6x4 screw is too large, allowing the head to go through the hole and not hold the battery. I sawed off the tab from the old battery to use as a washer.
You should be careful when removing the back panel as there also two clips on its back where the air ducts lie. If you are quick to remove it you may tear the air ducts which are quite (unreasonably) fragile given the fact they are plastic. I was unfortunate and I broke two of them so I had to use some duct tape as a minor gap would be visible between the back panel and the plastically covered air ducts. Other than that, it’s a pain to remove the back panel but not as difficult as it sounds.
Iraklis - Ответить