Введение
Use this guide to replace the lithium-ion battery in your Galaxy S8 Plus. With daily use, a typical battery will last around 18-24 months before losing significant capacity. If your battery no longer holds a full charge or is causing unexpected shutdowns, you can follow the instructions below to restore your phone to good working order.
Before disassembling your phone, discharge the battery below 25%. A charged lithium-ion battery can catch fire and/or explode if accidentally punctured.
If your battery is swollen, take appropriate precautions. Do not heat your phone. If needed, you can use a dropper or syringe to inject isopropyl alcohol (90+%) around the edges of the back cover to weaken the adhesive. Swollen batteries can be very dangerous, so wear eye protection and exercise due caution, or take it to a professional if you're not sure how to proceed.
Выберете то, что вам нужно
-
-
Prepare an iOpener and heat the back of the phone along its left edge for about two minutes. This will help soften the adhesive securing the back cover.
-
-
-
In the following steps, you'll be cutting through the adhesive securing the back cover.
-
As seen from outside the phone, you'll be slicing through the adhesive in the areas shown:
-
Thick portions of adhesive
-
Thin areas of adhesive
-
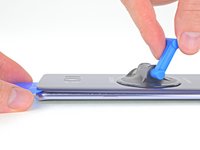
Avoid prying or slicing in this area, to protect the fingerprint sensor flex cable.
-
-
-
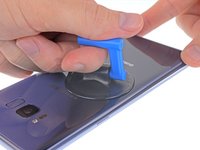
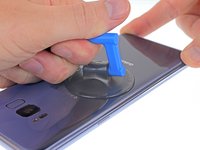
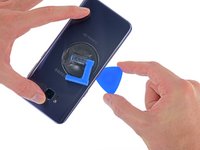
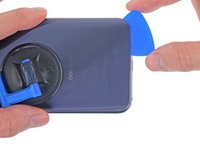
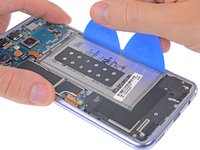
Secure a suction cup to the back cover, as close to the heated edge as possible.
-
Lift the back cover's left edge with your suction cup, opening a slight gap between the back cover and the frame.
-
-
-
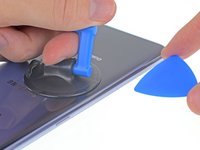
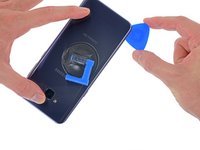
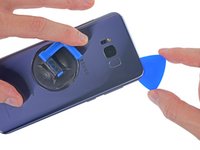
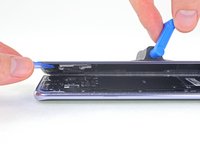
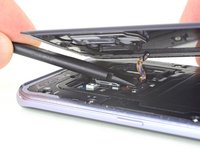
Slide your opening pick along the left edge of the phone to slice through the adhesive securing the back cover.
-
-
-
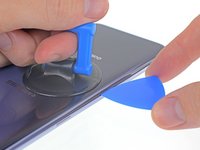
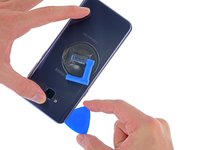
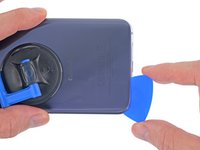
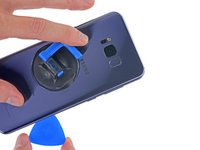
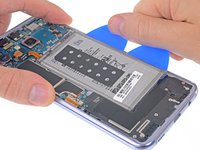
Continue slicing through the adhesive along the bottom edge of the phone.
-
Again, it may help to leave the opening pick in place and grab another one for the following step.
-
-
-
-
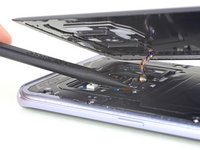
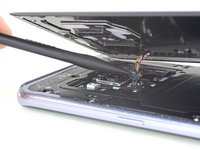
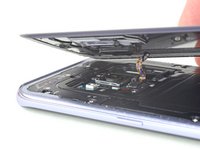
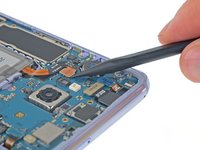
Use the point of a spudger to pry up and disconnect the fingerprint sensor flex cable.
-
-
-
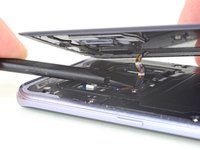
Then, use the flat end of your spudger to gently snap the connector into place by pressing it straight down.
-
-
Инструмент, используемый на этом этапе:Tweezers$4.99
-
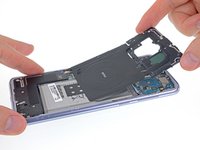
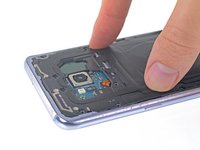
Remove the back cover.
-
Use tweezers to peel away any remaining adhesive from the phone's chassis. Then clean the adhesion areas with high concentration isopropyl alcohol (at least 90%) and a lint-free cloth to prep the surface for the new adhesive.
-
Peel the adhesive backing off of the new rear glass, carefully line up one edge of the glass against the phone chassis, and firmly press the glass onto the phone.
-
-
Инструмент, используемый на этом этапе:Tweezers$4.99
-
Remove the eleven 3.7 mm Phillips screws securing the wireless charging coil + antenna assembly.
-
If any screws are difficult to remove even when fully loosened, you can pull them out with tweezers.
-
-
-
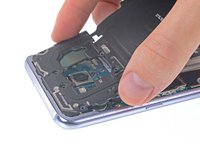
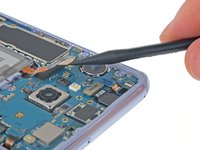
Use a spudger to gently pry up the plastic in the marked areas to pop the clips free.
-
-
-
Use a spudger to disconnect the battery by prying the connector straight up from its socket.
-
-
-
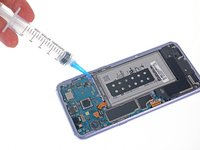
Apply 1-2 drops of high-concentration (>90%) isopropyl alcohol under each corner of the battery and allow it to penetrate for several minutes to help weaken the adhesive.
-
Alternatively, apply a freshly heated iOpener to the display directly behind the battery for two minutes to help soften the adhesive. Re-heat and reapply the iOpener as necessary.
-
-
Инструмент, используемый на этом этапе:Plastic Cards$2.99
-
Insert a couple of opening picks or a plastic card along the outer edge of the battery.
-
Apply steady, even pressure to slowly lever the battery up and out of the phone.
-
-
-
Remove the battery.
-
If you used isopropyl alcohol, wait ten minutes before installing the new battery to allow the alcohol to completely evaporate.
-


To reassemble your device, follow these instructions in reverse order.
For optimal performance, calibrate your newly installed battery after completing this guide.
To reassemble your device, follow these instructions in reverse order.
For optimal performance, calibrate your newly installed battery after completing this guide.
Отменить: Я не выполнил это руководство.
51 человек успешно провели ремонт по этому руководству.


14 Комментариев
this Iso + Heat method makes tough adhesive a thing of the past! just be patient. like the guide says, 2 mins to allow iso to penetrate
I applied the alcohol using a small paint brush, dipped into my iso jar, and “painted” along the battery edges.
roughly 30 seconds with heat gun on the front glass, boom, a freed battery
Just received this kit and I see it comes with the big adhesive, but it also has a smaller blue adhesive and a rectangle thing(that I think goes behind the battery?) that has a small one with it. Where do these things go?
Check out their guide they have up now for the replacement of this adhesive. Specifically, take a look at the pictures in step 10 to see where the little pieces are supposed to go.
Scott -
Highly recommend against doing this. Even going carefully and reheating, 2 of the corners cracked when moving the pick through. So much for taking perfect care of the phone for 2 years =o(
Ditto. I ended up cracking my glass using the iOpener method as well. After no ordering and replacing the rear glass as well now, I am resorting to only using isopropyl alcohol from now on. No matter how hot I got the iOpener, how long I let it heat soak the adhesive, or how many times i reheated the iOpener and reapplied it, I never got any of this adhesive to come off without a risky struggle. And upon ordering all the adhesive kits, I still was shipped missing pieces of adhesive (camera, fingerprint reader, specific support adhesive, etc.). Very frustrating and time consuming process; far more than what these guides say it takes.
Scott -