Перейти к основному содержанию

Samsung NP900X4B SSD Hard Drive Replacement

Выберете то, что вам нужно

  1. Samsung NP900X4B SSD Hard Drive Replacement, SSD Hard Drive: шаг 1, изображение 1 из 1
    • Before begining you must remove the back panel of the laptop. The Battery Removal guide demonstrates how to do this. The link to this guide is posed here. Samsung NP900X4B Battery Replacement

    • Once this is completed, use this image to locate the Hard Drive. It can be found in the upper left hand corner of the device.

  2. Samsung NP900X4B SSD Hard Drive Replacement: шаг 2, изображение 1 из 2 Samsung NP900X4B SSD Hard Drive Replacement: шаг 2, изображение 2 из 2
    • Remove the two 2.5mm Phillips #000 screws at the top of the SSD.

  3. Samsung NP900X4B SSD Hard Drive Replacement: шаг 3, изображение 1 из 2 Samsung NP900X4B SSD Hard Drive Replacement: шаг 3, изображение 2 из 2
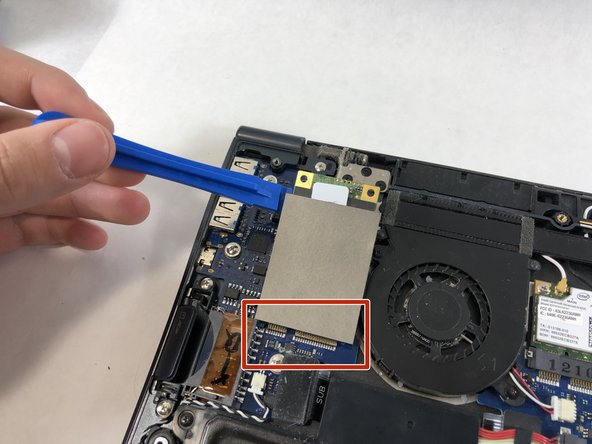
    • Gently lift up from the top of the SSD card using a plastic opening tool.

    • Pull gently away from the drive slot located at the base of the SSD.

    • After removing the SSD memory chip, carefully insert the new SSD into the old slot. When completed, reinsert the two screws. Then, slowly remove the heat tape from the old SSD and apply to the new SSD.

Заключение

To reassemble your device, follow these instructions in reverse order.

Bryton Lawrence

Участник с: 10/17/18

309 Репутация

Автор 2 руководств

Команда

UMass Dartmouth, Team S4-G6, Valliere Fall 2018 Участник UMass Dartmouth, Team S4-G6, Valliere Fall 2018

UMASSD-VALLIERE-F18S4G6

5 членов

Автор 6 руководств

Один комментарий

Excellent instruction. Thank you!

Sovfree - Ответить

Добавить комментарий

Просмотр статистики:

За последние 24часов: 2

За последние 7 дней: 10

За последние 30 дней: 34

За всё время: 2,153