Введение
An often encountered problem for amateur and professional photographers is as you use your camera over time the battery begins lasting a shorter and shorter time. After a few years (or months depending on the frequency of use) the camera may power on but will quickly show the battery exhausted error and then power off. This is an inherent part of modern batteries; the cycle life. While good batteries can last several thousand cycles, all batteries will eventually hold less and less charge. As time progresses this lack of battery power makes it impractical to use the camera at all. At this point the best solution is to replace the depleated battery with a new battery. This, fortunately, is a simple operation on the Sony DSLR a850.
Below is a step by step guide to preform this replacement.
Выберете то, что вам нужно
-
-
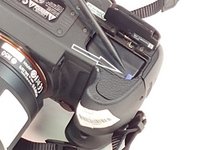
Flip the camera over and locate the battery compartment.
-
Note: while the charge port is on the side of the camera, the battery compartment is actually located on the base of the device.
 Спросите у FixBot
-
-
-
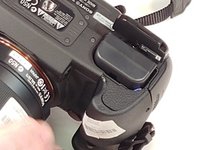
Using either a tool or your finger, apply a force forward in the direction of the arrow. This will release the latch. Simply let your finger or tool up without releasing pressure on the latch, and the spring system will cause the battery door to rise automagicly.
-
The best way to do this with your finger is to grip it from behind with your finger nail and pull the latch upwards and forwards. This allows it to easily lift upward as you pull towards yourself.
-
-
-
-
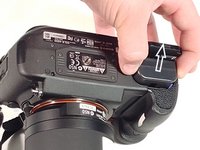
Now that the compartment is open, you will see a blue tab that holds the battery in place.
-
Take either a tool or your finger and press this tab in the direction indicated and the battery will pop up out of the compartment.
-
-
-
Now that your battery has been liberated, simply grasp it with your hand and lift it out of the compartment.
-
-
-
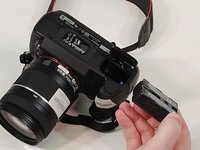
Now take a new battery and insert it in the compartment. You may need to insert it at an angle as shown so that blue tab will be pushed out of the way as you place your battery in your camera.
-
When placing the battery in the camera, insert downward and towards the outside of the camera. This will depress the blue tab allowing your battery to slide into place.
-


if the reassemble instructions are unclear try reversing the disassembly procedure.
Отменить: Я не выполнил это руководство.
Еще один человек закончил это руководство.

Команда

University of Memphis, Team S2-G4, Kim Spring 2018 Участник University of Memphis, Team S2-G4, Kim Spring 2018
UM-KIM-S18S2G4
3 членов
Автор 10 руководств