Введение
If the speaker inside your Sony SRS-XB13 device is damaged and no longer functioning as expected, this guide will inform you on how to remove the speaker for replacement. The speaker itself is the source of audio for the device and without it, the generation of sound is impossible.
Before using this guide, refer to the troubleshooting page. It provides information that could prove useful in resolving issues such as low volume or distorted sound, without the need of fully replacing the device's speaker.
Often times, a speaker that is played at an exceedingly high volume for extended periods of time can "go out" and no longer produce sound at the audio levels expected from it. When a speaker is incapable of producing any sound at all, it is usually time to replace it entirely.
Выберете то, что вам нужно
-
-
To get the bottom part of the speaker off, take a long and sturdy screwdriver and put it through the holes at the bottom of the speaker.
-
When you have the screwdriver through the holes, you'll want to push down very firmly. Rotate between the holes and repeat this process until the bottom piece pops off.
-
-
-
You should see three 11 mm screws once the bottom of the device is off. Use a #1 Phillips screwdriver to remove these screws.
-
-
-
To unplug the microphone from the motherboard, use the nylon tipped tweezers to clamp the white block that is attached to the red and white wires.
-
Pull up and away from the motherboard until the block is fully disconnected from the slot.
-
-
-
-
Place one end of the ifixit opening tool underneath the white bracket that sits above the motherboard, so that it latches onto the bottom side of the bracket.
-
With the opposite end of the tool, apply a gentle but firm downward motion to slowly pry the bracket from its position.
-
-
-
Using the precision tweezers set, pinch the tabs on the electric plugins and gently pull outwards to disconnect the wires from the motherboard.
-
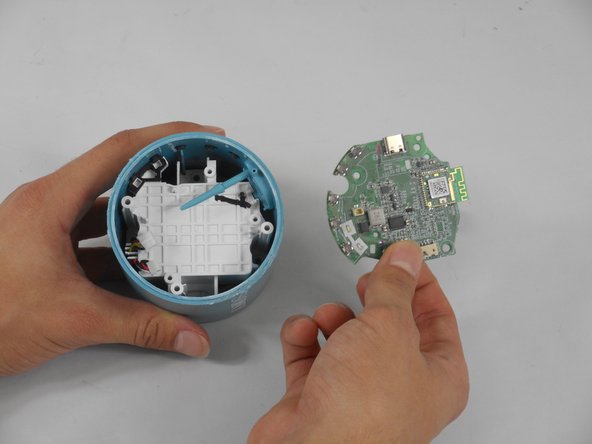
Insert a finger under the motherboard and gently lift it out of the casing.
-
-
-
Locate the four 11 mm screws along the base of the white center block.
-
Use the Phillips #1 screwdriver with the 150mm flex extension from the Mako Driver kit to unscrew and remove the screws from their positions.
-
-
-
Use the blunt tweezers from the precision tweezers set to clamp down on a solid piece of the white center block.
-
With a firm grip, pull upwards with the blunt tweezers until the white center block is released from its position.
-
-
-
Locate the small brackets along the side of the white center block that hold the red, yellow, black, and white wires in place.
-
With your fingers, gently pull the wires away from the center block so that they are no longer held up by the brackets.
-
Flip the white center block over so that the black speaker is facing upwards.
-
Firmly grasp the speaker with your hands and pull it up and away from the center block until it fully disconnects from it.
-


To reassemble your device, follow these instructions in reverse order.
To reassemble your device, follow these instructions in reverse order.

Команда

University of New Orleans, Team 5-4, McDonald Fall 2023 Участник University of New Orleans, Team 5-4, McDonald Fall 2023
UNO-MCDONALD-F23S5G4
3 членов
Автор 4 руководств