Введение
This guide will outline how to replace the battery of your SwagTron T1 Hoverboard. This may be necessary if the battery is defective or worn out. Before attempting this replacement, recalibrate your hoverboard. If the issue persists, continue with this replacement.
Выберете то, что вам нужно
-
-
-
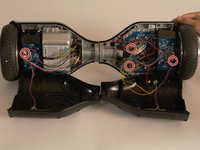
Turn the SwagTron upside down to see the underside.
 Спросите у FixBot
-
-
-
Unscrew the eighteen 10mm screws that secure the back panels using a Phillips #2 screwdriver.
-
Carefully lift the panels off
-
-
-
-
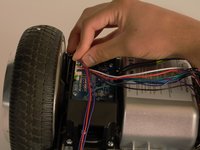
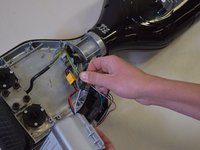
Follow the wires from the panels to the motherboard.
-
You may need to cut any zip ties that are holding the wires together.
-
There is one connection on the battery side and three on the other side that must be removed.
-
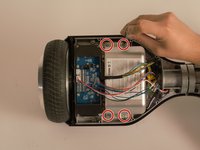
Your back panels are now completely removed.
-
-
-
-
-
Your SwagTron should look like this once the back panels are removed.
-
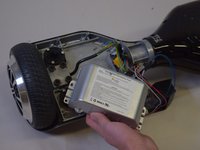
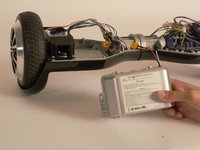
The battery is located on the left side as shown.
-
-
-
Unscrew the four 10mm screws that secure the battery using a Philips #2 screwdriver.
-
-
-
Disconnect the two wires that come from the battery from the wires coming from the hoverboard.
-
There are only two connections that need to be separated.
-
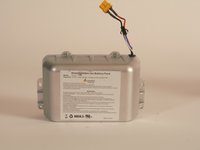
The battery should be completely removed from the hoverboard.
-
-


To reassemble your device, follow these instructions in reverse order.
Отменить: Я не выполнил это руководство.
7 человек успешно провели ремонт по этому руководству.
Команда

Cal Poly, Team S17-G5, Banghart Spring 2017 Участник Cal Poly, Team S17-G5, Banghart Spring 2017
CPSU-BANGHART-S17S17G5
4 членов
Автор 5 руководств
16 Комментарии к руководству
Is there a blue and black wire that gets connected also?
Where dI you get the battery.
Thanks.
I’m also wanting to know where you found the replacement battery. I’ve found several replacement battery packs for hover boards but none that match the T1. The T1 has a circuit board attached to the battery pack, fused…. where can I find this?
Yep, can’t find a T1 battery anywhere. Even Swagtron won’t tell me how to get one, short of sending it in for service.
Swagtron tech support offers to replace any battery if under warranty, which requires that you pay to ship the entire unit back to them for service. This seems insanely costly, but probably avoids voiding the warranty.
If you are out-of-warranty, they said they would sell me a battery, but did not offer any pricing info.
If you want to do-it-yourself, out-of-warranty: My guess it that the metal shielded “battery” actually contains commercially available LiIon cells which can be privately sourced, but may require some wire splicing, may be a shock hazard and such, so is more complex than just plug-in a replacement.
What type of replacement battery is used for the Swagtron T1?
Swagtron wont give me the information!!