Перейти к основному содержанию

Toshiba Satellite L55t-B5271 RAM Replacement

Выберете то, что вам нужно

  1. Toshiba Satellite L55t-B5271 RAM Replacement, Battery: шаг 1, изображение 1 из 3 Toshiba Satellite L55t-B5271 RAM Replacement, Battery: шаг 1, изображение 2 из 3 Toshiba Satellite L55t-B5271 RAM Replacement, Battery: шаг 1, изображение 3 из 3
    • Make sure you turn the laptop off first.

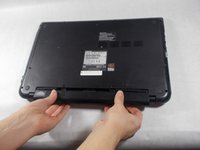
    • Close the laptop lid and flip it over so that Toshiba logo is facing down.

  2. Toshiba Satellite L55t-B5271 RAM Replacement: шаг 2, изображение 1 из 2 Toshiba Satellite L55t-B5271 RAM Replacement: шаг 2, изображение 2 из 2
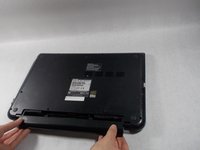
    • Remove the two 6.5 mm Phillips head screws indicated using a Phillips #00 screw driver.

  3. Toshiba Satellite L55t-B5271 RAM Replacement: шаг 3, изображение 1 из 3 Toshiba Satellite L55t-B5271 RAM Replacement: шаг 3, изображение 2 из 3 Toshiba Satellite L55t-B5271 RAM Replacement: шаг 3, изображение 3 из 3
    • Once the screws are removed, slide the battery pack out of the computer.

  4. Toshiba Satellite L55t-B5271 RAM Replacement, Back Panel: шаг 4, изображение 1 из 3 Toshiba Satellite L55t-B5271 RAM Replacement, Back Panel: шаг 4, изображение 2 из 3 Toshiba Satellite L55t-B5271 RAM Replacement, Back Panel: шаг 4, изображение 3 из 3
    Инструмент, используемый на этом этапе:
    Anti-Static Wrist Strap
    $7.95
    Купить
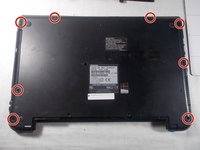
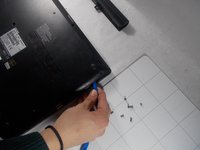
    • Remove all 6.5 mm Philips head screws on the back cover of the laptop with a Philips #00 screwdriver.

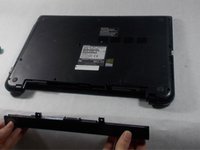
    • Use the plastic opening tool to remove the back cover from the laptop.

    • Be aware that static discharge can cause damage to sensitive electrical components within the computer. To avoid this you can wear an anti-static wrist strap.

  5. Toshiba Satellite L55t-B5271 RAM Replacement, RAM: шаг 5, изображение 1 из 3 Toshiba Satellite L55t-B5271 RAM Replacement, RAM: шаг 5, изображение 2 из 3 Toshiba Satellite L55t-B5271 RAM Replacement, RAM: шаг 5, изображение 3 из 3
    • This laptop does not have a RAM present. Follow instructions to replace your own.

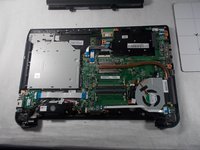
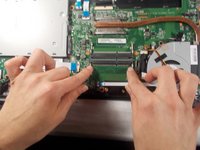
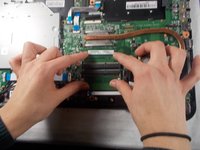
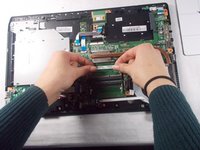
    • Evenly press down on the clips on either side of the RAM stick.

    • To pull out the RAM stick, be sure to align the notches on the RAM stick with the notches in the RAM holder.

Заключение

To reassemble your device, follow these instructions in reverse order.

Еще один человек закончил это руководство.

Carson Longendorfer

Участник с: 03/26/18

274 Репутация

Автор 2 руководств

Команда

UMass Dartmouth, Team S3-G3, Peak Spring 2018 Участник UMass Dartmouth, Team S3-G3, Peak Spring 2018

UMASSD-PEAK-S18S3G3

3 членов

Автор 8 руководств

Один комментарий

I’ve got this exact model. Stock 6GB of RAM. However, I’ve attempted to upgrade to 8GB and have tried multiple sticks of RAM and no matter what, the computer won’t recognize it. I’ve ensured it’s locked in properly, RAM is functional, even factory reset. All to no success. Any ideas?

Steve B - Ответить

Добавить комментарий

Просмотр статистики:

За последние 24часов: 0

За последние 7 дней: 0

За последние 30 дней: 0

За всё время: 389