Перейти к основному содержанию

Toshiba Satellite S55T-B5335 Keyboard Replacement

Выберете то, что вам нужно

  1. Toshiba Satellite S55T-B5335 Keyboard Replacement, Battery: шаг 1, изображение 1 из 1
    • Remove the two 7 mm Phillips #1 screws that hold the battery in place.

  2. Toshiba Satellite S55T-B5335 Keyboard Replacement: шаг 2, изображение 1 из 3 Toshiba Satellite S55T-B5335 Keyboard Replacement: шаг 2, изображение 2 из 3 Toshiba Satellite S55T-B5335 Keyboard Replacement: шаг 2, изображение 3 из 3
    • Pull the battery from laptop.

  3. Toshiba Satellite S55T-B5335 Keyboard Replacement, Bottom Cover: шаг 3, изображение 1 из 2 Toshiba Satellite S55T-B5335 Keyboard Replacement, Bottom Cover: шаг 3, изображение 2 из 2
    • Remove the ten 7 mm Phillips #1 screws that secure the back cover.

  4. Toshiba Satellite S55T-B5335 Keyboard Replacement: шаг 4, изображение 1 из 1
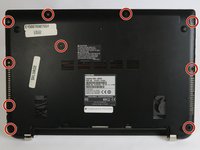
    • Wedge the tip of a plastic opening tool between the back cover and the metal frame.

    • Twist the plastic opening tool, while wedged, in order to release the retaining tabs from the frame.

    • Repeat these steps in a circular pattern around the laptop to release all retaining tabs.

  5. Toshiba Satellite S55T-B5335 Keyboard Replacement: шаг 5, изображение 1 из 1
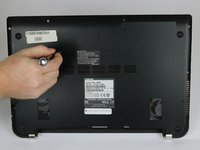
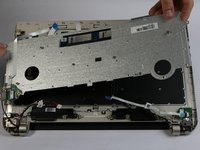
    • Once all retaining tabs are released from the frame, you can pull up on the back cover to remove it.

  6. Toshiba Satellite S55T-B5335 Keyboard Replacement, Cooling Fans: шаг 6, изображение 1 из 1
    • Remove the two 3.5 mm Phillips #1 screws that hold the cooling fan in place.

  7. Toshiba Satellite S55T-B5335 Keyboard Replacement: шаг 7, изображение 1 из 1
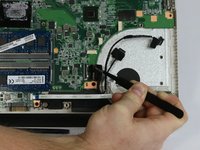
    • Wedge the flat end of the spudger between the connector and its socket.

    • Twist back and forth in order to pry the connector loose from its socket.

    • Although you can pull on the connector wires to remove it from the socket, it is not recommended until the connector is loose to prevent damage to the wires.

  8. Toshiba Satellite S55T-B5335 Keyboard Replacement: шаг 8, изображение 1 из 1
    • Lift up on the cooling fan to remove it from the laptop.

    • Repeat steps 6-8 for the other cooling fan.

  9. Toshiba Satellite S55T-B5335 Keyboard Replacement, Motherboard: шаг 9, изображение 1 из 1
    • Remove the three 4 mm Phillips #1 screws holding the motherboard in place.

  10. Toshiba Satellite S55T-B5335 Keyboard Replacement: шаг 10, изображение 1 из 2 Toshiba Satellite S55T-B5335 Keyboard Replacement: шаг 10, изображение 2 из 2
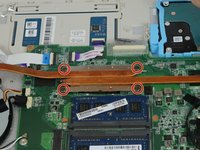
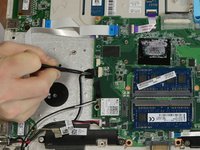
    • Remove the four 4 mm Phillips #1 screws mounting the heat sink to the motherboard.

  11. Toshiba Satellite S55T-B5335 Keyboard Replacement: шаг 11, изображение 1 из 1
    • Gently lift on either side of the heat sink to separate it from the laptop.

    • When reassembling the device, be sure to apply new thermal paste to the heat sink and processor.

  12. Toshiba Satellite S55T-B5335 Keyboard Replacement: шаг 12, изображение 1 из 2 Toshiba Satellite S55T-B5335 Keyboard Replacement: шаг 12, изображение 2 из 2
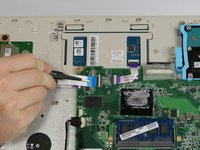
    • On all ZIF (Zero Insertion Force) connectors, use a spudger to lift the lock.

    • Use tweezers to pull on the designated pull tab to remove each ZIF connector.

  13. Toshiba Satellite S55T-B5335 Keyboard Replacement: шаг 13, изображение 1 из 2 Toshiba Satellite S55T-B5335 Keyboard Replacement: шаг 13, изображение 2 из 2
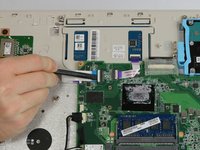
    • On all No-Fuss Ribbon Cable Connectors use tweezers, on the designated tabs, to remove them.

  14. Toshiba Satellite S55T-B5335 Keyboard Replacement: шаг 14, изображение 1 из 1
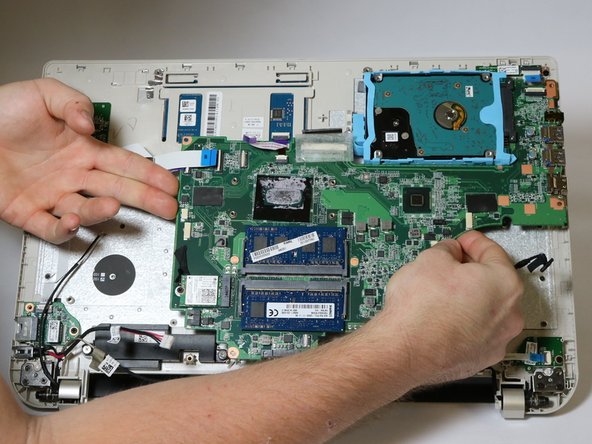
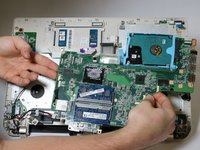
    • Lift on the motherboard from the USB port area while pulling the frame away from motherboard.

  15. Toshiba Satellite S55T-B5335 Keyboard Replacement: шаг 15, изображение 1 из 3 Toshiba Satellite S55T-B5335 Keyboard Replacement: шаг 15, изображение 2 из 3 Toshiba Satellite S55T-B5335 Keyboard Replacement: шаг 15, изображение 3 из 3
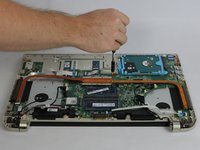
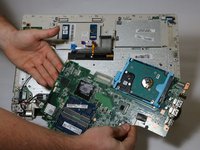
    • Once all connectors are separated from the motherboard and the USB port area is freed, carefully lift on either side of the motherboard to remove it.

  16. Toshiba Satellite S55T-B5335 Keyboard Replacement, Keyboard: шаг 16, изображение 1 из 1
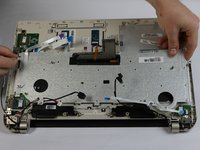
    • Remove the twenty-seven 2 mm Phillips #0 screws that secure the keyboard retaining plate.

  17. Toshiba Satellite S55T-B5335 Keyboard Replacement: шаг 17, изображение 1 из 2 Toshiba Satellite S55T-B5335 Keyboard Replacement: шаг 17, изображение 2 из 2
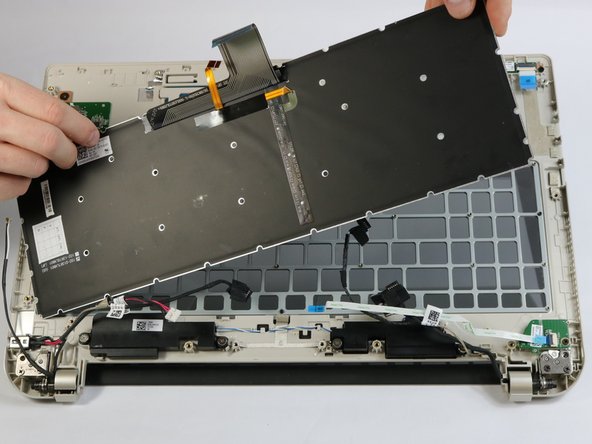
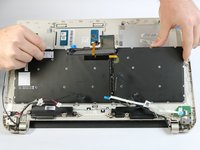
    • Carefully lift the keyboard retaining plate away from the laptop making sure not to damage any connectors.

  18. Toshiba Satellite S55T-B5335 Keyboard Replacement: шаг 18, изображение 1 из 2 Toshiba Satellite S55T-B5335 Keyboard Replacement: шаг 18, изображение 2 из 2
    • Lift up on the keyboard to remove it from the laptop.

Заключение

To reassemble your device, follow these instructions in reverse order.

4 участников успешно повторили данное руководство.

George Gillespie

Участник с: 09/15/16

721 Репутация

Автор 7 руководств

Команда

USF Tampa, Team 2-1, Blackwell Fall 2016 Участник USF Tampa, Team 2-1, Blackwell Fall 2016

USFT-BLACKWELL-F16S2G1

4 членов

Автор 7 руководств

Один комментарий

trying to find repair guide for Toshiba Satellite L55-A5226. Keyboard needs repacing.

macariq - Ответить

Добавить комментарий

Просмотр статистики:

За последние 24часов: 3

За последние 7 дней: 3

За последние 30 дней: 13

За всё время: 3,732