Введение
In this guide, you will learn how to replace the battery in your Treblab HD77. Rechargeable batteries have a tendency to deteriorate over time as a result of the constant draining and charging of the battery. Every time you recharge a battery it loses a little bit of its capacity and eventually it lowers to a point where it either cannot perform the way the user needs or the battery may stop functioning all together. Replacing the battery will give the speaker a longer life off a full charge, and will provide better power delivery which will boost the speakers overall performance.
Note that this speaker is water resistant and as a result uses a water resistant adhesive in some areas which will have to be removed in certain areas in order to access the battery. To restore its water resistance, this adhesive will need to be manually reapplied before reassembling the speaker.
Выберете то, что вам нужно
-
-
Remove the outer casing of the speaker by prying at the edges to unlock each prong holding the casing to the speaker.
 Спросите у FixBot
-
-
-
Remove the plastic ring on top of the rubber surround on the side of the speaker by lifting it gently.
-
-
-
Insert the blade of a small precision knife between the edge of the rubber surround and the plastic edge.
-
Gently apply pressure and slide the blade in a circle along the entire circumference until the surround loosens and can be removed.
-
-
-
Slide a small precision knife underneath the LED light strip and remove the adhesive holding it in place.
-
There are four points where adhesive is used to hold the LED light strip down.
-
Lift up the LED light strip from the plastic casing.
-
-
-
Flip the LED light strip upside down to see where the cord is plugged in.
-
Gently pinch the wire with your pointer finger and thumb, and remove the cord from the LED slowly.
-
-
-
-
Using a Phillips #0 screwdriver, remove all four 10mm screws that were exposed by removing the LED light strip.
-
Lift the plastic ring once all the screws have been removed.
-
-
-
Slide the inner electronics casing out from the outer tubing encasing it.
-
-
-
Unscrew the six 10mm screws holding the two halves of the electronics casing together using a Phillips #0 screwdriver.
-
-
-
Insert the blade of a precision knife in between the edge of the rubber button cover and the extruded edges holding it in place.
-
Gently trace around the edge until you feel the cover beginning to loosen, and then slowly peel the cover up.
-
-
-
Using a Phillips #0 screwdriver, unscrew the six 5mm screws holding the circuit board in place.
-
-
-
Turn the speaker over to the side with the charging port dock, and gently pull the two halves apart by firmly grasping each half until they separate.
-
-
-
Pinch the thin wire under the circuit board that connects it to the motherboard, and gently remove the wire from the circuit board.
-
-
-
Orient the speaker so the motherboard is on the bottom half, facing up, and the circuit board cutout is facing you.
-
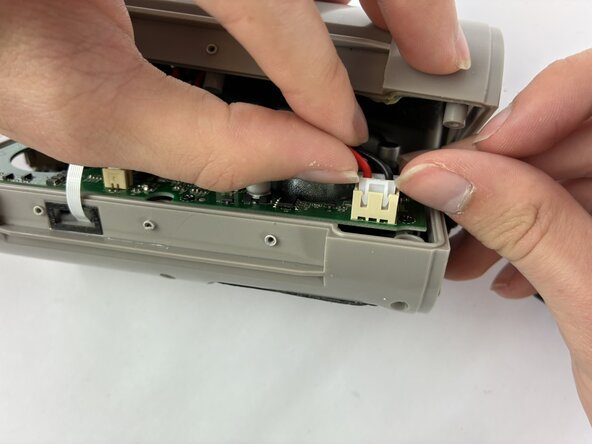
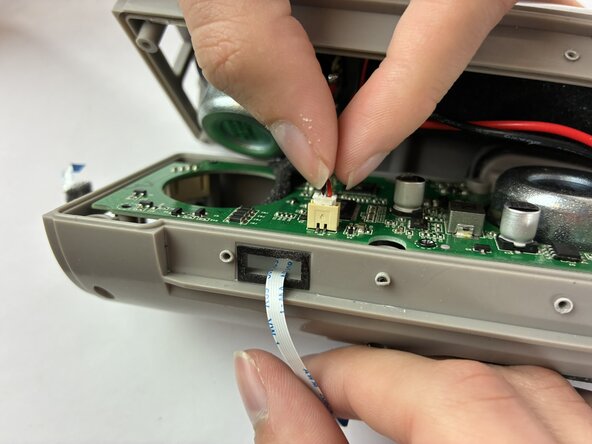
Using your thumb and pointer finger, grip the plug connected to the large red and black wires just below the extruded tip, and gently lift until the plug comes out.
-
-
-
Using your thumb and pointer finger, grip the plug connected to the smaller red and black wires just below the extruded tip, and gently lift until the plug comes out.
-
-
-
Lift the battery out of the shell using your thumb on the edge of the battery.
-






To reassemble your device, follow these instructions in reverse order.
Отменить: Я не выполнил это руководство.
2 человек успешно провели ремонт по этому руководству.

Команда

UMass Dartmouth, Team 3-5, Biswokarma Fall 2025 Участник UMass Dartmouth, Team 3-5, Biswokarma Fall 2025
UMASSD-BISWOKARMA-F25S3G5
5 членов
Автор 5 руководств
