Перейти к основному содержанию

Wii Balance Board Frame Replacement

Выберете то, что вам нужно

  1. Wii Balance Board Frame Replacement, Unscrewing the Foot Cover: шаг 1, изображение 1 из 1
    • Flip device upside-down so the plastic white board is facing the ground.

    • Locate the four feet in the corners of the Balance Board.

    • Unscrew the three 12.7 mm Phillips screws from each foot cover.

  2. Wii Balance Board Frame Replacement, Removing the Foot Cover: шаг 2, изображение 1 из 1
    • Remove the gray plastic ring from the actual foot by lifting it up.

  3. Wii Balance Board Frame Replacement, Removing the Foot: шаг 3, изображение 1 из 1
    • Separate the loose foot from the device by lifting it up.

  4. Wii Balance Board Frame Replacement, Removing the Additional Feet: шаг 4, изображение 1 из 1
    • Repeat steps two and three on the remaining four feet.

  5. Wii Balance Board Frame Replacement, Unscrewing the Back Cover: шаг 5, изображение 1 из 1
    • Unscrew the ten 12.7 mm Phillips #1 screws.

  6. Wii Balance Board Frame Replacement, Removing the Back Cover: шаг 6, изображение 1 из 1
    • Lift off the gray back cover.

  7. Wii Balance Board Frame Replacement, Battery Compartment: шаг 7, изображение 1 из 2 Wii Balance Board Frame Replacement, Battery Compartment: шаг 7, изображение 2 из 2
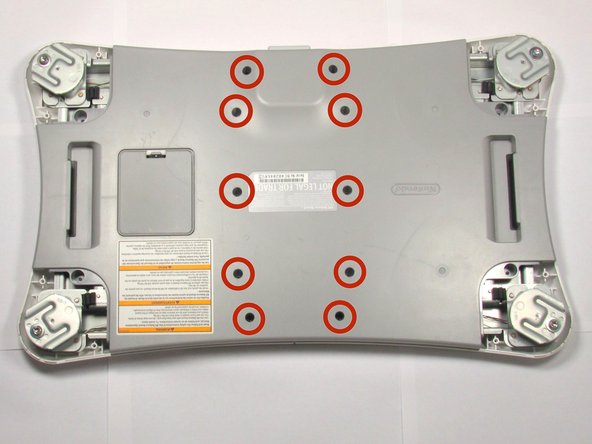
    • Locate the gray battery compartment.

    • Push the tab on the bottom and lift up completely to remove the cover to the batteries.

  8. Wii Balance Board Frame Replacement, Removing the Battery Case: шаг 8, изображение 1 из 1
    • Unscrew the two 6.35 mm Phillips #1 screws.

    • Slide the battery case out.

  9. Wii Balance Board Frame Replacement, Unscrewing the Frame: шаг 9, изображение 1 из 1
    • Unscrew the four 12.7 mm #1 screws.

  10. Wii Balance Board Frame Replacement, Removing the Frame: шаг 10, изображение 1 из 1
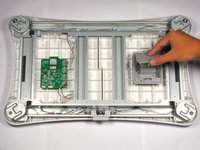
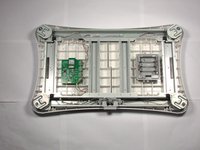
    • Lift the frame, circuit board, and power supply out of the front case. These components are all connected.

  11. Wii Balance Board Frame Replacement, Removing the Power Supply: шаг 11, изображение 1 из 1
    • Lift out the power supply. It is not screwed in.

Заключение

To reassemble your device, follow these instructions in reverse order.

Еще один человек закончил это руководство.

Cory Olson

Участник с: 09/29/14

891 Репутация

Автор 4 руководств

Команда

Cal Poly, Team 13-8, Forte Fall 2014 Участник Cal Poly, Team 13-8, Forte Fall 2014

CPSU-FORTE-F14S13G8

5 членов

Автор 15 руководств

Один комментарий

Top Anleitung, aber wo kann ich die Platine herbekommen? Danke!!!

Dominik - Ответить

Добавить комментарий

Просмотр статистики:

За последние 24часов: 0

За последние 7 дней: 3

За последние 30 дней: 44

За всё время: 2,903