Перейти к основному содержанию

Xbox 360 Wireless Controller Rear Case Replacement

Выберете то, что вам нужно

  1. Xbox 360 Wireless Controller Rear Case Replacement, Battery: шаг 1, изображение 1 из 2 Xbox 360 Wireless Controller Rear Case Replacement, Battery: шаг 1, изображение 2 из 2
    • Depress the battery release button on the top of the controller.

    • Remove the battery holder from the controller.

    • The standard option for Xbox 360 Wireless Controllers Battery Packs is AA batteries. A rechargeable battery is also available, but both battery options are removed from the controller in the same way.

  2. Xbox 360 Wireless Controller Rear Case Replacement, Rear Case: шаг 2, изображение 1 из 1
    Инструмент, используемый на этом этапе:
    Tweezers
    $4.99
    • Use a pair of tweezers to peel the barcode sticker from the battery compartment.

  3. Xbox 360 Wireless Controller Rear Case Replacement: шаг 3, изображение 1 из 1
    • Remove the seven 9.3 mm T8 Security Torx screws securing the rear case to the front case.

  4. Xbox 360 Wireless Controller Rear Case Replacement: шаг 4, изображение 1 из 2 Xbox 360 Wireless Controller Rear Case Replacement: шаг 4, изображение 2 из 2
    Инструмент, используемый на этом этапе:
    Spudger
    $2.99
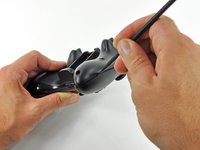
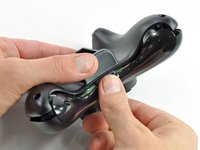
    • Insert a Spudger between the front and rear cases along the left edge of the controller.

    • Rotate the spudger toward the front of the controller, prying the two cases apart.

  5. Xbox 360 Wireless Controller Rear Case Replacement: шаг 5, изображение 1 из 2 Xbox 360 Wireless Controller Rear Case Replacement: шаг 5, изображение 2 из 2
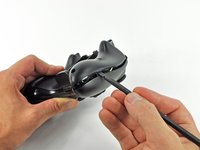
    • Insert a spudger between the front and rear cases, near the headphone jack.

    • Rotate the spudger toward the front of the controller to pry the two cases apart.

  6. Xbox 360 Wireless Controller Rear Case Replacement: шаг 6, изображение 1 из 2 Xbox 360 Wireless Controller Rear Case Replacement: шаг 6, изображение 2 из 2
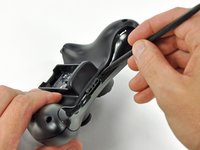
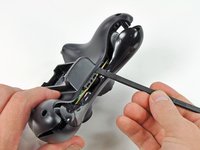
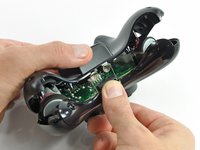
    • Grasp the controller by the battery compartment and the headphone jack.

    • Lift the battery compartment away from the headphone jack, separating the rear case from the front case and logic board.

    • The battery contact springs are held in place by slots in the battery housing in the rear case. Be sure to realign them properly during reassembly.

Заключение

To reassemble your device, follow these instructions in reverse order.

25 человек успешно провели ремонт по этому руководству.

Brett Hartt

Участник с: 04/12/10

131 193 Репутация

Автор 143 руководств

Команда

iFixit Участник iFixit

Staff

123 членов

Автор 23 608 руководств

0 Комментарии к руководству

Добавить комментарий

Статистика просмотров:

За последние 24 часов: 4

За последние 7 дней: 11

За последние 30 дней: 63

За всё время: 24,578