Введение
The directional pad on your Xbox Controller could become unresponsive or sticky. If this happens it could be necessary to remove the directional pad to either replace or clean it. This guide will teach you how to access and replace the directional pad on your Xbox One Wireless Controller Model 1708.
Выберете то, что вам нужно
-
-
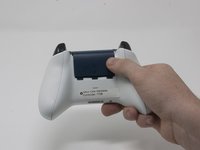
Slide the battery cover toward the top of the controller to remove it.
-
Lift up the batteries or the battery pack from the battery compartment.
-
-
-
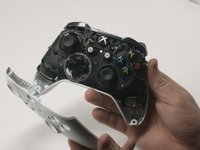
Insert a plastic opening tool into the top seam, and gently work the opening tool to the bottom of the controller.
-
Continue using the opening tool to gently pry the side plate off of the controller.
-
Repeat this process for the second side plate.
Only use a pry tool! The vibration motor wires are exposed and directly accessible from the side when opening. I attempted to open it with a small knife, expecting to be able to gently pry the clips open, accidentally sliced through my right motor’s wires.
If you have some Guitar picks laying around they work GREAT!
For some reason, the two closest hinges at the top of the two handle covers are extremely strong. I had to play around to get them off unlike several guides and video tutorials that, I don't know how, take them off without the slightest effort.
Controller wireless Xbox One Model 1708 -
-
-
Gently peel the battery label or punch a hole in the center of the sticker in the battery compartment to reveal the hidden screw.
-
Remove the five 9mm torx-9 security screws from the back of the controller.
Since mine is out of warranty I just broke out the security nib with a 2.0 standard bit. Then used a T8 torx.
-
-
-
-
Orient the controller so the front plate is facing up.
-
Lift the front cover off of the controller.
-
-
-
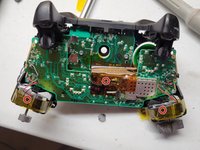
Turn the controller face down and gently lift the rear plate.
-
-
-
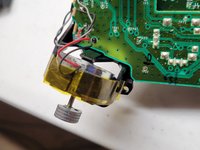
Tape the Rumbler/shock motors in place.
-
This will prevent the motors from falling out.
if you replace thumbsticks only, this step is NOT required and it is safer not to remove bottom cover, removing faceplate is sufficient to replace thumbsticks
-
-
-
Turn the device over and remove the directional pad by gently pulling it away from the controller.
It needs to be made a little clearer that the thin metal retaining ring needs to be unclipped before pulling on the D-pad. A small, flatbladed screwdriver did it nicely for me.
As mentioned above, clarification is needed that the metal ring is intended to lay on top of the DPad - you should remove it first when disassembling, and it should be installed after the DPad to hold the DPad down when re-assembling.
Additionally, the DPad is oriented so that the directional button without an extended tab on the end is on the bottom (down).
This step is not necessary if you are removing the top motherboard for replacing the joysticks as the D-pad is part of the bottom motherboard.
In the case of replacing the joysticks (adding in hall effect sensor sticks) I found it useful to desolder all the rumble motor wires before disconnecting top & bottom motherboards. -


To reassemble your device, follow these instructions in reverse order.
To reassemble your device, follow these instructions in reverse order.
Отменить: Я не выполнил это руководство.
22 человек успешно провели ремонт по этому руководству.
Команду

Cal Poly, Team S18-G3, Forte Fall 2017 Участник Cal Poly, Team S18-G3, Forte Fall 2017
CPSU-FORTE-F17S18G3
4 членов
Автор 34 руководств
7 Комментариев
Will one of the D-pads from the Xbox One controller model 1698 fit and work with the Xbox One-S controller model 1708. I have been looking all over the net for a replacement D-pad and other buttons like the RB, LB Bumper setup and I have had absolutely no luck finding replacement D-pads or other buttons specifically designed for the Xbox One-S controller. I would greatly appreciate your help.
My D-pad was not working properly so I dropped drops of alcohol and other cleaners to fix the issue since the screws inside my controller were stripped and I was unable to open it and at the beginning it worked but then It started failing again so I did it again and this time the left direction is dead. I sent it to be repaired and they told it couldn't be salvaged yet they repaired the thumbsticks just to force me to pay them.
The D-pad on our controller sticks. I disassembled the device and discovered one of the small metal pieces that are supposed to spring back after the button is pressed has been deformed. I will need new ones, but I don’t know what to call the part or where to get it, but I’m sure it’s pennies? Any suggestions? I’d add a photo if I could here.
Search for “Xbox One Controller Replacement D-Pad Button Metal Dome Conductive Film Sticker” on Amazon, NewEgg or Ebay. Should cost 5-10 bucks. Cheaper if you get it shipped from China, but takes forever.
I too have disassembled a controller to discover that this is the cause of the D-Pad not functioning on one side. I am however unsure of how to remove the damaged part as the guide only covers removing the D-Pad itself.
Incomplete guide making it useless and I am pretty sure someone else can do better
estou com um problema no meu controle. quando pressiono o D-Pad para esquerda ele vai para a esquerda e para cima, quando pressiono para cima ela vai para cima e para esquerda. Como posso resolver esse problema? qual peça tenho que trocar?