Перейти к основному содержанию

Xbox One Wireless Controller Trigger Rumble Motor Replacement

Выберете то, что вам нужно

  1. Xbox One Wireless Controller Trigger Rumble Motor Replacement, Battery Pack: шаг 1, изображение 1 из 1
    • Remove the battery pack cover.

    • Remove batteries.

  2. Xbox One Wireless Controller Trigger Rumble Motor Replacement, Side Handles: шаг 2, изображение 1 из 2 Xbox One Wireless Controller Trigger Rumble Motor Replacement, Side Handles: шаг 2, изображение 2 из 2
    • We recommend using a nylon spudger for this step. A metal spudger is shown.

    • Grip the controller firmly to remove the side handles, wedging a spudger into the seam between the front and handle plates.

    • Pry the side plate away from the front plate by moving the spudger back and forth. You will need to do this all the way around the side plate's seam.

  3. Xbox One Wireless Controller Trigger Rumble Motor Replacement, Screws: шаг 3, изображение 1 из 2 Xbox One Wireless Controller Trigger Rumble Motor Replacement, Screws: шаг 3, изображение 2 из 2
    • There is a hidden screw located in the middle of the controller behind the label.

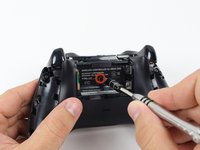
    • Use a screwdriver and punch a hole directly in the center of the label.

    • You may also lift the label if you do not want to puncture it.

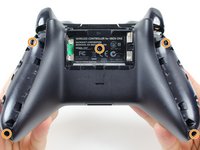
    • Remove the five 10mm screws located on the back of the controller using the TR8 Security Torx Screwdriver.

  4. Xbox One Wireless Controller Trigger Rumble Motor Replacement, Backplate: шаг 4, изображение 1 из 1
    • Remove the backplate.

  5. Xbox One Wireless Controller Trigger Rumble Motor Replacement, Faceplate: шаг 5, изображение 1 из 1
    • Remove the faceplate.

  6. Xbox One Wireless Controller Trigger Rumble Motor Replacement, Top Motherboard: шаг 6, изображение 1 из 2 Xbox One Wireless Controller Trigger Rumble Motor Replacement, Top Motherboard: шаг 6, изображение 2 из 2
    • You may let the rumble motors hang freely out of their sockets.

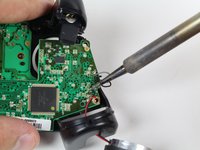
    • De-solder the soldered joints while holding the red and black wires down on the top motherboard.

    • De-solder the black and gray wires that are attached to the top motherboard.

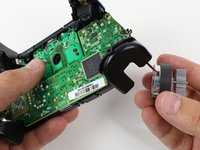
    • Remove the rumble motors and set them aside.

    • Be careful while using the soldering iron not to damage other components or hurt yourself.

    • For information on how to solder, click here.

  7. Xbox One Wireless Controller Trigger Rumble Motor Replacement: шаг 7, изображение 1 из 1
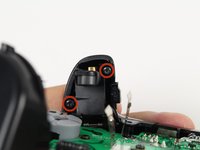
    • Unscrew the two 7mm T6 screws located near the rumble motor sockets.

  8. Xbox One Wireless Controller Trigger Rumble Motor Replacement: шаг 8, изображение 1 из 1
    • Firmly grip sides of motherboard near the middle.

    • Lift upwards while slightly wiggling the motherboard forward and backward.

    • Lifting the motherboard will require some force.

  9. Xbox One Wireless Controller Trigger Rumble Motor Replacement, Trigger Rumble Motors: шаг 9, изображение 1 из 1
    • Remove the yellow tape holding the wires in place on the front of the controller.

  10. Xbox One Wireless Controller Trigger Rumble Motor Replacement: шаг 10, изображение 1 из 3 Xbox One Wireless Controller Trigger Rumble Motor Replacement: шаг 10, изображение 2 из 3 Xbox One Wireless Controller Trigger Rumble Motor Replacement: шаг 10, изображение 3 из 3
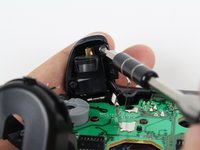
    • Unscrew the two 7mm T6 Hex screws located on underside the triggers.

  11. Xbox One Wireless Controller Trigger Rumble Motor Replacement: шаг 11, изображение 1 из 1
    • Remove the trigger covers.

  12. Xbox One Wireless Controller Trigger Rumble Motor Replacement: шаг 12, изображение 1 из 1
    • Desolder the wires from the motherboard.

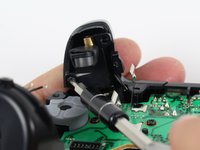
    • Remove the rumble motors from its socket and pull the wire with it.

Заключение

To reassemble your device, follow these instructions in reverse order.

19 участников успешно повторили данное руководство.

Tommy

Участник с: 01/22/15

1 909 Репутация

Автор 2 руководств

Команда

Cal Poly, Team 20-15, Maness Winter 2015 Участник Cal Poly, Team 20-15, Maness Winter 2015

CPSU-MANESS-W15S20G15

5 членов

Автор 50 руководств

10 Комментариев

After a drop onto tile flooring, the side clip of the outer handle snapped and got lodged into the trigger, causing it to only pull to 80% and go no further. Thanks for this breakdown.

solofrom303 - Ответить

My right trigger won't work on gta 5 and on other games it works

Devean Velasquez - Ответить

Very strange, Devean. That sounds more like a software problem than a hardware problem, if I had to guess. If you haven't already, maybe check to make sure that your control setup is correct.

Alternatively, see if you can find any other games that your RT doesn't work for, and see what they have in common with GTA - it might be that the trigger isn't registering as fully depressed, or only ever registering when fully depressed.

Liam Gow -

Trying to replace bumpers assembly and green sync button fell out can not figure how to put it back in.

Anthony Bembenek - Ответить

Do you know how to remove the plastic plate where the trigger rumble sits?

Angel Marban - Ответить

Добавить комментарий

Просмотр статистики:

За последние 24часов: 8

За последние 7 дней: 54

За последние 30 дней: 211

За всё время: 60,056