Эта версия возможно содержит некорректные исправления. Переключить на последнюю проверенную версию.
Выберете то, что вам нужно
-
Этот шаг не переведен. Помогите перевести
-
Before beginning any work on your iMac: Unplug the computer and press and hold the power button for ten seconds to discharge the power supply's capacitors.
-
-
Этот шаг не переведен. Помогите перевести
-
Starting on the left of the display, near the power button, insert the iMac Opening Tool into the gap between the glass panel and the rear enclosure.
-
-
Этот шаг не переведен. Помогите перевести
-
Use the tool like a pizza cutter—roll it along through the gap, and it will cut the foam adhesive through the center.
-
Run the tool up along the left side of the display.
-
-
Этот шаг не переведен. Помогите перевести
-
Finish pushing the opening tool to the bottom of the right side of the display.
-
-
Этот шаг не переведен. Помогите перевести
-
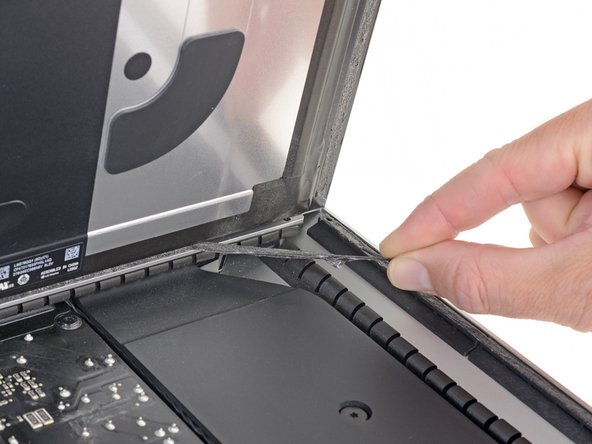
Starting from the top right corner of the iMac, wedge a plastic card between the display and frame.
-
-
-
Этот шаг не переведен. Помогите перевести
-
Gently twist the plastic card sideways to create a gap between the display and frame.
-
Move slowly and be careful not to stress the display glass too much—you only need to make a gap of about 1/4".
-
-
Этот шаг не переведен. Помогите перевести
-
Slide the card toward the center of the display to cut any of the remaining adhesive along the top right corner of the iMac.
-
-
Этот шаг не переведен. Помогите перевести
-
Wedge the plastic card into the top right corner once again, and leave it there to prevent the adhesive from resticking.
-
-
Этот шаг не переведен. Помогите перевести
-
Insert a second plastic card into the gap between the display and frame near the top left corner of the iMac.
-
-
Этот шаг не переведен. Помогите перевести
-
Gently twist the card upward, slightly increasing the space between the display and frame.
-
-
Этот шаг не переведен. Помогите перевести
-
Slide the plastic card toward the center, again stopping just before the iSight camera.
-
-
Этот шаг не переведен. Помогите перевести
-
With both plastic cards inserted as shown near the corners, gently twist the cards sideways to increase the gap between display and case.
-
Begin to lift the top of the display up from the frame.
-
-
Этот шаг не переведен. Помогите перевести
-
Hold the display with one hand while using your other hand to unplug the display power cable.
-
-
Этот шаг не переведен. Помогите перевести
-
Continuing to support the display with one hand, flip up the metal retaining bracket on the display data cable.
-
Carefully pull the display data cable from its socket on the logic board.
-
-
Этот шаг не переведен. Помогите перевести
-
Grasp the small tab at the end of one of the bottom edge display adhesive strips and pull the adhesive toward the top of the iMac to remove it.
-
Repeat this step with the other adhesive strip and remove it.
-
-
Этот шаг не переведен. Помогите перевести
-
Lift the display up from the frame and remove it from the iMac.
-
It may be necessary to slowly lift from one side to peel against the remaining adhesive.
-
-
Этот шаг не переведен. Помогите перевести
-
Remove the following T10 Torx screws securing the hard drive brackets to the iMac:
-
Two 21 mm screws
-
One 9 mm screw
-
One 27 mm screw
-
-
Этот шаг не переведен. Помогите перевести
-
Remove the left and right hard drive brackets from the iMac.
-
-
Этот шаг не переведен. Помогите перевести
-
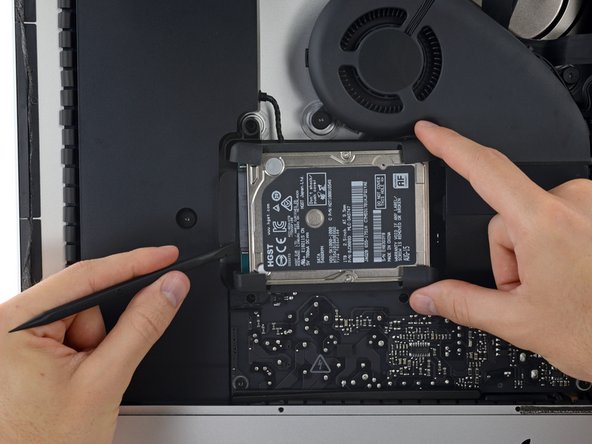
Lift the hard drive from the edge nearest the logic board and pull it slightly out of its recess.
-
-
Этот шаг не переведен. Помогите перевести
-
Use a spudger to disconnect the single SATA cable by prying it gently away from the hard drive.
-
Remove the hard drive assembly from the iMac.
-
-
Этот шаг не переведен. Помогите перевести
-
Peel the rubber bumper off one side of the hard drive.
-
Repeat for the other side.
-


Отменить: Я не выполнил это руководство.
82 участников успешно повторили данное руководство.

35 Комментариев
What type of SATA SSDs are compatible with iMac? I don't want to buy the kit because I have the necessary tools, but I'd like to know which brand of SSDs work the best.
>Will take any SATA SSD.
>On a mac with a fusion drive, it just removes the spinning drive from the mix, leaving you with a separate 28gig or 128 gig SSD drive that will appear on your desktop along with the newly installed SATA SSD.
>NO TEMPERATURE monitor is needed. This generation of iMacs has done away with the propietary temp sensor. It just relies on S.M.A.R.T. tech now.
Does the screen stick back on with the same adhesive or do you have to reapply new adhesive? If yes, does it come in the kit?
You have to apply new adhesive. Go slow and careful, it’s really not hard at all.