Перейти к основному содержанию

iPad 2 Touch Screen Replacement Video tutorial

Архивированное руководство
Это руководство сохранено для исторических целей. Используйте его обновлённую версию, чтобы выполнить ремонт.

Выберете то, что вам нужно

Видео обзор

  1. iPad 2 Touch Screen Replacement Video tutorial, Front Panel Assembly: шаг 1, изображение 1 из 2 iPad 2 Touch Screen Replacement Video tutorial, Front Panel Assembly: шаг 1, изображение 2 из 2
    • Use the edge of a plastic opening tool to carefully flip up the retaining flaps on the two digitizer ribbon cable ZIF sockets.

    • Be sure you are prying up on the hinged retaining flaps, not the sockets themselves.

    • The retaining flaps are highlighted in red in the second picture.

  2. iPad 2 Touch Screen Replacement Video tutorial: шаг 2, изображение 1 из 2 iPad 2 Touch Screen Replacement Video tutorial: шаг 2, изображение 2 из 2
    • Use the edge of a plastic opening tool to peel the digitizer cable off the shields on the logic board.

    • Carefully pull the digitizer cable off the adhesive securing it to the side of the rear case.

  3. iPad 2 Touch Screen Replacement Video tutorial: шаг 3, изображение 1 из 1
    • Pull the digitizer ribbon cable straight out of its two sockets on the logic board.

  4. iPad 2 Touch Screen Replacement Video tutorial: шаг 4, изображение 1 из 2 iPad 2 Touch Screen Replacement Video tutorial: шаг 4, изображение 2 из 2
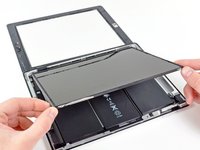
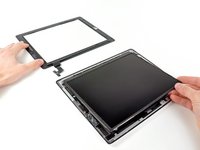
    • In order to remove the front panel assembly, the ribbon cable needs to slide out between the case and the LCD. You'll need to move the LCD to make some room.

    • Be very careful when moving the LCD, and do not attempt to remove it from the iPad—its cable will remain connected while it is rotated over.

    • Lift the LCD from its long edge farthest from the digitizer cable and gently flip it toward the rear case—like closing a book.

    • While holding the LCD up, gently slide the front panel away from the iPad. Be careful not to snag the digitizer cable on the rear case or LCD.

    • Set the LCD back into the body for safekeeping.

Заключение

To reassemble your device, follow these instructions in reverse order.

4 участников успешно повторили данное руководство.

ZFix

Участник с: 12/09/13

191 182 Репутация

Автор 330 руководств

Команда

Master Techs Участник Master Techs

Community

322 членов

Автор 2 519 руководств

Один комментарий

We replaced the screen successfully and it turns on all looks beautiful except the touch screen isn’t working at all—any thoughts? We are beginners

shelley fiedler - Ответить

Добавить комментарий

Просмотр статистики:

За последние 24часов: 0

За последние 7 дней: 0

За последние 30 дней: 1

За всё время: 4,465