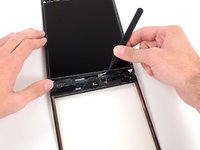
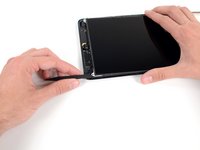
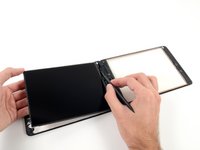
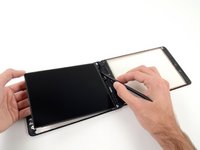
Перейти к основному содержанию

iPad Mini CDMA LCD Assembly Replacement

Абсолютно необходимое руководство
Это руководство предназначено только для использования в качестве обязательного условия для других руководств. Оно не полностью само по себе.

Выберете то, что вам нужно

  1. iPad Mini CDMA LCD Assembly Replacement, LCD Assembly: шаг 1, изображение 1 из 3 iPad Mini CDMA LCD Assembly Replacement, LCD Assembly: шаг 1, изображение 2 из 3 iPad Mini CDMA LCD Assembly Replacement, LCD Assembly: шаг 1, изображение 3 из 3
    • Small pieces of foam tape cover the top and bottom right-hand screws securing the LCD to the rear case.

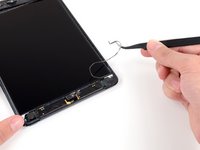
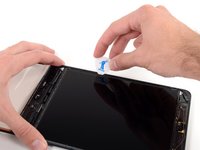
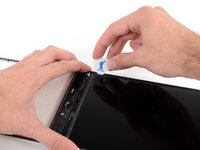
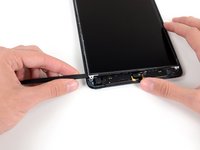
    • Use tweezers to peel up and remove the rectangular piece of foam tape covering the top right LCD screw.

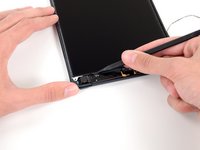
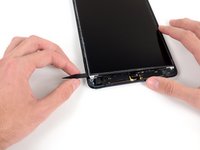
    • Remove the triangular tape covering the lower right LCD screw.

  2. iPad Mini CDMA LCD Assembly Replacement: шаг 2, изображение 1 из 2 iPad Mini CDMA LCD Assembly Replacement: шаг 2, изображение 2 из 2
    • The top left LCD screw may be covered by adhesive tape from the front panel.

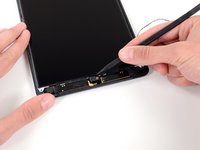
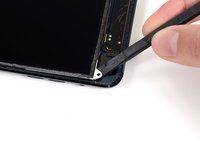
    • If the tape is present, use the flat end of a spudger to pry the tape up and away, exposing the LCD screw beneath.

  3. iPad Mini CDMA LCD Assembly Replacement: шаг 3, изображение 1 из 1
    • Remove the four 3.9 mm Phillips #000 screws securing the LCD to the rear case.

  4. iPad Mini CDMA LCD Assembly Replacement: шаг 4, изображение 1 из 2 iPad Mini CDMA LCD Assembly Replacement: шаг 4, изображение 2 из 2
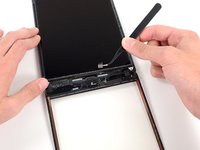
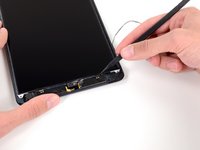
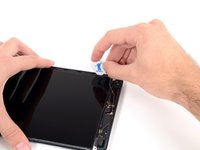
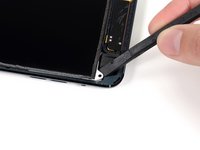
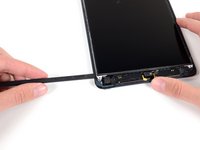
    • Use a pair of tweezers to peel up the small piece of tape connecting the LCD frame to the right speaker.

  5. iPad Mini CDMA LCD Assembly Replacement: шаг 5, изображение 1 из 3 iPad Mini CDMA LCD Assembly Replacement: шаг 5, изображение 2 из 3 iPad Mini CDMA LCD Assembly Replacement: шаг 5, изображение 3 из 3
    • A thin strip of foam tape on the LCD frame is covering a piece of tape connecting the LCD to the panel beneath it. To proceed, you'll have to break and peel up some of the foam tape to expose the tape hidden beneath.

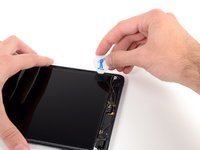
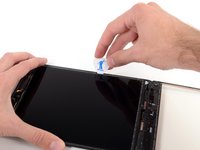
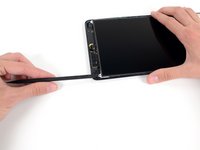
    • Use a pair of thin tweezers to pull up the top of the foam tape surrounding the LCD.

    • Be careful not to touch the LCD with the tweezers, as you may damage the display.

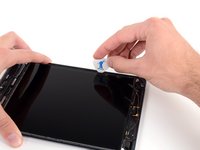
    • Use the tweezers to peel the foam tape up to expose the top of the LCD.

  6. iPad Mini CDMA LCD Assembly Replacement: шаг 6, изображение 1 из 3 iPad Mini CDMA LCD Assembly Replacement: шаг 6, изображение 2 из 3 iPad Mini CDMA LCD Assembly Replacement: шаг 6, изображение 3 из 3
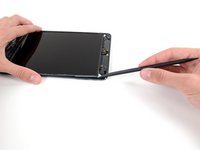
    • Insert the tip of a spudger between the LCD frame and the tape on the top of the LCD.

    • Slide the spudger along the space between the LCD frame and tape, separating the tape from the LCD frame.

  7. iPad Mini CDMA LCD Assembly Replacement: шаг 7, изображение 1 из 2 iPad Mini CDMA LCD Assembly Replacement: шаг 7, изображение 2 из 2
    • The LCD is glued to the metal LCD shield plate behind it along the top, left, and right edges. In order to safely loosen this adhesive, you'll be using a guitar pick to shift the LCD a couple of millimeters left and right several times.

    • Insert a guitar pick into the gap between the LCD and rear case, near the top of the left side of the LCD.

    • Bend the pick slightly away from the iPad, just enough to spread the gap between the LCD and rear case.

  8. iPad Mini CDMA LCD Assembly Replacement: шаг 8, изображение 1 из 3 iPad Mini CDMA LCD Assembly Replacement: шаг 8, изображение 2 из 3 iPad Mini CDMA LCD Assembly Replacement: шаг 8, изображение 3 из 3
    • Insert the guitar pick into three more locations down the left side of the LCD and bend it over in each location, to slide the LCD over to the right side of the rear case.

  9. iPad Mini CDMA LCD Assembly Replacement: шаг 9, изображение 1 из 3 iPad Mini CDMA LCD Assembly Replacement: шаг 9, изображение 2 из 3 iPad Mini CDMA LCD Assembly Replacement: шаг 9, изображение 3 из 3
    • Now switch to the right side of the LCD, and pry with the guitar pick in several places along the side to shift the LCD back to the left.

    • Repeat this and the previous step a few times, until the LCD is easily moved left and right.

  10. iPad Mini CDMA LCD Assembly Replacement: шаг 10, изображение 1 из 3 iPad Mini CDMA LCD Assembly Replacement: шаг 10, изображение 2 из 3 iPad Mini CDMA LCD Assembly Replacement: шаг 10, изображение 3 из 3
    • In the next few steps, you'll be sliding a spudger between the LCD and the metal backing plate to fully separate the LCD from the adhesive beneath.

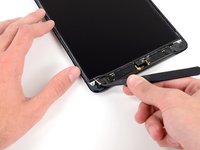
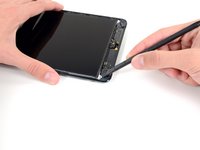
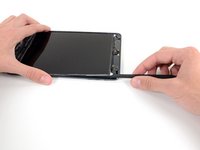
    • Insert the flat end of a spudger between the LCD frame and the metal backing plate.

    • Be sure to get the spudger between the LCD frame and backing plate, and not beneath the plate. Prying up on the plate will damage it, because it is screwed down to the rear case beneath the LCD.

  11. iPad Mini CDMA LCD Assembly Replacement: шаг 11, изображение 1 из 3 iPad Mini CDMA LCD Assembly Replacement: шаг 11, изображение 2 из 3 iPad Mini CDMA LCD Assembly Replacement: шаг 11, изображение 3 из 3
    • Starting at the top right of the device, slide the spudger in between the LCD frame and metal backing plate, which will separate the adhesive as you push.

    • The goal is to separate the adhesive, not to pry the LCD up, so keep the pointed tip of the spudger as low as possible to prevent bending the LCD.

    • If inserting the spudger causes the corner of the LCD to bend up, repeat the steps with the guitar pick to further loosen the adhesive.

  12. iPad Mini CDMA LCD Assembly Replacement: шаг 12, изображение 1 из 3 iPad Mini CDMA LCD Assembly Replacement: шаг 12, изображение 2 из 3 iPad Mini CDMA LCD Assembly Replacement: шаг 12, изображение 3 из 3
    • Repeat the previous procedure along the top of the LCD.

    • Insert the flat end of the spudger between the LCD frame and metal backing plate and gently push the spudger in across the top of the device, separating adhesive.

  13. iPad Mini CDMA LCD Assembly Replacement: шаг 13, изображение 1 из 3 iPad Mini CDMA LCD Assembly Replacement: шаг 13, изображение 2 из 3 iPad Mini CDMA LCD Assembly Replacement: шаг 13, изображение 3 из 3
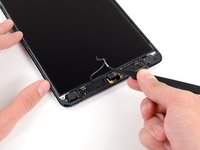
    • Continue with the left side of the LCD: insert the flat end of the spudger between the LCD and shield plate and insert the spudger as far as it will go.

    • At this point the LCD should be loosened from the adhesive holding it. If it is not, re-insert the spudger on the right side or top to fully free the LCD.

  14. iPad Mini CDMA LCD Assembly Replacement: шаг 14, изображение 1 из 1
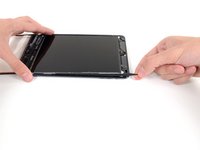
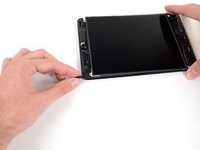
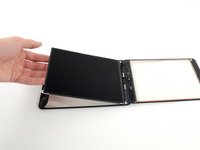
    • Lift the LCD up a couple inches from the rear case to ensure it's free from the adhesive.

  15. iPad Mini CDMA LCD Assembly Replacement: шаг 15, изображение 1 из 2 iPad Mini CDMA LCD Assembly Replacement: шаг 15, изображение 2 из 2
    • Two wide strips of tape connect the LCD to the speakers.

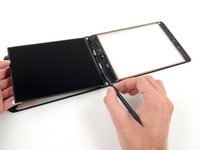
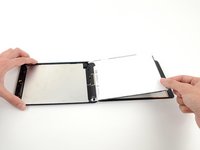
    • While holding the LCD with one hand, Insert the flat end of a spudger into the gap between this tape and the left speaker.

    • Gently pull the LCD away from the speakers while rotating the spudger outward to separate the tape from the speaker.

  16. iPad Mini CDMA LCD Assembly Replacement: шаг 16, изображение 1 из 2 iPad Mini CDMA LCD Assembly Replacement: шаг 16, изображение 2 из 2
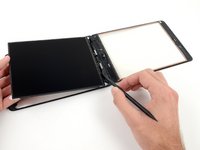
    • Insert the flat end of the spudger into the gap between the right speaker and the LCD tape.

    • While pulling the LCD away from the speakers, rotate the spudger outward, widening the gap and releasing the tape from the speaker.

  17. iPad Mini CDMA LCD Assembly Replacement: шаг 17, изображение 1 из 2 iPad Mini CDMA LCD Assembly Replacement: шаг 17, изображение 2 из 2
    • Flip the LCD over and rest it on top of the front panel glass.

    • Do not attempt to remove the LCD from the iPad, as it is still connected by its data cable.

Заключение

To reassemble your device, follow these instructions in reverse order.

Еще один человек закончил это руководство.

Andrew Optimus Goldheart

Участник с: 10/17/09

502 109 Репутация

Автор 407 руководств

Команда

iFixit Участник iFixit

Staff

135 членов

Автор 16 476 руководств

0 Комментариев

Добавить комментарий

Просмотр статистики:

За последние 24часов: 0

За последние 7 дней: 0

За последние 30 дней: 2

За всё время: 345