Перейти к основному содержанию

iPad Pro 9.7" Opening Display Assembly

Абсолютно необходимое руководство
Это руководство предназначено только для использования в качестве обязательного условия для других руководств. Оно не полностью само по себе.

Выберете то, что вам нужно

  1. iPad Pro 9.7" Opening Display Assembly, Slice through the remaining adhesive: шаг 1, изображение 1 из 3 iPad Pro 9.7" Opening Display Assembly, Slice through the remaining adhesive: шаг 1, изображение 2 из 3 iPad Pro 9.7" Opening Display Assembly, Slice through the remaining adhesive: шаг 1, изображение 3 из 3
    • Use picks to ensure most of the adhesive has been cut through on the top, left, and bottom sides.

    • Twist the top and bottom picks to separate the display assembly from the rear case.

    • Do not attempt to remove the display—it is still attached to the rear case.

  2. iPad Pro 9.7" Opening Display Assembly: шаг 2, изображение 1 из 3 iPad Pro 9.7" Opening Display Assembly: шаг 2, изображение 2 из 3 iPad Pro 9.7" Opening Display Assembly: шаг 2, изображение 3 из 3
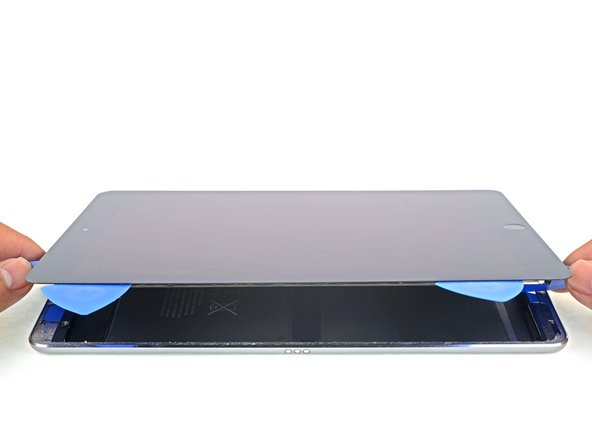
    • Swing the display assembly towards the right of the case, using the right edge as a hinge.

    • As you move the display assembly, make sure that the display ribbon cable is not being stressed.

    • Continue swinging the display assembly until it lays flat next to the rear case.

Заключение

To reassemble your device, follow these instructions in reverse order.

Arthur Shi

Участник с: 01/03/18

249 876 Репутация

Автор 503 руководств

Команда

iFixit Участник iFixit

Staff

135 членов

Автор 16 732 руководств

0 Комментариев

Добавить комментарий

Просмотр статистики:

За последние 24часов: 0

За последние 7 дней: 0

За последние 30 дней: 0

За всё время: 75