Перейти к основному содержанию
/
Мой рабочий стол для верстки руководств

Получите быстрый доступ к руководствам, запчастям и ответам касательно ваших устройств

iPhone 15 Pro Max Screen Opening

iPhone 15 Pro Max Screen Opening

Clay Eickemeyer

Clay Eickemeyer

Последнее обновление August 12, 2024

Нет оценки
Средне
Абсолютно необходимое руководство
Это руководство предназначено только для использования в качестве обязательного условия для других руководств. Оно не полностью само по себе.

This guide demonstrates how to open your iPhone 15 Pro Max.

  1. iPhone 15 Pro Max Screen Opening, Secure the back glass: шаг 1, изображение 1 из 3 iPhone 15 Pro Max Screen Opening, Secure the back glass: шаг 1, изображение 2 из 3 iPhone 15 Pro Max Screen Opening, Secure the back glass: шаг 1, изображение 3 из 3
    Инструмент, используемый на этом этапе:
    Clampy - Anti-Clamp
    $24.95
    • The next four steps demonstrate the Anti-Clamp, a tool we designed to make the opening procedure easier. If you aren't using the Anti-Clamp, skip down four steps for an alternate method.

    • For complete instructions on how to use the Anti-Clamp, check out this guide.

    • The Anti-Clamp applies suction to both the screen and the back glass. To open the screen, you need to secure the back glass with tape. You can also check out the full instructions on how to use this tape.

    • Cut two strips of tape, apply them along the long edges of the phone, and fold them over the back glass to secure it.

  2. iPhone 15 Pro Max Screen Opening, Secure an Anti-Clamp: шаг 2, изображение 1 из 3 iPhone 15 Pro Max Screen Opening, Secure an Anti-Clamp: шаг 2, изображение 2 из 3 iPhone 15 Pro Max Screen Opening, Secure an Anti-Clamp: шаг 2, изображение 3 из 3
    • Pull the Anti-Clamp's blue handle backward to unlock the arms.

    • With the screen facing up, slide the arms over the left edge of your phone, with one suction cup on the screen and the other on the back glass. Center the suction cups near the bottom edge.

    • Support your phone so it rests level while between the Anti-Clamp's arms—a small box works well.

    • Squeeze the cups together to create suction.

    • If you find that the surface of your iPhone is too slippery for the Anti-Clamp to hold onto, use tape to create a grippier surface.

  3. iPhone 15 Pro Max Screen Opening, Create a gap under the screen: шаг 3, изображение 1 из 3 iPhone 15 Pro Max Screen Opening, Create a gap under the screen: шаг 3, изображение 2 из 3 iPhone 15 Pro Max Screen Opening, Create a gap under the screen: шаг 3, изображение 3 из 3
    • Pull the blue handle forward to lock the arms.

    • Turn the handle one full turn (360 degrees) or until the cups start to stretch.

    • As the cups stretch, make sure they stay vertically aligned with each other. If they tend to slip, remove the Anti-Clamp and apply tape for the cups to stick to.

    • If you don't have tape, you may use your hands to clean the suction cups and warm them up to help them stick.

  4. iPhone 15 Pro Max Screen Opening, Insert an opening pick: шаг 4, изображение 1 из 3 iPhone 15 Pro Max Screen Opening, Insert an opening pick: шаг 4, изображение 2 из 3 iPhone 15 Pro Max Screen Opening, Insert an opening pick: шаг 4, изображение 3 из 3
    • Use a hair dryer or heat gun to heat the bottom edge of the screen until it's hot to the touch.

    • Be careful not to heat the phone hotter than this—the battery is susceptible to heat damage.

    • Wait up to a minute for the adhesive to separate and a gap to form between the screen and the frame.

    • If a gap doesn't appear after one minute, apply more heat and rotate the handle a quarter turn. Let the Anti-Clamp and time do the work for you.

    • Insert an opening pick into the gap.

    • Remove the Anti-Clamp using the pull tabs on the suction cups.

    • Skip the next two steps.

  5. iPhone 15 Pro Max Screen Opening, Heat the bottom edge: шаг 5, изображение 1 из 1
    • Use a hair dryer or heat gun to heat the bottom edge of the screen until it's hot to the touch.

    • Be careful not to heat the phone hotter than this—the battery is susceptible to heat damage.

  6. iPhone 15 Pro Max Screen Opening, Insert an opening pick: шаг 6, изображение 1 из 3 iPhone 15 Pro Max Screen Opening, Insert an opening pick: шаг 6, изображение 2 из 3 iPhone 15 Pro Max Screen Opening, Insert an opening pick: шаг 6, изображение 3 из 3
    • Apply a suction handle to the bottom edge of the screen.

    • Pull up on the handle with a strong, steady force to create a gap between the screen and the frame.

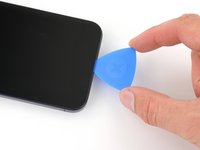
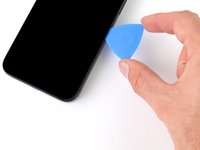
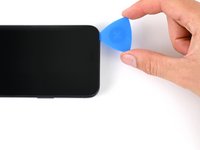
    • Insert the tip of an opening pick into the gap.

  7. iPhone 15 Pro Max Screen Opening, Screen information: шаг 7, изображение 1 из 1
    • As you slice the adhesive securing the screen in the next steps, be careful of the following areas:

    • There are two delicate cables connecting the screen to the phone: one just above the action button, and the other near the middle of the left edge.

    • There are multiple spring contacts around the perimeter of the phone. Be extra careful not to insert your pick deeper than suggested in these locations to avoid bending the contacts.

  8. iPhone 15 Pro Max Screen Opening, Separate the bottom edge adhesive: шаг 8, изображение 1 из 3 iPhone 15 Pro Max Screen Opening, Separate the bottom edge adhesive: шаг 8, изображение 2 из 3 iPhone 15 Pro Max Screen Opening, Separate the bottom edge adhesive: шаг 8, изображение 3 из 3
    • Don't insert your opening pick deeper than 3 mm along the bottom edge.

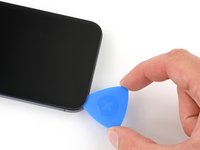
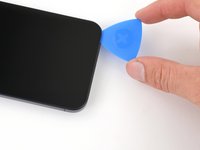
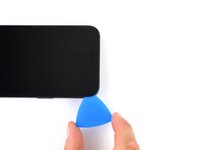
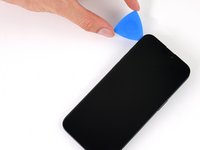
    • Slide your pick back and forth along the bottom edge to separate the adhesive.

    • Leave your pick inserted in the bottom right corner to prevent the adhesive from re-sealing.

  9. iPhone 15 Pro Max Screen Opening, Heat the right edge: шаг 9, изображение 1 из 1
    • Heat the right edge of the screen until it's hot to the touch.

  10. iPhone 15 Pro Max Screen Opening, Position the opening pick: шаг 10, изображение 1 из 3 iPhone 15 Pro Max Screen Opening, Position the opening pick: шаг 10, изображение 2 из 3 iPhone 15 Pro Max Screen Opening, Position the opening pick: шаг 10, изображение 3 из 3
    • Don't insert your pick deeper than 5 mm along the right edge.

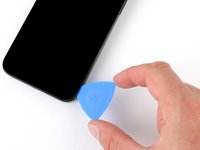
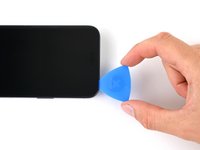
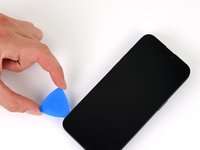
    • Slide your pick around the bottom right corner of the screen and toward the power button until you feel a hard stop at a clip securing the screen.

    • Rotate your pick so the flat edge is under the screen.

  11. iPhone 15 Pro Max Screen Opening, Release the right clip: шаг 11, изображение 1 из 3 iPhone 15 Pro Max Screen Opening, Release the right clip: шаг 11, изображение 2 из 3 iPhone 15 Pro Max Screen Opening, Release the right clip: шаг 11, изображение 3 из 3
    • Twist the pick to increase the gap between the screen and the frame until the right clip releases.

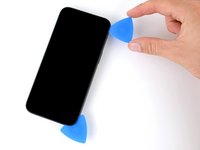
    • Insert a second opening pick to the right of the first pick.

  12. iPhone 15 Pro Max Screen Opening, Separate the right edge adhesive: шаг 12, изображение 1 из 3 iPhone 15 Pro Max Screen Opening, Separate the right edge adhesive: шаг 12, изображение 2 из 3 iPhone 15 Pro Max Screen Opening, Separate the right edge adhesive: шаг 12, изображение 3 из 3
    • Slide the first pick back to the bottom right corner of the screen.

    • Slide the second pick to the top right corner of the screen to separate the adhesive.

    • Leave these picks inserted to prevent the adhesive from resealing.

  13. iPhone 15 Pro Max Screen Opening, Heat the top edge: шаг 13, изображение 1 из 1
    • Heat the top edge of the screen until it's hot to the touch.

  14. iPhone 15 Pro Max Screen Opening, Separate the top edge adhesive: шаг 14, изображение 1 из 3 iPhone 15 Pro Max Screen Opening, Separate the top edge adhesive: шаг 14, изображение 2 из 3 iPhone 15 Pro Max Screen Opening, Separate the top edge adhesive: шаг 14, изображение 3 из 3
    • Don't insert your pick deeper than 3 mm along the top edge.

    • Slide your pick around the top right corner and along the top edge to release the two clips and adhesive securing it.

  15. iPhone 15 Pro Max Screen Opening, Heat the left edge: шаг 15, изображение 1 из 1
    • Heat the left edge of the screen until it's hot to the touch.

  16. iPhone 15 Pro Max Screen Opening, Separate the left edge adhesive: шаг 16, изображение 1 из 3 iPhone 15 Pro Max Screen Opening, Separate the left edge adhesive: шаг 16, изображение 2 из 3 iPhone 15 Pro Max Screen Opening, Separate the left edge adhesive: шаг 16, изображение 3 из 3
    • Don't insert your pick deeper than 2 mm along the left edge to avoid the two cables connecting the screen to the phone.

    • Rotate your pick around the top left corner of the screen.

    • Slide your pick to the bottom left corner of the screen to separate the adhesive.

Заключение

To reassemble your device, follow these instructions in reverse order.

Clay Eickemeyer

Участник с: 09/19/22

81 290 Репутация

Автор 455 руководств

Команду

Guide Team Участник Guide Team

Staff

9 членов

Автор 11 365 руководств

0 Комментариев

Добавить комментарий

Статистика просмотров:

За последние 24 час(ов): 0

За последние 7 дней: 10

За последние 30 дней: 15

За всё время: 58