Введение
The click wheel receives the feedback of your fingers and transmits it to the logic board.
Выберете то, что вам нужно
-
-
Insert a plastic opening tool into the seam between the front and back of the iPod.
right here, you should insert a picture of the little clips on the rails inside the back of the ipod, so that we can visualise what we're trying to undo, & get a better idea of which way to bend, which way NOT to bend the tools.
Good point! There is such a picture showing the location of at least four (4) clips on each side of the case here:
https://d3nevzfk7ii3be.cloudfront.net/ig...
in the Step 4 of the “iPod Classic Teardown”: iPod Classic Teardown
As mentioned below by Kevin M there are 3 more (1 on top and 2 on the bottom sides).
LDS -
Actually it’s a wayyyyyyy easier using the iFlash opening tool and following the pdf of this guy (youtube link)
Actually it’s wayyyyyy easier using this tool as mentioned by this awesome guy on his video.
That video is excellent. He has a PDF you print which is the same size as the iPod so you know exactly where the 11 clips are (1 on top, 2 on bottom, and 4 more along each side).
Appreciated the earlier comment about using guitar picks. It is very easy to open the iPod with guitar picks. It still requires patience sometimes, but no noticeable damage to the iPod. Went to the local music store, they stocked Fender picks. Fender "Thin" work best for me for starters, but sometimes Fender "Medium" are needed. (Go to your local music store-- very cheap!) I have opened (and repaired successfully!) four different iPods just using guitar picks.
-
-
-
Insert another plastic opening tool into the seam between the front and back of the iPod, leaving at least 1.5 inches of space between the two tools.
-
-
-
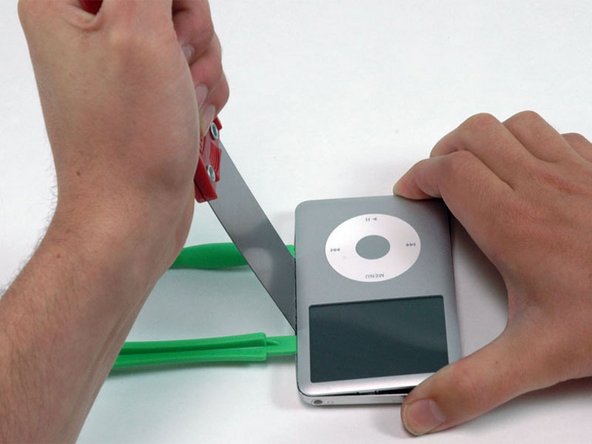
At an angle, carefully insert a putty knife about 1/8 inch into the seam between the two opening tools.
-
Once the putty knife has cleared the lip of the rear panel, pivot the putty knife so that it is vertical, and carefully (but firmly) wiggle it straight down into the gap between the opening tools.
I tried this on the first iPod I was trying to fix. This method really messes up the sides of the iPod. Go back and read earlier comments about using guitar picks or other tools!
I tried this on the first iPod I was trying to fix. This method really messes up the sides of the iPod. Go back and read earlier comments about using guitar picks or other tools!
-
-
-
Push with your fingers on the rear panel behind the putty knife to minimize bending. Slowly flex the putty knife, as shown in the picture, to ensure that most of the metal tabs on this side of the iPod are disengaged.
I tried this on the first iPod I was trying to fix. This method really messes up the sides of the iPod. Go back and read earlier comments about using guitar picks or other tools!
-
-
-
Remove the putty knife from the iPod and reinsert it closer to the corner of the iPod, using the same wiggle method as before.
-
-
-
Near the headphone jack, insert a plastic opening tool into the seam between the front and back of the iPod.
-
-
-
Near the center of the display, carefully insert a metal spudger into the gap created by the plastic opening tool.
-
Using the metal spudger, disengage the single clip on the top of the iPod.
-
-
-
Near the other top corner, insert a plastic opening tool into the seam between the front and back of the iPod
-
-
-
On the other side, insert a plastic opening tool into the seam between the front and back of the iPod.
-
-
-
Remove the opening tool from the top corner and insert it into the seam between the front and back of the iPod, leaving at least 1.5 inches of space between the two tools (as done on the other side).
-
-
-
At an angle, carefully insert a putty knife about 1/8 inch into the seam between the two opening tools.
-
Once the putty knife has cleared the lip of the rear panel, angle the putty knife so that it is vertical, and carefully (but firmly) wiggle it straight down into the iPod via the gap between the plastic opening tools.
-
Push with your fingers on the rear panel behind the putty knife to minimize bending. Ever so slightly flex the putty knife to ensure that most of the metal tabs on this side of the iPod are disengaged.
-
-
-
-
Gently wiggle the metal spudger down so that it is all the way in the rear panel.
-
-
-
Continue to push up on the front panel with the metal spudger until the metal clip releases.
-
-
-
Grasp the front panel assembly with one hand and the rear panel with the other.
-
Gently (GENTLY) disengage the remaining clips on the rear panel by pulling the tops of the front and rear panels away from each other (think of the bottom of the iPod as a hinge), taking great care not to damage the ribbon cables holding the two halves together.
-
-
-
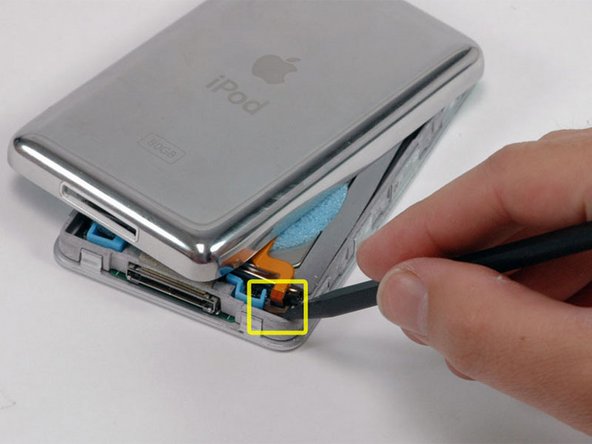
Use a spudger to slide up the connector holding the orange battery ribbon in place. You only need to lift the locking bar up about 2 mm to free the cable.
-
Slide the orange battery ribbon out of its connector.
If the small battery black/white connector pumps out of the ipod when you are trying to unplug the cable...REMEMBER the "U" black shape is meant to be just in the same direction as the blue plastic "U" beside it. If you plug it back in the wrong way it will display "Charging please wait..." forever!.
:)
How did you get the black battery piece to stay in after it popped out?
I knocked this little bit out too! Any tips to get it back in? Soldering?
This step is what ultimately destroyed my iPod. A caution to be very careful would be good.
I got the whole black white thing disconnected from the pins. After a lot of struggle I was able to get it back in, but I couldn’t get the black locking part to go up on its own. after many tries and some tries to get it in when the black thing is closed, i tore out the pins that were connected to the panel. can’t get it back on so it isn’t connected to the battery…
Now i have a perfect iPod with a new harddrive but I can’t use it.
Please add a red caution sentence because I’m pretty sure that if i had known what I had to do I would’ve been more careful and I would now have a functioning iPod.
Nonetheless, great guide! without this I wouldn’t even have tried and the harddisk came from another broken down iPod classic so it’s not that I lost money.
I got the whole battery clamp connector (black and white) all out too… So angry about it! I thought that the white part should be disconnected too, like former iPod models. Be careful, you only have to release the BLACK locking bar! One more photo with a zoom on the battery connector could have been useful… Great guide anyway :-)!
battery connector fix
Hello! Trying to identify the problem on my Ipod. I think I'm not qualified to open it and do the fixing. Do you know a shop or someone in Paris that would try it? Apple says they are not qualified anymore.
Thanks in advance!
OK, you have to be really careful with this step! If you pry too hard, the little plastic clamp that holds the cable will come up too far and break, and then you are ****ed. It only needs to be raised millimeter or two, but at first, it doesn't move at aIl, so it is easy to pry upwards too hard. I have found that using angled tweezers while VERY GENTLY prying upwards on both sides works best. But still, BE VERY CAREFUL AND GENTLE! It's also easy not to even know that it is up all the way! So every now and then try gently lifting the ribbon cable to see if it is already released.
-
-
-
Place the rear panel next to the iPod, being careful not to strain the orange headphone jack cable.
-
-
-
Lift the hard drive up with one hand so you can access the headphone jack ribbon beneath.
-
Use a spudger to flip up the plastic tab holding the headphone jack ribbon in place. The tab will rotate up 90 degrees, releasing the ribbon cable.
-
Slide the orange headphone jack ribbon out of its connector.
-
The rear panel is now free from the iPod.
-
-
-
Now to repair the damage caused by liberating the internal parts of the iPod Classic! It is highly likely that at least one of the metal clips in the lower case has been bent upward. These clips must all be pointing downward in order to reinstall the rear panel.
-
-
-
Take the broad, flat side of the metal spudger and push the clip down, taking care not to tear the thin metal rail from the rear panel.
-
-
-
On a clean, hard surface, lay the rear panel on its side. Carefully but firmly push down on it, rolling the entire lip side back into its proper spot.
-
-
-
Rotate the hard drive out of the framework and place it so that the connector is facing up.
-
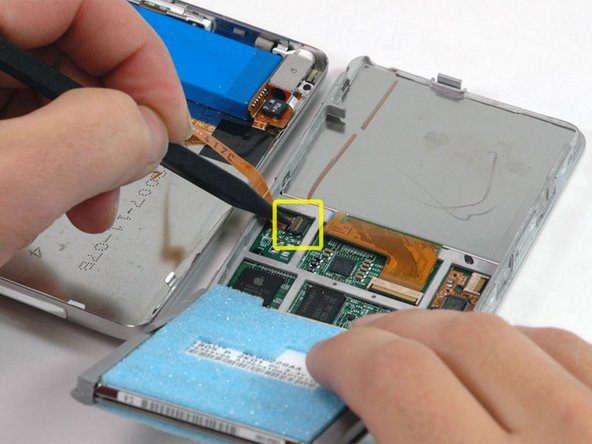
Use a spudger to flip up the small black locking tab holding the orange hard drive ribbon in place. The tab will rotate up 90 degrees, releasing the ribbon cable.
To be clear, the plastic tab to be flipped up is the SMALL BLACK piece shown vertically in the photo above. The spudger is pointing directly to it. The tab flips TOWARDS the ribbon. While the picture is correct, this wasn’t obvious to me.
Thanks for the feedback! I will adjust the wording to clarify this.
-
-
-
Slide the orange hard drive ribbon cable directly out of its connector.
-
If you are replacing the hard drive in your iPod and it did not come with the rubber mounting brackets and foam padding, transfer these items from your old drive to the replacement drive.
-
-
-
Remove the three Phillips screws securing the front panel to the metal framework.
See here, it’s a PH00.
-
-
-
Rotate the iPod 180 degrees and remove the three Phillips screws securing the front panel to the metal framework on the other side.
-
-
-
Carefully work around the edges of the iPod to separate the front panel from the gray metal framework.
I would suggest prying with a tool on one of the lips that holds the front place on, but do NOT pry on one near the LCD screen or you may damage the screen. Also, don't forget there is an extra small latch on the top of the LCD that has to be loosened too.
I pressed gently on the click wheel on the play botton side first to help unlock the glue. Keep away from the screen side best you can.
After reading all your warnings and how risky it is to damage my IPOD I don’t dare to replace the display which got out of light and I no longer see the text. I planned to send for a new but it seems like the possibility to succeed without damaging the IPOD is less than succeeding. It is really a pity since I love it snd have so much good music saved to it. I usually fix my damaged apparatus but this seems more orf ess impossible after reading the text. I am really sad/devastated!! :
-
-
-
Lift the framework (including the attached screen, logic board, and click wheel) away from the front panel.
-
-
-
Use a spudger to flip up the plastic tab holding the orange display ribbon in place. The tab will rotate up 90 degrees towards the display, releasing the ribbon cable.
-
-
-
Lift the framework assembly up, and slide the display and LCD metal backplate out of the framework assembly.
-
-
-
Move the click wheel from beneath the logic board so that the icons on the click wheel are visible.
-
Use a spudger to flip up the plastic tab holding the orange click wheel ribbon in place. The tab will rotate up 90 degrees, releasing the ribbon cable.
-
-
-
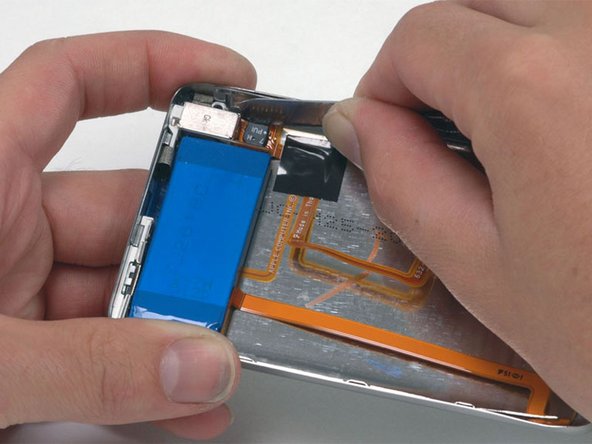
Use a spudger to lift the click wheel cable off the logic board. Be careful not to bend the cable too much, or the electronics on the cable could be damaged.
-
-
-
Slide the click wheel cable out of its connector.
-
Lift the click wheel assembly away from the logic board.
-
Before you snap the case shut, be sure to test the device to ensure that it's working properly.
To reassemble your device, follow these instructions in reverse order.
Before you snap the case shut, be sure to test the device to ensure that it's working properly.
To reassemble your device, follow these instructions in reverse order.
Отменить: Я не выполнил это руководство.
53 участников успешно повторили данное руководство.
6 Комментариев
Thanks ifixit.com
Waiting on parts. Will update when finished.
I replaced the clickwheel and now it isnt responding when i click or try to use the clickwheel.
Did you ever figure out why? Mine is doing the same thing. Thanks!


If you're meticulous, the job can perfectly be done, without any of the recommended tools. I hadn't the time to order them, so I opened my iPod with the large blade of my Victorinox swiss army knife. By just following the instruction I succeeded in releasing all of the metal tabs all around the iPod, and didn't damage any of them. You can clearly hear them "declipsing". I think the blade of the Victorinox is thiner than the putty knife, the only thing you have to take care of, is not to cut the black or silver painting of the front of the case, but if you are used to cut with a knife, you should succeed. Just be aware that it is however a difficult job !
jcfsystems - Ответить
Thank you for these instructions - my dead iPod classic (that died whilst attached to an ipod dock during a heavy thunderstorm which took out the dock too) is now working again. Opening the case took me 40 minutes and 7 plastic case openers not to mention very sore hands but the rest of the process worked fine. thanks again
Stuart Hutchesson - Ответить
Opened it up with MANY super thin nylon guitar picks in less than a minute starting from the two tabs on the bottom - I used the putty knife in my shop for wood filler and patching walls :)
cmguitar - Ответить
Appreciated the earlier comment about using guitar picks. It is waaaaaay easier to open the iPod with guitar picks. It still requires patience sometimes, but no noticeable damage to the iPod. Went to the local music store, they stocked Fender picks. Fender "Thin" work best for me for starters, but sometimes Fender "Medium" are needed. (Go to your local music store-- very cheap!) I have opened (and repaired successfully!) four different iPods just using guitar picks.
Novice iPod Repair Guy - Ответить