Введение
Upgrade your storage with a new hard drive.
Выберете то, что вам нужно
-
-
Insert a plastic opening tool into the seam between the front and back of the iPod.
-
-
-
Insert another plastic opening tool into the seam between the front and back of the iPod, leaving at least 1.5 inches of space between the two tools.
-
-
-
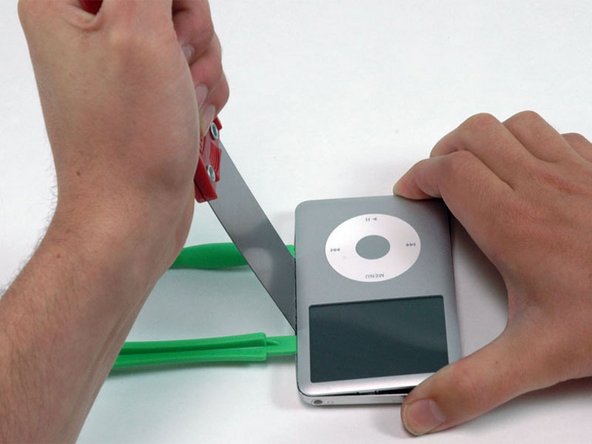
At an angle, carefully insert a putty knife about 1/8 inch into the seam between the two opening tools.
-
Once the putty knife has cleared the lip of the rear panel, pivot the putty knife so that it is vertical, and carefully (but firmly) wiggle it straight down into the gap between the opening tools.
-
-
-
Push with your fingers on the rear panel behind the putty knife to minimize bending. Slowly flex the putty knife, as shown in the picture, to ensure that most of the metal tabs on this side of the iPod are disengaged.
-
-
-
Remove the putty knife from the iPod and reinsert it closer to the corner of the iPod, using the same wiggle method as before.
-
-
-
Near the headphone jack, insert a plastic opening tool into the seam between the front and back of the iPod.
-
-
-
Near the center of the display, carefully insert a metal spudger into the gap created by the plastic opening tool.
-
Using the metal spudger, disengage the single clip on the top of the iPod.
-
-
-
Near the other top corner, insert a plastic opening tool into the seam between the front and back of the iPod
-
-
-
-
On the other side, insert a plastic opening tool into the seam between the front and back of the iPod.
-
-
-
Remove the opening tool from the top corner and insert it into the seam between the front and back of the iPod, leaving at least 1.5 inches of space between the two tools (as done on the other side).
-
-
-
At an angle, carefully insert a putty knife about 1/8 inch into the seam between the two opening tools.
-
Once the putty knife has cleared the lip of the rear panel, angle the putty knife so that it is vertical, and carefully (but firmly) wiggle it straight down into the iPod via the gap between the plastic opening tools.
-
Push with your fingers on the rear panel behind the putty knife to minimize bending. Ever so slightly flex the putty knife to ensure that most of the metal tabs on this side of the iPod are disengaged.
-
-
-
Carefully insert a metal spudger into the area near the stubborn metal clip.
-
-
-
Gently wiggle the metal spudger down so that it is all the way in the rear panel.
-
-
-
Continue to push up on the front panel with the metal spudger until the metal clip releases.
-
-
-
Grasp the front panel assembly with one hand and the rear panel with the other.
-
Gently (GENTLY) disengage the remaining clips on the rear panel by pulling the tops of the front and rear panels away from each other (think of the bottom of the iPod as a hinge), taking great care not to damage the ribbon cables holding the two halves together.
-
-
-
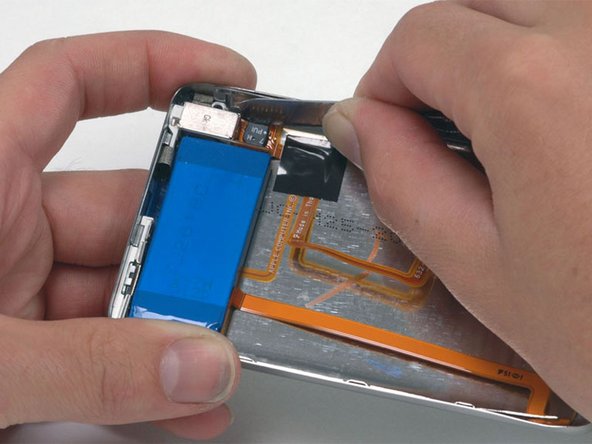
Use a spudger to slide up the connector holding the orange battery ribbon in place. You only need to lift the locking bar up about 2 mm to free the cable.
-
Slide the orange battery ribbon out of its connector.
-
-
-
Place the rear panel next to the iPod, being careful not to strain the orange headphone jack cable.
-
-
-
Lift the hard drive up with one hand so you can access the headphone jack ribbon beneath.
-
Use a spudger to flip up the plastic tab holding the headphone jack ribbon in place. The tab will rotate up 90 degrees, releasing the ribbon cable.
-
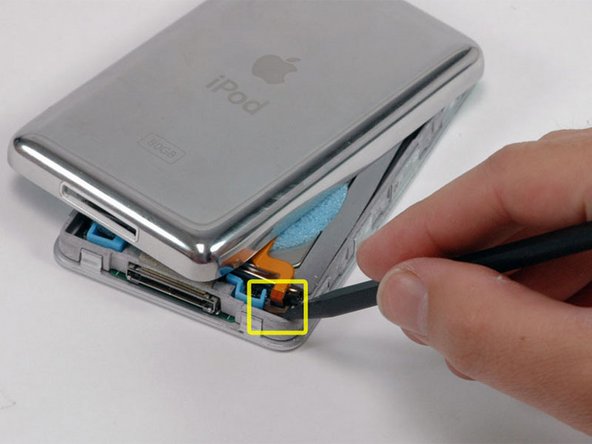
Slide the orange headphone jack ribbon out of its connector.
-
The rear panel is now free from the iPod.
-
-
-
Now to repair the damage caused by liberating the internal parts of the iPod Classic! It is highly likely that at least one of the metal clips in the lower case has been bent upward. These clips must all be pointing downward in order to reinstall the rear panel.
-
-
-
Take the broad, flat side of the metal spudger and push the clip down, taking care not to tear the thin metal rail from the rear panel.
-
-
-
On a clean, hard surface, lay the rear panel on its side. Carefully but firmly push down on it, rolling the entire lip side back into its proper spot.
-
-
-
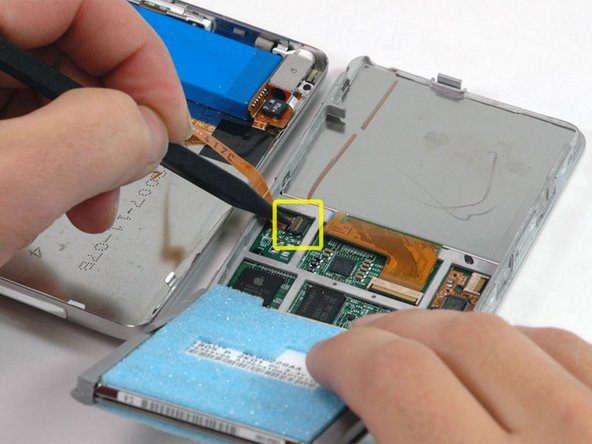
Rotate the hard drive out of the framework and place it so that the connector is facing up.
-
Use a spudger to flip up the small black locking tab holding the orange hard drive ribbon in place. The tab will rotate up 90 degrees, releasing the ribbon cable.
-
-
-
Slide the orange hard drive ribbon cable directly out of its connector.
-
If you are replacing the hard drive in your iPod and it did not come with the rubber mounting brackets and foam padding, transfer these items from your old drive to the replacement drive.
-


Before you snap the case shut, be sure to test the device to ensure that it's working properly.
To reassemble your device, follow these instructions in reverse order.
Отменить: Я не выполнил это руководство.
336 человек успешно провели ремонт по этому руководству.

51 Комментарии к руководству
The instructions worked like a charm. This is not for the faint of heart and requires some modicum of skill, but I saved a buttload of money by doing it myself. You will definitely need the recommended tools.
It worked like a charm... Just need to follow the instructions carefully and you can avoid to spend 200 something € to buy a new iPod!
Thanks iFixit
i couldn't get the plastic opening tool in between the 2 sections. i ended up using two razor blades instead of the plastic tools and the putty knife, i was able to replace the hard drive with very little struggle and almost no cosmetic damage(not that i care what the thing looks like)
Thanks for a highly useful guide. Slowly and methodically, using a single-bladed, razor blade, I was able to open the case, following this procedure. Patience is, indeed, a virtue, in this case.
I was able to successfully replace the hard drive and battery.
The only snag I encountered was that the headphone jack ribbon was glued to circuit board adjacent to the connector under the hard drive. (I just left this ribbon be, not wanting to risk damaging the ribbon.) It was a bit awkward straightening the case edges, but I managed.
Overall, I'd give this guide a grade of "A"....it was nearly perfect and very clear. Bravo!
Well I managed to get it apart, though it wasn't all that difficult with the right tools, but getting it back together has been a nightmare. Just saying "reverse the process" is reall not quite enough in this case. All the little pieces of shock padding keep falling off, it's almost impossible to get the two wires plugged back in as well as keeping them in place, but I got there in the end. Or so I thought . Now my ipod has no sound (except from dock output) - and on investigating I find I have severed the orange cable near the jack itself- either by bending it or catching it on something. So another part to buy. So it's a warning to be very careful.