Перейти к основному содержанию

iPod Nano 4th Generation Battery Replacement

Выберете то, что вам нужно

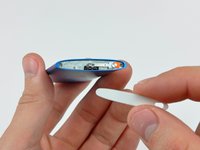
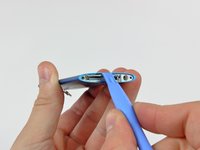
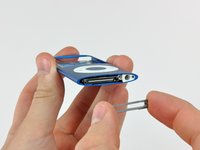
  1. iPod Nano 4th Generation Battery Replacement, Glass Panel: шаг 1, изображение 1 из 2 iPod Nano 4th Generation Battery Replacement, Glass Panel: шаг 1, изображение 2 из 2
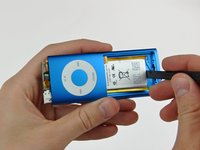
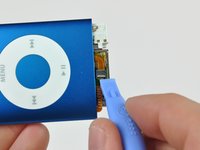
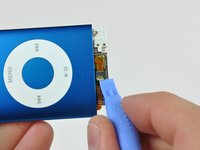
    • Insert the edge of an iPod opening tool into the gap between the outer case and the top bezel.

    • Pry the top bezel off the adhesive securing it to the display retainer.

    • At this point the hold switch slider is free and may fall. Be careful not to lose it.

  2. iPod Nano 4th Generation Battery Replacement: шаг 2, изображение 1 из 1
    • Remove the hold switch slider from the top of the Nano.

  3. iPod Nano 4th Generation Battery Replacement: шаг 3, изображение 1 из 1
    • Remove the two angled Phillips screws from the two corners of the display retainer.

    • These screw heads are extremely small and easily stripped.

  4. iPod Nano 4th Generation Battery Replacement: шаг 4, изображение 1 из 1
    • Insert an iPod opening tool between the outer case and the display retainer.

    • Use the tool to slide the display assembly out of the case slightly.

    • Do not rotate the display retainer about the top edge of the display, as it is attached to a thin steel bracket that is easily broken.

    • Do not forcefully remove the display retainer, as the hold switch cable is liable to snap.

  5. iPod Nano 4th Generation Battery Replacement: шаг 5, изображение 1 из 1
    • Slide the display out of the Nano. It will move about .5" until the display data cable limits its travel.

    • Do not put unnecessary tension on the very thin display data cable.

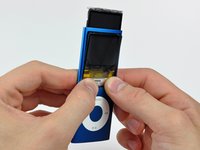
  6. iPod Nano 4th Generation Battery Replacement: шаг 6, изображение 1 из 2 iPod Nano 4th Generation Battery Replacement: шаг 6, изображение 2 из 2
    • With the display pulled out of the case as much as possible, gently press on the lower edge of the glass panel until it pops in slightly (~1 mm).

    • Use your thumbs on the lower edge of the glass panel to slide the glass down and into the case until the top edge pops up out of the case.

  7. iPod Nano 4th Generation Battery Replacement: шаг 7, изображение 1 из 1
    • Lift the glass panel out of the Nano.

    • Before reinstalling the glass panel, be sure to clean the face of the display and the inside of the panel as any dust or fingerprints will be annoyingly visible when the Nano is turned on.

  8. iPod Nano 4th Generation Battery Replacement, Display: шаг 8, изображение 1 из 1
    • Use the edge of an iPod opening tool to separate the hold switch from the adhesive securing it to the top edge of the display.

    • The hold switch ribbon cable is extremely fragile and easily broken. Work gently.

  9. iPod Nano 4th Generation Battery Replacement: шаг 9, изображение 1 из 1
    • Peel back the Kapton tape covering the display data cable socket.

  10. iPod Nano 4th Generation Battery Replacement: шаг 10, изображение 1 из 1
    • While holding the light colored socket down with one finger, use the tip of a spudger to flip the ZIF cable lock up toward the bottom of the Nano.

  11. iPod Nano 4th Generation Battery Replacement: шаг 11, изображение 1 из 1
    • Use an iPod opening tool to peel the display data cable off the thin metal plate attached to the display.

    • Be careful not to rip the display data cable.

  12. iPod Nano 4th Generation Battery Replacement: шаг 12, изображение 1 из 1
    • Pull the display out of the Nano, minding the hold switch cable that may get caught.

    • As you pull the display out of the case, be careful not to break the hold switch cable.

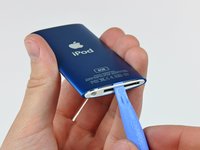
  13. iPod Nano 4th Generation Battery Replacement, Logic Board Assembly: шаг 13, изображение 1 из 2 iPod Nano 4th Generation Battery Replacement, Logic Board Assembly: шаг 13, изображение 2 из 2
    • Insert an iPod opening tool between the bottom bezel and the dock connector.

    • Separate the bottom bezel from the adhesive securing it to the Nano and set it aside.

  14. iPod Nano 4th Generation Battery Replacement: шаг 14, изображение 1 из 1
    • Remove the three Phillips screws along the bottom of the Nano.

    • These screw heads are extremely small and easily stripped.

    • The slightly longer of the three screws belongs in the middle.

  15. iPod Nano 4th Generation Battery Replacement: шаг 15, изображение 1 из 2 iPod Nano 4th Generation Battery Replacement: шаг 15, изображение 2 из 2
    • Use an iPod opening tool to pry the aluminum dock bezel out of the Nano.

    • The dock bezel is very thin cast aluminum. To avoid breaking it, do not excessively flex it during removal.

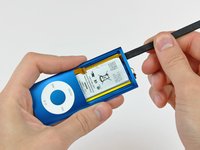
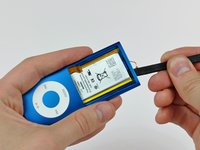
  16. iPod Nano 4th Generation Battery Replacement: шаг 16, изображение 1 из 3 iPod Nano 4th Generation Battery Replacement: шаг 16, изображение 2 из 3 iPod Nano 4th Generation Battery Replacement: шаг 16, изображение 3 из 3
    • Use the flat end of a spudger to separate the battery from the adhesive securing it to the outer case.

    • The lithium polymer battery used in the Nano is very flexible. Try not to deform it excessively while separating it from the outer case.

    • Use the flat end of a spudger to push the logic board assembly and battery slightly out of the bottom of the Nano. Stop once it pops out a little bit.

  17. iPod Nano 4th Generation Battery Replacement: шаг 17, изображение 1 из 1
    • Use the edge of an iPod opening tool to peel the click wheel ribbon cable and its ZIF socket off the dock connector.

  18. iPod Nano 4th Generation Battery Replacement: шаг 18, изображение 1 из 2 iPod Nano 4th Generation Battery Replacement: шаг 18, изображение 2 из 2
    • Use the edge of an iPod opening tool to flip the ZIF cable lock up toward the headphone jack.

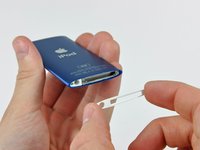
  19. iPod Nano 4th Generation Battery Replacement: шаг 19, изображение 1 из 1
    • Use a pair of tweezers to slide the click wheel ribbon cable out of its socket.

    • Before proceeding, be sure that both the click wheel ribbon cable socket and its cable are freed from the adhesive securing them to the dock connector and logic board.

    • Peel back the cable on both ends!

  20. iPod Nano 4th Generation Battery Replacement: шаг 20, изображение 1 из 1
    • Pull the logic board assembly out of the outer case, minding the hold switch and click wheel cables that may get caught.

    • When reassembling, ensure the click wheel cable is toward the front of the Nano and not in the grooves on the side. If it is in the groove you will probably cut it while sliding the logic board into place.

  21. iPod Nano 4th Generation Battery Replacement, Battery: шаг 21, изображение 1 из 2 iPod Nano 4th Generation Battery Replacement, Battery: шаг 21, изображение 2 из 2
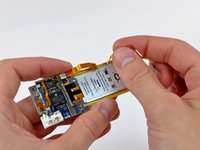
    • Peel the hold switch cable from along the edge of the battery and lay it aside. The hold switch cable is not attached to the battery.

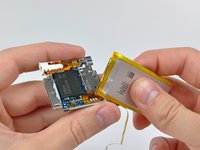
    • The battery is held on to the logic board by a strong adhesive. Force may be required to remove the battery from the logic board.

    • Pry the battery off the adhesive securing it to the metal tray on the logic board.

  22. iPod Nano 4th Generation Battery Replacement: шаг 22, изображение 1 из 2 iPod Nano 4th Generation Battery Replacement: шаг 22, изображение 2 из 2
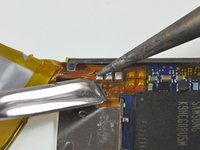
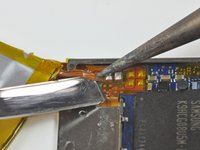
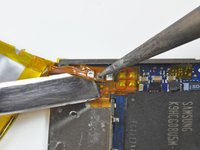
    • The battery on the fourth generation nano is attached via solder pads with small holes that go through the battery ribbon cable and attach to flat pads on the face of the logic board. In this step, you will heat each solder pad individually while using a metal spudger to pry it up from the logic board.

    • DO NOT bridge the connection between the solder pads both on the board and on the ribbon cable with your spudger. Shorts have the potential to ruin the logic board.

    • Beware of overheating the board and the cable. Only hold the tip of the iron against the pad long enough to let the solder melt. Excess heat buildup has the potential to ruin the logic board or melt the ribbon cable. Consider letting the board cool off between melting each solder pad.

    • Start working from one side of the battery ribbon cable. In our case, we started on the left. Heat the leftmost solder pad while gently prying up from under the ribbon cable to free it from the board.

  23. iPod Nano 4th Generation Battery Replacement: шаг 23, изображение 1 из 2 iPod Nano 4th Generation Battery Replacement: шаг 23, изображение 2 из 2
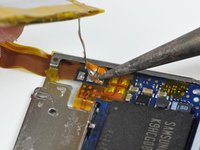
    • Repeat the previous step for each of the two remaining pads, working either right to left or left to right.

    • At this point, the battery should be free from the logic board.

    • Lift the old battery out of the nano and set it aside.

Заключение

To reassemble your device, follow these instructions in reverse order, while being careful not to damage the iPod.

166 участников успешно повторили данное руководство.

34 Комментариев

There is one small point which is worth a mention here.After disconnnecting the screen by flicking up a little black bit on the ZIF Connector, I went on to open the next ZiF (The Click Switch)

Yes- bits of ZIF connector everywhere.I actually had to examine a new Click Switch circuit carefully to find that this one is different.

Yes - you flick the White bit. Do apple do this just to keep us on our toes?

Pete Green - Ответить

I have taken the nano apart and started to use a solder iron to remove the old battery. I must have pulled on the battery before fully melting the solder and have pulled off two of the three tabs from the board.

Can this be fixed?

Vicente - Ответить

I tried what Bradley suggested because it really seems easier than to solder the new battery to the iPod circuit board, which is really tiny. Still I couldn't do it. The battery pads are very fragile and I had an hard time folding the leads and the battery circuit board so that it looked the way it originally was. This was the part where I failed because afterwards I wasn't able to insert the battery plus the iPod circuit board inside its case again and ended it breaking it.

ruigsantos - Ответить

When I soldered my battery in I first touched the top and bottom of the pads on the new battery with flux and then added a little solder to the top and bottom of the pads. When I put the pads in place I only had to apply a quick touch and it soldered on perfectly.

Overall it was a real pain! :)

Rene Jeddore - Ответить

After 3 hours of hard work I did it !

It's the first time I try such a job, and I found it "quite easy" to change the battery with the guide. Just follow the pictures and you'll be done.

The hard work for me was the solder part - and a friend of mine gave me a hand as he was more used to do this.

You can do it, it worth a try :)
maxdelamure - Ответить

Добавить комментарий

Просмотр статистики:

За последние 24часов: 93

За последние 7 дней: 671

За последние 30 дней: 2,811

За всё время: 495,927