Перейти к основному содержанию

iPhone XR ディスプレイアセンブリの交換

Примечание: Вы редактируете необходимое руководство. Любые внесённые вами изменения влияют на все 9 руководства, которые включают этот шаг.

Английский
Японский
Шаг 4
iPhone XR Display Assembly Replacement, Disconnect the digitizer: шаг 0, изображение 1 из 2 iPhone XR Display Assembly Replacement, Disconnect the digitizer: шаг 0, изображение 2 из 2
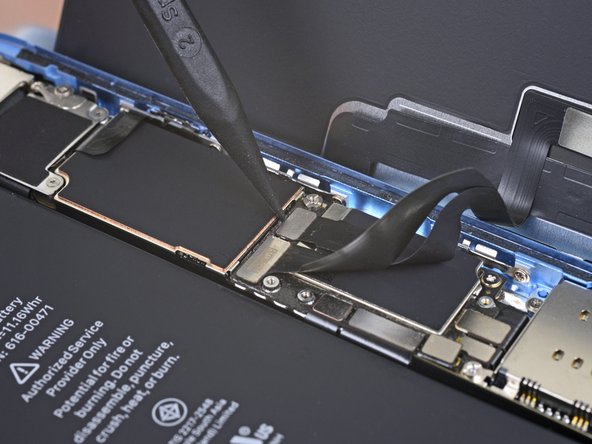
Disconnect the digitizer
  • Use the tip of a spudger to pry up and disconnect the digitizer cable.

  • To re-attach press connectors like this one, carefully align and press down on one side until it clicks into place, then repeat on the other side. Do not press down on the middle. If the connector is misaligned, the pins can bend, causing permanent damage.

  • If any part of your screen doesn't respond to touch after your repair, disconnect the battery and then re-seat this connector, making sure it clicks fully into place and that there's no dust or other obstruction in the socket.

スパッジャーの先端を使って、デジタイザーケーブルの接続を外します。

このようなプレスコネクタを再装着する際は、所定の位置にコネクタの一辺を合わせてカチッと音がするまで押し込み、反対側も同じ作業を繰り返します。 コネクタ中央を押さないでください。 装着位置がずれていると、ピンが曲がってしまい、恒久的な損傷を引き起こす可能性があります。

修理後に画面の一部が反応しない場合は、一旦バッテリーを外してから、このコネクターを再装着してください。カチッと音がしたか、ソケットに埃やその他異物が挟まっていないか確認します。

Ваш вклад лицензируется под свободной лицензией Creative Commons .