Перейти к основному содержанию

iPhone XR Display Assembly 디스플레이 어셈블리 교체

Примечание: Вы редактируете необходимое руководство. Любые внесённые вами изменения влияют на все 9 руководства, которые включают этот шаг.

Английский
Корейский
Шаг 4
iPhone XR Display Assembly Replacement, Disconnect the digitizer: шаг 0, изображение 1 из 2 iPhone XR Display Assembly Replacement, Disconnect the digitizer: шаг 0, изображение 2 из 2
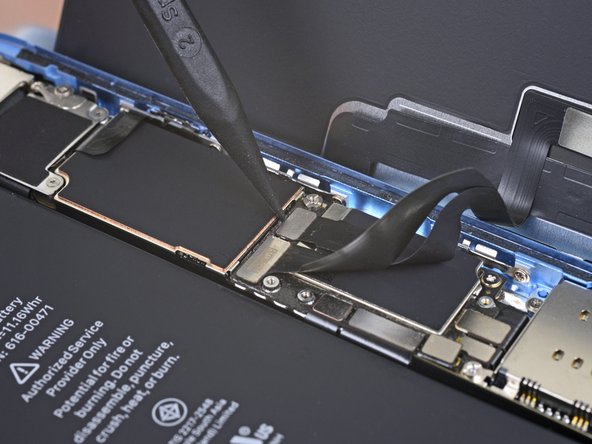
Disconnect the digitizer
  • Use the tip of a spudger to pry up and disconnect the digitizer cable.

  • To re-attach press connectors like this one, carefully align and press down on one side until it clicks into place, then repeat on the other side. Do not press down on the middle. If the connector is misaligned, the pins can bend, causing permanent damage.

  • If any part of your screen doesn't respond to touch after your repair, disconnect the battery and then re-seat this connector, making sure it clicks fully into place and that there's no dust or other obstruction in the socket.

Spudger/스퍼저의 끝을 사용하여 디지타이저 케이블을 들어 올려 분리하십시오.

이와 같은 프레스 커넥터를 다시 붙이려면 조심스럽게 정렬하여 한쪽을 제대로 들어맞을 때까지 아래로 누른 다음 다른 쪽도 반복하십시오. 가운데 부분은 누르지 마십시오. 커넥터가 잘못 정렬되어 있을 경우 핀이 구부러져 영구적인 손상을 입을 수 있습니다.

수리를 마친 후 스크린에 터치 반응이 없는 부분이 생긴 경우 배터리를 분리한 다음 이 커넥터를 다시 제대로 들어맞게 장착하고 소켓에 먼지 또는 기타 장애물이 없음을 확인하십시오.

Ваш вклад лицензируется под свободной лицензией Creative Commons .