Перейти к основному содержанию

Reemplazo del ensamblaje de pantalla del iPhone XR.

Примечание: Вы редактируете необходимое руководство. Любые внесённые вами изменения влияют на все 9 руководства, которые включают этот шаг.

Английский
Испанский
Шаг 6
iPhone XR Display Assembly Replacement, Unscrew the logic board connector cover: шаг 0, изображение 1 из 2 iPhone XR Display Assembly Replacement, Unscrew the logic board connector cover: шаг 0, изображение 2 из 2
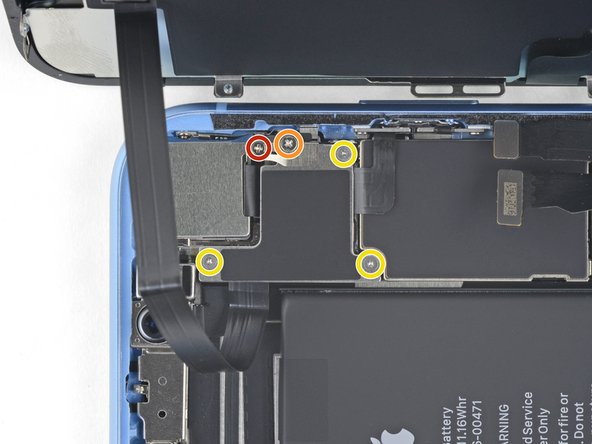
Unscrew the logic board connector cover
  • Remove the five screws securing the logic board connector bracket to the rear case:

  • One 1.3 mm Phillips #000 screw

  • One 1.5 mm Phillips #000 screw

  • Three 1.2 mm Y000 screws

  • Remove the bracket.

  • Be careful not to lose the smaller bracket clipped onto the edge. It's secured with a small clip and is easy to accidentally knock off of the larger bracket.

Remueve los cinco tornillos que sujetan el soporte del conector de la placa lógica a la caja trasera:

Un tornillo Phillips #000 de 1.3 mm

Un tornillo Phillips #000 de 1.5 mm

Tres tornillos Y000 de 1.2 mm

Quita el soporte.

Ten cuidado de no perder el soporte más pequeño que está enganchado al borde. Está sujeto con un pequeño clip y es muy fácil de sacarlo del soporte más grande accidentalmente.

Ваш вклад лицензируется под свободной лицензией Creative Commons .