Перейти к основному содержанию

Sostituzione gruppo display iPhone XR

Примечание: Вы редактируете необходимое руководство. Любые внесённые вами изменения влияют на все 9 руководства, которые включают этот шаг.

Английский
Итальянский
Шаг 6
iPhone XR Display Assembly Replacement, Unscrew the logic board connector cover: шаг 0, изображение 1 из 2 iPhone XR Display Assembly Replacement, Unscrew the logic board connector cover: шаг 0, изображение 2 из 2
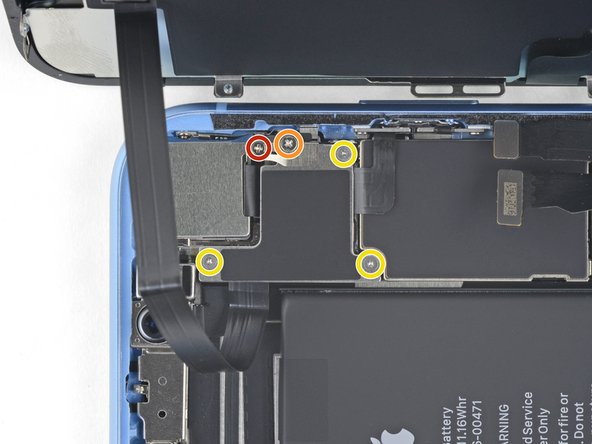
Unscrew the logic board connector cover
  • Remove the five screws securing the logic board connector bracket to the rear case:

  • One 1.3 mm Phillips #000 screw

  • One 1.5 mm Phillips #000 screw

  • Three 1.2 mm Y000 screws

  • Remove the bracket.

  • Be careful not to lose the smaller bracket clipped onto the edge. It's secured with a small clip and is easy to accidentally knock off of the larger bracket.

Rimuovi le cinque viti che fissano sul case posteriore la staffa del connettore della scheda logica.

Una vite a croce Phillips da 1,3 mm

Una vite a croce Phillips da 1,5 mm

Tre viti tri-wing Y000 da 1,2 mm

Stai attento a non perdere la staffa più piccola attaccata al bordo. È tenuta in posizione tramite una piccola clip ed è facile che che si separi accidentalmente dalla staffa più grande.

Ваш вклад лицензируется под свободной лицензией Creative Commons .