Перейти к основному содержанию

iPhone XR屏幕的更换

Примечание: Вы редактируете необходимое руководство. Любые внесённые вами изменения влияют на все 9 руководства, которые включают этот шаг.

Английский
Китайский
Шаг 6
iPhone XR Display Assembly Replacement, Unscrew the logic board connector cover: шаг 0, изображение 1 из 2 iPhone XR Display Assembly Replacement, Unscrew the logic board connector cover: шаг 0, изображение 2 из 2
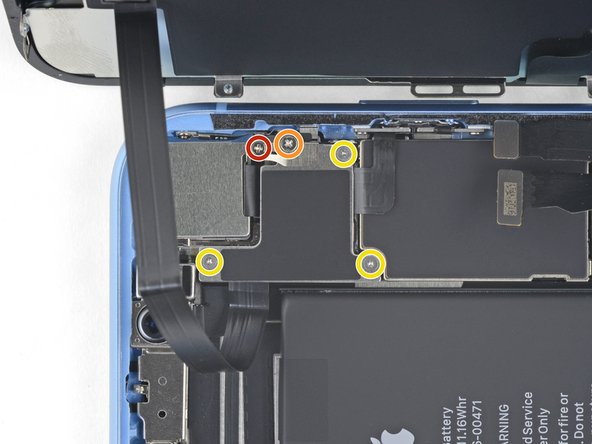
Unscrew the logic board connector cover
  • Remove the five screws securing the logic board connector bracket to the rear case:

  • One 1.3 mm Phillips #000 screw

  • One 1.5 mm Phillips #000 screw

  • Three 1.2 mm Y000 screws

  • Remove the bracket.

  • Be careful not to lose the smaller bracket clipped onto the edge. It's secured with a small clip and is easy to accidentally knock off of the larger bracket.

拧下将逻辑板连接器支架固定至后壳的五颗螺钉:

一颗 1.3 mm Phillips #000 螺丝

一颗1.5 mm Phillips #000 螺丝

一颗 1.2 mm Y000 螺丝

拿下盖板

注意不要丢失夹在边缘上的小支架 。 它用小夹子固定,很容易会从较大的支架上意外脱落下来。

Ваш вклад лицензируется под свободной лицензией Creative Commons .