Перейти к основному содержанию

Remplacement de la batterie du MacBook Pro 13" Retina fin 2013

Примечание: Вы редактируете необходимое руководство. Любые внесённые вами изменения влияют на все 6 руководства, которые включают этот шаг.

Английский
Французский
Шаг 9
MacBook Pro 13" Retina Display Late 2013 Battery Replacement: шаг 0, изображение 1 из 3 MacBook Pro 13" Retina Display Late 2013 Battery Replacement: шаг 0, изображение 2 из 3 MacBook Pro 13" Retina Display Late 2013 Battery Replacement: шаг 0, изображение 3 из 3
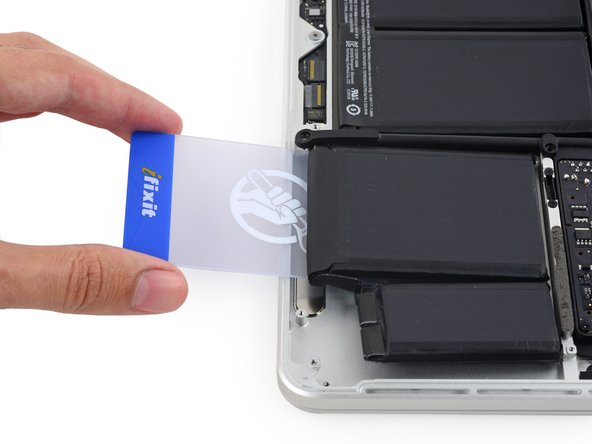
  • Repeat this procedure with the adjacent battery cell:

  • Apply a small amount of liquid adhesive remover under the battery cell, and wait 2-3 minutes for it to penetrate and soften the adhesive.

  • Alternatively, re-heat this section with your iOpener if needed.

  • Push a plastic card about an inch between the battery cell and the upper case, and slowly pry the cell up to separate all of the adhesive.

Répétez la procédure pour décoller la cellule adjacente :

Appliquez une petite quantité de dissolvant liquide sous la cellule de la batterie et attendez 2 à 3 minutes qu'il pénètre et que l'adhésif ramollisse.

Ou bien refaites chauffer la zone avec votre iOpener, si nécessaire.

Insérez une carte en plastique sur environ 2,5 cm de long entre la cellule de batterie et le boîtier supérieur, et faites lentement levier pour les décoller de l'adhésif.

Ваш вклад лицензируется под свободной лицензией Creative Commons .