Введение
Replace a broken, cracked or defective display on your Apple Watch.
As a precaution against damaging your device, this guide starts by disconnecting the battery, in the only way you can—by removing it.
Выберете то, что вам нужно
-
-
Heat the iOpener for thirty seconds.
-
Throughout the repair procedure, as the iOpener cools, reheat it in the microwave for an additional thirty seconds at a time.
-
-
-
Remove the iOpener from the microwave, holding it by one of the two flat ends to avoid the hot center.
-
-
-
Fill a pot or pan with enough water to fully submerge an iOpener.
-
Heat the water to a boil. Turn off the heat.
-
Place an iOpener into the hot water for 2-3 minutes. Make sure the iOpener is fully submerged in the water.
-
Use tongs to extract the heated iOpener from the hot water.
-
Thoroughly dry the iOpener with a towel.
-
Your iOpener is ready for use! If you need to reheat the iOpener, heat the water to a boil, turn off the heat, and place the iOpener in the water for 2-3 minutes.
-
-
-
Before starting repairs, take your watch off the charger and power it down.
-
-
-
Prepare an iOpener (or grab a hair dryer or heat gun) and heat the face of the watch until it's slightly too hot to touch.
-
Leave the iOpener on the watch for at least a minute to fully heat the screen and soften the adhesive holding it to the case.
-
-
-
Place the curved section of the blade in the gap between the glass and case on the lower edge of the watch face, and press firmly straight down into the gap.
-
When the glass has lifted, gently rotate the knife down, opening the gap more by pushing the glass up.
-
-
-
Once you've opened the gap enough, insert the tip of an opening pick under the glass.
-
Slide the pick along the bottom edge to separate adhesive holding the screen to the case.
-
-
-
-
Roll the opening pick up the side of the button side of the watch, gently pushing in to separate the adhesive and widening the gap as you go.
-
-
-
Work the pick around the top right corner, and roll it along the top edge of the screen.
-
-
-
Continue working the pick around the perimeter of the screen, rolling down along the left side to cut the last of the adhesive.
-
-
-
While holding the first pick in place, use a second to check that all of the adhesive is separated around the entire perimeter of the screen.
-
-
-
Pry slightly up on the right side of the screen, to free it from any remaining adhesive.
-
Pry up on the left to free it as well—but do not attempt to remove the screen as it is still held in place by two cables.
-
-
-
The top layer of the sensor may be adhered to the back of the screen—if so, push it back down and separate it.
-
-
-
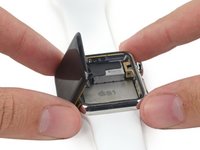
Lift the screen up and shift it to the left, minding the display data and digitizer cables.
-
-
-
Place the watch on an elevated surface, at least 1/2" or 1 cm tall—a small box or the edge of a book will work great. This will allow the screen to hang down vertically and give better access to the battery.
-
-
-
Use scissors to cut one of your opening picks to about the width of the battery. Try not to leave any sharp corners.
-
Insert the modified pick between the right side of the battery and the case.
-
Use constant, steady pressure to slowly pry the battery up, separating it from the adhesive securing it to the system board.
-
On the larger (42 mm) models, it's possible to accidentally pry at the system board underneath the battery. Insert the pick only far enough to get underneath the battery, not the system board.
-
If needed, apply a little high concentration isopropyl alcohol (90% or greater) around and under the battery to help weaken the adhesive.
-
-
-
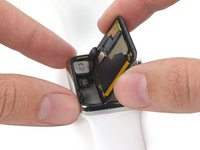
Hold the battery up and out of the way, to expose the battery cable connector.
-
Use a plastic opening tool, prying against the bottom of the case to separate the battery cable connector from the watch's battery cable.
-
Remove the battery from the watch.
-
-
-
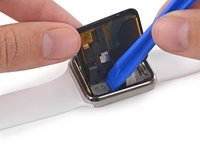
Fold the screen up and over to the right, to expose the cables underneath.
-
-
-
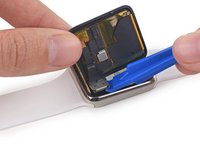
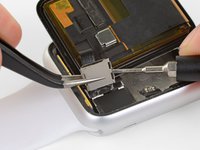
Use a plastic opening tool to flip the bracket toward the display and up from the speaker.
-
-
Инструмент, используемый на этом этапе:Tweezers$4.99
-
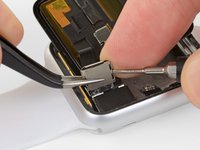
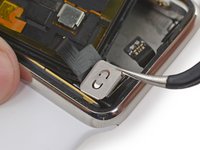
Steady the bracket from the left side using your fingers or tweezers.
-
At the same time, insert a small (1 mm) flathead screwdriver under the tiny tab on the right.
-
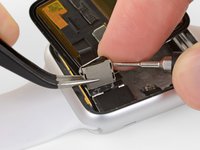
Finally, place one finger behind the tab, and pinch the bracket hard between your finger and the screwdriver to detach the cover.
-
-
-
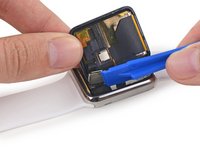
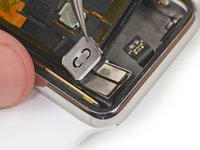
Grab the cover with your tweezers and slide it toward the top of the watch to free the final slotted tab, and remove the cover.
-
-
-
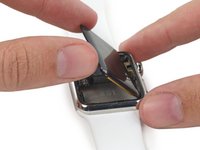
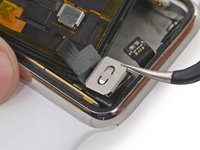
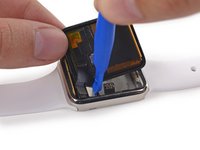
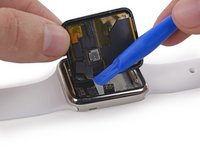
Carefully pry up to disconnect the display data and digitizer cables.
-
Remove the display.
-


Continue from Step 22 of our Force Touch Sensor guide to re-seal your watch and complete your repair.
Отменить: Я не выполнил это руководство.
97 человек успешно провели ремонт по этому руководству.

Команда

Tobias Isakeit - Repairability Engineer Участник Tobias Isakeit - Repairability Engineer
Business
1 член
Автор 1 145 руководств
5 Комментарии к руководству
I followed all the instructions but needed to look repair videos on YouTube. Everything worked perfectly. The bracket is a bit of a challenge, I just took my time.
I did replace my display and it works super-fine (thanks to iFixit) but the issue am facing right now is glueing the Display+Force Touch Ring+Body. Am unable to keep hold of display to the body and it keeps removing even after sevseral days of rubber banding and heat treatment.
It wasn’t easy but the guide really helped a lot.
THANK YOU
Super Anleitung. Die Uhr ist zwischendurch angegangen… Obwohl ich mit den Steckern nicht zimperlich war, funktioniert die Uhr nun wieder perfekt. ⭐⭐⭐⭐⭐
The screen does not respond to any touch. Does that mean the screen is broken? Do I need to replace the full screen with a Force Touch sensor? Thank you.