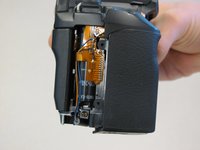
Перейти к основному содержанию

Canon EOS 30 Side Panel With Remote Control Socket Replacement

Выберете то, что вам нужно

  1. Canon EOS 30 Side Panel With Remote Control Socket Replacement, Front Panel: шаг 1, изображение 1 из 1
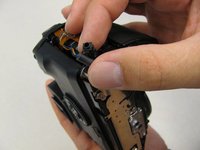
    • Remove the two 4.8 mm black screws above the lens on the front of the camera.

  2. Canon EOS 30 Side Panel With Remote Control Socket Replacement: шаг 2, изображение 1 из 1
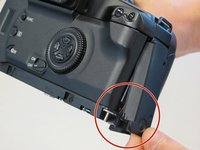
    • Remove the 4.3 mm black screw under the lens ring, and the 4.8 mm black screw under the camera.

  3. Canon EOS 30 Side Panel With Remote Control Socket Replacement: шаг 3, изображение 1 из 1
    • Remove the 4.8 mm black screw on the left side of the camera.

  4. Canon EOS 30 Side Panel With Remote Control Socket Replacement: шаг 4, изображение 1 из 1
    • Remove the front panel by lifting it away from the camera's body.

  5. Canon EOS 30 Side Panel With Remote Control Socket Replacement, Bottom Panel: шаг 5, изображение 1 из 1
    • Remove seven 4.25 mm black screws on the bottom panel.

  6. Canon EOS 30 Side Panel With Remote Control Socket Replacement: шаг 6, изображение 1 из 1
    • Remove the bottom panel.

  7. Canon EOS 30 Side Panel With Remote Control Socket Replacement, Side Panel With Remote Control Socket: шаг 7, изображение 1 из 1
    • Remove two 6.5 mm black screws from the panel.

  8. Canon EOS 30 Side Panel With Remote Control Socket Replacement: шаг 8, изображение 1 из 1
    • Remove the plastic remote control socket cap by pulling it straight out.

  9. Canon EOS 30 Side Panel With Remote Control Socket Replacement: шаг 9, изображение 1 из 2 Canon EOS 30 Side Panel With Remote Control Socket Replacement: шаг 9, изображение 2 из 2
    • Slide the panel toward the bottom of the camera to remove.

  10. Canon EOS 30 Side Panel With Remote Control Socket Replacement: шаг 10, изображение 1 из 1
    • Remove the single 4.8 silver screw from the control socket.

  11. Canon EOS 30 Side Panel With Remote Control Socket Replacement: шаг 11, изображение 1 из 2 Canon EOS 30 Side Panel With Remote Control Socket Replacement: шаг 11, изображение 2 из 2
    • The control socket is now secure by three wires.

    • Desolder connections to replace the remote control socket.

Заключение

To reassemble your device, follow these instructions in reverse order.

Sterling Vinson

Участник с: 04/17/11

259 Репутация

Автор 5 руководств

Команда

Cal Poly, Team 8-8, Regan Spring 2011 Участник Cal Poly, Team 8-8, Regan Spring 2011

CPSU-REGAN-S11S8G8

5 членов

Автор 22 руководств

3 Комментариев

i have this camera and the door that holds the film in will not stay closed because the plastic piece has broken at the release point. Which piece is it that I need to replace?

luederscoupons - Ответить

That's a bit of a bugger. The piece that's broken off is most likely the little "hook" on the "door" (the proper name of this "door" would be "back").

Since this little hook is integral with the back, you'd have to replace the entire back.

If you still have the piece that has broken off, it may be possible to glue it back in place, but you'd have to reinforce it with e.g. a small piece of aluminium sheet cut from a soft drink can or something like that. Use cyanoacrylate glue (otherwise known as "superglue") and make sure the pieces are clean and fit perfectly before applying the glue. You need only a tiny drop.

Flying Dutchman -

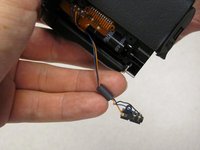
The EOS 30 is a film camera and therefore does not have an A/V Port, since it does neither Audio nor Video. The socket near the bottom on the grip side is for a wired remote control.

Flying Dutchman - Ответить

Добавить комментарий

Просмотр статистики:

За последние 24часов: 4

За последние 7 дней: 6

За последние 30 дней: 8

За всё время: 1,763