Перейти к основному содержанию

Dell Latitude 7490 WLAN Card Replacement

Выберете то, что вам нужно

  1. Dell Latitude 7490 WLAN Card Replacement, Prepare your laptop for disassembly: шаг 1, изображение 1 из 2 Dell Latitude 7490 WLAN Card Replacement, Prepare your laptop for disassembly: шаг 1, изображение 2 из 2
    • Allow your laptop's battery to drain below 25% before starting this repair—a charged battery may catch fire if damaged.

    • Unplug all cables and fully shut down your laptop.

  2. Dell Latitude 7490 WLAN Card Replacement, Flip your laptop over: шаг 2, изображение 1 из 1
    • Flip your laptop over so the rubber feet strips are facing up.

  3. Dell Latitude 7490 WLAN Card Replacement, Loosen the captive screws: шаг 3, изображение 1 из 2 Dell Latitude 7490 WLAN Card Replacement, Loosen the captive screws: шаг 3, изображение 2 из 2
    • Use a Phillips screwdriver to fully loosen the eight captive screws securing the back cover.

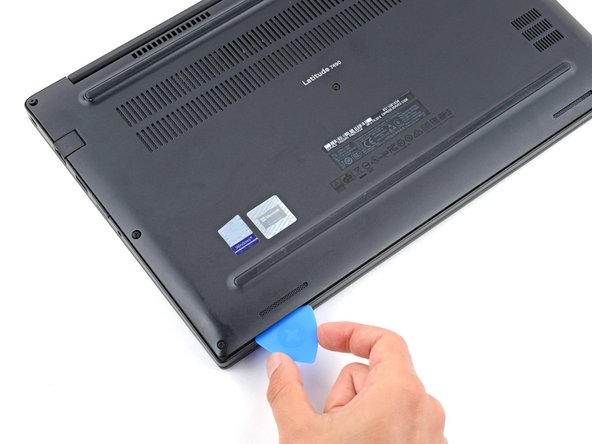
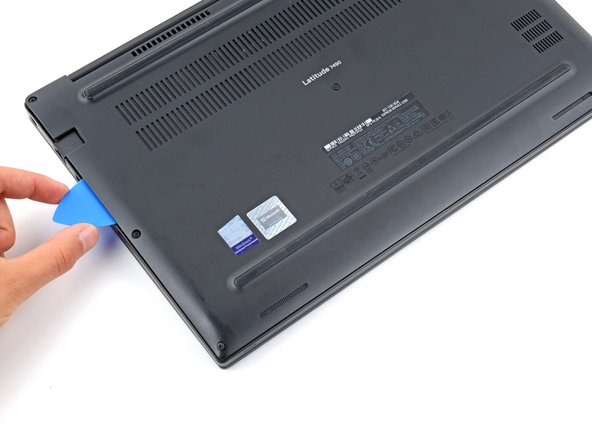
  4. Dell Latitude 7490 WLAN Card Replacement, Insert an opening pick: шаг 4, изображение 1 из 3 Dell Latitude 7490 WLAN Card Replacement, Insert an opening pick: шаг 4, изображение 2 из 3 Dell Latitude 7490 WLAN Card Replacement, Insert an opening pick: шаг 4, изображение 3 из 3
    • Plastic clips secure the back cover to the frame. You'll hear and feel them release as you work.

    • Insert the long side of an opening pick between the top right corner of the back cover and frame.

    • Pry the back cover up to release the clips securing the top right corner.

  5. Dell Latitude 7490 WLAN Card Replacement, Release the clips: шаг 5, изображение 1 из 3 Dell Latitude 7490 WLAN Card Replacement, Release the clips: шаг 5, изображение 2 из 3 Dell Latitude 7490 WLAN Card Replacement, Release the clips: шаг 5, изображение 3 из 3
    • Slide the opening pick down the right edge and around the bottom right corner to release the clips.

  6. Dell Latitude 7490 WLAN Card Replacement: шаг 6, изображение 1 из 3 Dell Latitude 7490 WLAN Card Replacement: шаг 6, изображение 2 из 3 Dell Latitude 7490 WLAN Card Replacement: шаг 6, изображение 3 из 3
    • Slide the opening pick along the front edge and up to the top left corner to release the remaining clips securing the back cover.

  7. Dell Latitude 7490 WLAN Card Replacement, Remove the back cover: шаг 7, изображение 1 из 3 Dell Latitude 7490 WLAN Card Replacement, Remove the back cover: шаг 7, изображение 2 из 3 Dell Latitude 7490 WLAN Card Replacement, Remove the back cover: шаг 7, изображение 3 из 3
    • Remove the back cover.

    • During reassembly, lay the back cover on the frame and press down firmly around the perimeter to engage all the clips.

  8. Dell Latitude 7490 WLAN Card Replacement, Disconnect the battery: шаг 8, изображение 1 из 2 Dell Latitude 7490 WLAN Card Replacement, Disconnect the battery: шаг 8, изображение 2 из 2
    • Grip the plastic tab on the battery connector and pull straight up to disconnect it.

    • During reassembly, align this connector over its socket and press down until it clicks into place. If it doesn't connect, re‑align it and try again.

  9. Dell Latitude 7490 WLAN Card Replacement, Unfasten the WLAN card: шаг 9, изображение 1 из 3 Dell Latitude 7490 WLAN Card Replacement, Unfasten the WLAN card: шаг 9, изображение 2 из 3 Dell Latitude 7490 WLAN Card Replacement, Unfasten the WLAN card: шаг 9, изображение 3 из 3
    Инструмент, используемый на этом этапе:
    Tweezers
    $4.99
    Купить
    • Use a Phillips screwdriver to remove the 3.5 mm‑long screw securing the WLAN card and its bracket.

    • Use tweezers or your fingers to remove the WLAN card bracket.

  10. Dell Latitude 7490 WLAN Card Replacement, Disconnect the WLAN card: шаг 10, изображение 1 из 3 Dell Latitude 7490 WLAN Card Replacement, Disconnect the WLAN card: шаг 10, изображение 2 из 3 Dell Latitude 7490 WLAN Card Replacement, Disconnect the WLAN card: шаг 10, изображение 3 из 3
    • Insert an arm of your angled tweezers under the metal neck of one the WLAN card's coaxial connectors.

    • Gently lift as close to the head as possible to disconnect the cable.

    • Repeat the process for the second antenna cable.

    • To reconnect coaxial connectors, hold each one in place over its socket and press down with the flat end of your spudger. The connector will snap into place.

  11. Dell Latitude 7490 WLAN Card Replacement, Remove the WLAN card: шаг 11, изображение 1 из 3 Dell Latitude 7490 WLAN Card Replacement, Remove the WLAN card: шаг 11, изображение 2 из 3 Dell Latitude 7490 WLAN Card Replacement, Remove the WLAN card: шаг 11, изображение 3 из 3
    • The WLAN card is held in place by adheisve.

    • Use a spudger or clean fingernail to pry up the WLAN card's notched edge until it pops up at a slight angle.

    • If you're having trouble, heat an iOpener and apply it to the notched edge for two minutes. Alternatively, you can use a hair dryer to heat the edge.

    • Pull the WLAN card straight out of its socket and remove it.

    • During reassembly, insert the WLAN card at a slight downward angle and push down to secure it with the leftover adhesive.

Заключение

To reassemble your device, follow these instructions in reverse order.

Take your e-waste to an R2 or e-Stewards certified recycler.

Repair didn’t go as planned? Try some basic troubleshooting, or ask our Answers community for help.

Еще один человек закончил это руководство.

Spencer Day

Участник с: 09/14/22

55 149 Репутация

Автор 408 руководств

Команда

iFixit Участник iFixit

Staff

136 членов

Автор 17 410 руководств

0 Комментариев

Добавить комментарий

Просмотр статистики:

За последние 24часов: 0

За последние 7 дней: 6

За последние 30 дней: 28

За всё время: 204