Перейти к основному содержанию

Framework Laptop 16" Mainboard Replacement

Выберете то, что вам нужно

  1. Framework Laptop 16" Mainboard Replacement, Before you begin: шаг 1, изображение 1 из 2 Framework Laptop 16" Mainboard Replacement, Before you begin: шаг 1, изображение 2 из 2
    • Unplug all cables and fully shut down your laptop.

    • If your repair requires a spudger, a T5 Torx, or a Phillips screwdriver, you can use the included Framework screwdriver. Whichever works best for you!

    • Framework recommends that you put your laptop into battery disconnect mode in the BIOS whenever removing the battery. Read how to do that here.

    • To disable this mode, click here.

  2. Framework Laptop 16" Mainboard Replacement, Unlock the expansion cards: шаг 2, изображение 1 из 3 Framework Laptop 16" Mainboard Replacement, Unlock the expansion cards: шаг 2, изображение 2 из 3 Framework Laptop 16" Mainboard Replacement, Unlock the expansion cards: шаг 2, изображение 3 из 3
    • Flip your laptop over and find the two locking tabs beneath the expansion cards.

    • Pull the locking tabs down to unlock the rows of expansion cards above them.

    • The locking tab will show red when it's unlocked.

  3. Framework Laptop 16" Mainboard Replacement, Remove the expansion card: шаг 3, изображение 1 из 3 Framework Laptop 16" Mainboard Replacement, Remove the expansion card: шаг 3, изображение 2 из 3 Framework Laptop 16" Mainboard Replacement, Remove the expansion card: шаг 3, изображение 3 из 3
    • Insert your fingernail over the white rubber lip along the inner edge of the expansion card.

    • Pull the card away from the laptop to disconnect it.

    • This might take some initial force. If you're having trouble, make sure the locking tab is properly unlocked.

    • Slide the card completely off its rail and remove it.

    • Repeat for all of the expansion cards.

    • During reassembly, align the new card on the rail and push it in until it sits evenly with the edge of the laptop.

  4. Framework Laptop 16" Mainboard Replacement, Unlock the Input Modules: шаг 4, изображение 1 из 3 Framework Laptop 16" Mainboard Replacement, Unlock the Input Modules: шаг 4, изображение 2 из 3 Framework Laptop 16" Mainboard Replacement, Unlock the Input Modules: шаг 4, изображение 3 из 3
    • Use your fingernail to pull out the two Input Module latches and unlock them.

    • The latch will show red if it's unlocked.

  5. Framework Laptop 16" Mainboard Replacement, Remove the touchpad spacers: шаг 5, изображение 1 из 3 Framework Laptop 16" Mainboard Replacement, Remove the touchpad spacers: шаг 5, изображение 2 из 3 Framework Laptop 16" Mainboard Replacement, Remove the touchpad spacers: шаг 5, изображение 3 из 3
    • Use your fingers to slide the touchpad spacer toward the bottom edge of the laptop and unclip it.

    • If you're having trouble, check if the corresponding Input Module latch is properly unlocked.

    • Lift the touchpad spacer off the laptop and remove it.

  6. Framework Laptop 16" Mainboard Replacement: шаг 6, изображение 1 из 1
    • Repeat the same procedure for the other touchpad spacer.

  7. Framework Laptop 16" Mainboard Replacement, Remove the touchpad: шаг 7, изображение 1 из 3 Framework Laptop 16" Mainboard Replacement, Remove the touchpad: шаг 7, изображение 2 из 3 Framework Laptop 16" Mainboard Replacement, Remove the touchpad: шаг 7, изображение 3 из 3
    • Use your fingers to slide the touchpad toward the bottom edge of the laptop and disconnect it.

    • If you're having trouble, check if the Input Module latches are properly unlocked.

    • Lift the touchpad and remove it.

    • During reassembly, perform the following:

    • Place the touchpad flat on its cutout so its clips are properly aligned.

    • Press the touchpad down and slide it into place so it lines up evenly with the bottom edge of the laptop.

  8. Framework Laptop 16" Mainboard Replacement, Remove the keyboard: шаг 8, изображение 1 из 3 Framework Laptop 16" Mainboard Replacement, Remove the keyboard: шаг 8, изображение 2 из 3 Framework Laptop 16" Mainboard Replacement, Remove the keyboard: шаг 8, изображение 3 из 3
    • The keyboard is held in place with strong magnets. Apply gradually increasing force to avoid having the keyboard violently eject.

    • Grip the two pull tabs along the bottom of the keyboard.

    • Lift the pull tabs until the keyboard magnets release.

    • Remove the keyboard.

    • During reassembly, make sure the keyboard is seated properly on its alignment pegs and sits evenly with the edges of the laptop.

  9. Framework Laptop 16" Mainboard Replacement, Remove the numpad: шаг 9, изображение 1 из 3 Framework Laptop 16" Mainboard Replacement, Remove the numpad: шаг 9, изображение 2 из 3 Framework Laptop 16" Mainboard Replacement, Remove the numpad: шаг 9, изображение 3 из 3
    • The numpad is held in place with strong magnets. Apply gradually increasing force to avoid having the numpad violently eject.

    • Grip the pull tab at the bottom of the numpad.

    • Lift the pull tab until the numpad magnets release.

    • Remove the numpad.

    • During reassembly, make sure the numpad is seated properly on its alignment pegs and sits flush with the edges of the laptop.

  10. Framework Laptop 16" Mainboard Replacement, Disconnect the midframe cable: шаг 10, изображение 1 из 2 Framework Laptop 16" Mainboard Replacement, Disconnect the midframe cable: шаг 10, изображение 2 из 2
    • Grip the black pull tab on the midframe cable press connector.

    • Lift up to disconnect the midframe cable.

  11. Framework Laptop 16" Mainboard Replacement, Loosen the midframe screws: шаг 11, изображение 1 из 2 Framework Laptop 16" Mainboard Replacement, Loosen the midframe screws: шаг 11, изображение 2 из 2
    • The midframe screws are ordered from 2–17 (number 1 is the press connector). You don't have to follow the order, but you can use it to help keep track of the screws you've loosened.

    • Use a T5 Torx screwdriver to loosen the 16 captive screws securing the midframe.

    • During reassembly, follow the order (starting with 2) to reinstall the screws across the midframe evenly.

  12. Framework Laptop 16" Mainboard Replacement, Remove the midframe: шаг 12, изображение 1 из 2 Framework Laptop 16" Mainboard Replacement, Remove the midframe: шаг 12, изображение 2 из 2
    • Use your fingernail to lift the bottom edge of the midframe enough to grip it with your fingers.

  13. Framework Laptop 16" Mainboard Replacement: шаг 13, изображение 1 из 2 Framework Laptop 16" Mainboard Replacement: шаг 13, изображение 2 из 2
    • Lift the midframe off the laptop and remove it.

    • During reassembly, make sure the midframe sits evenly on its alignment pegs before tightening the screws.

  14. Framework Laptop 16" Mainboard Replacement, Loosen the battery screws: шаг 14, изображение 1 из 2 Framework Laptop 16" Mainboard Replacement, Loosen the battery screws: шаг 14, изображение 2 из 2
    • Use a T5 Torx screwdriver to loosen the three captive screws securing the battery.

  15. Framework Laptop 16" Mainboard Replacement, Remove the battery: шаг 15, изображение 1 из 3 Framework Laptop 16" Mainboard Replacement, Remove the battery: шаг 15, изображение 2 из 3 Framework Laptop 16" Mainboard Replacement, Remove the battery: шаг 15, изображение 3 из 3
    • Grip the black pull tab at the top of the battery.

    • Lift the pull tab to disconnect the battery connector.

    • Remove the battery.

  16. Framework Laptop 16" Mainboard Replacement, Remove the SSD screw: шаг 16, изображение 1 из 2 Framework Laptop 16" Mainboard Replacement, Remove the SSD screw: шаг 16, изображение 2 из 2
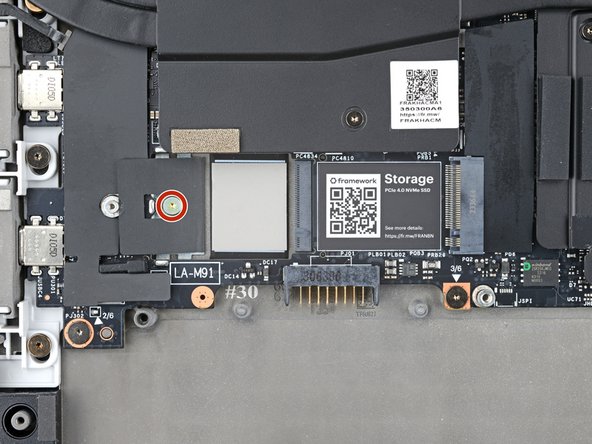
    • Use a T5 Torx screwdriver to remove the 2 mm‑long screw securing the SSD.

    • The SSD might pop up at a shallow angle when you remove the screw.

  17. Framework Laptop 16" Mainboard Replacement, Remove the SSD: шаг 17, изображение 1 из 3 Framework Laptop 16" Mainboard Replacement, Remove the SSD: шаг 17, изображение 2 из 3 Framework Laptop 16" Mainboard Replacement, Remove the SSD: шаг 17, изображение 3 из 3
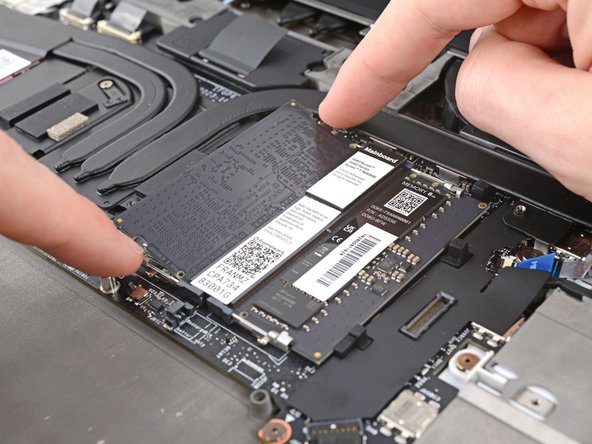
    • Grip the end of the SSD with the screw hole and slide it out of its socket.

    • Remove the SSD.

    • If you're installing a secondary M.2 2230 SSD, remove the 2 mm‑long screw next to the gray thermal pad and follow the same removal procedure.

    • During reassembly, insert the SSD at a shallow angle into its socket, and hold it flat to the laptop while you reinsert its screw.

  18. Framework Laptop 16" Mainboard Replacement, Remove the RAM: шаг 18, изображение 1 из 3 Framework Laptop 16" Mainboard Replacement, Remove the RAM: шаг 18, изображение 2 из 3 Framework Laptop 16" Mainboard Replacement, Remove the RAM: шаг 18, изображение 3 из 3
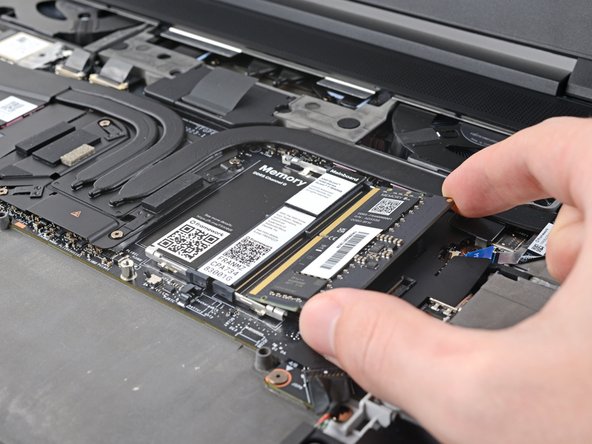
    • Push the two metal arms on each side of the RAM stick outward until they disengage and the stick pops up at a shallow angle.

    • Repeat for the other RAM stick.

  19. Framework Laptop 16" Mainboard Replacement: шаг 19, изображение 1 из 3 Framework Laptop 16" Mainboard Replacement: шаг 19, изображение 2 из 3 Framework Laptop 16" Mainboard Replacement: шаг 19, изображение 3 из 3
    • Slide the RAM stick out of its socket and remove it.

    • Repeat for the other RAM stick.

    • During reassembly, insert the RAM sticks into their sockets at a slight downward angle, then push down firmly until both metal arms lock the sticks in place.

  20. Framework Laptop 16" Mainboard Replacement, Loosen the Wi-Fi card screw: шаг 20, изображение 1 из 2 Framework Laptop 16" Mainboard Replacement, Loosen the Wi-Fi card screw: шаг 20, изображение 2 из 2
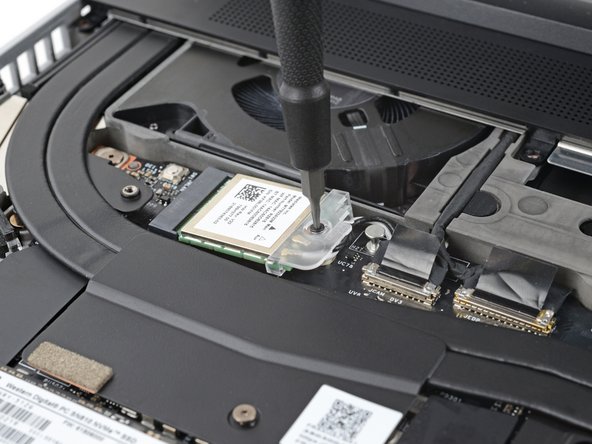
    • Use a T5 Torx screwdriver to loosen the captive screw securing Wi-Fi card.

    • The Wi-Fi card might pop up at a shallow angle when you loosen the screw.

  21. Framework Laptop 16" Mainboard Replacement, Remove the Wi-Fi card: шаг 21, изображение 1 из 2 Framework Laptop 16" Mainboard Replacement, Remove the Wi-Fi card: шаг 21, изображение 2 из 2
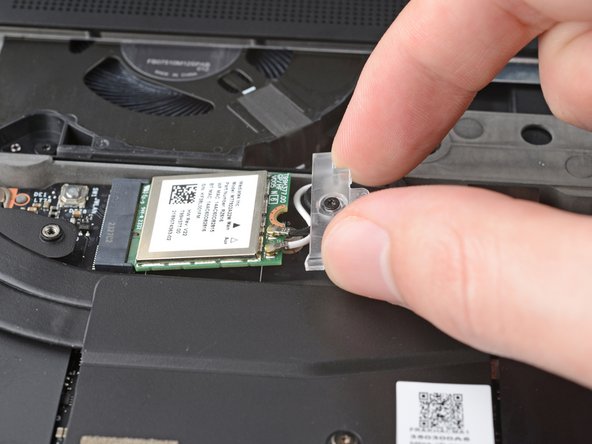
    • Slide the clear Wi-Fi card cover straight off the card and remove it.

  22. Framework Laptop 16" Mainboard Replacement: шаг 22, изображение 1 из 2 Framework Laptop 16" Mainboard Replacement: шаг 22, изображение 2 из 2
    • Grip the end of the Wi-Fi card with the screw hole and slide it out of its socket.

    • Don't pull the Wi-Fi card too far from its socket, as it's still connected by two cables.

  23. Framework Laptop 16" Mainboard Replacement: шаг 23, изображение 1 из 3 Framework Laptop 16" Mainboard Replacement: шаг 23, изображение 2 из 3 Framework Laptop 16" Mainboard Replacement: шаг 23, изображение 3 из 3
    • Insert the flat end of a spudger under one of the coaxial connectors, where the cable meets the metal head.

    • Lift the spudger straight up to disconnect the coaxial cable.

    • Repeat for the other coaxial cable and remove the Wi-Fi card.

    • During reassembly, refer to the arrows on the Wi-Fi card for which cable (black or white) a connector belongs to.

  24. Framework Laptop 16" Mainboard Replacement, Lift the interposer door: шаг 24, изображение 1 из 2 Framework Laptop 16" Mainboard Replacement, Lift the interposer door: шаг 24, изображение 2 из 2
    • Lift the interposer door by its black pull tab and let it rest upright.

  25. Framework Laptop 16" Mainboard Replacement, Loosen the interposer screws: шаг 25, изображение 1 из 3 Framework Laptop 16" Mainboard Replacement, Loosen the interposer screws: шаг 25, изображение 2 из 3 Framework Laptop 16" Mainboard Replacement, Loosen the interposer screws: шаг 25, изображение 3 из 3
    • If you have the graphics module installed, your interposer will have four screws. Otherwise, you'll have three screws.

    • Lift the pull tab on the interposer and let it rest vertically to access all of its screws.

    • Use a T5 Torx screwdriver to loosen the three captive screws securing the interposer.

    • If you have the graphics module, use a T5 Torx screwdriver to loosen the four captive screws securing the interposer.

  26. Framework Laptop 16" Mainboard Replacement, Remove the interposer: шаг 26, изображение 1 из 2 Framework Laptop 16" Mainboard Replacement, Remove the interposer: шаг 26, изображение 2 из 2
    • Lift the interposer by its pull tab and remove it.

  27. Framework Laptop 16" Mainboard Replacement, Loosen the expansion bay screws: шаг 27, изображение 1 из 2 Framework Laptop 16" Mainboard Replacement, Loosen the expansion bay screws: шаг 27, изображение 2 из 2
    • Use a T5 Torx screwdriver to loosen the two captive screws securing the expansion bay.

    • Close the interposer door before continuing.

  28. Framework Laptop 16" Mainboard Replacement, Remove the expansion bay: шаг 28, изображение 1 из 3 Framework Laptop 16" Mainboard Replacement, Remove the expansion bay: шаг 28, изображение 2 из 3 Framework Laptop 16" Mainboard Replacement, Remove the expansion bay: шаг 28, изображение 3 из 3
    • Close your laptop and flip it over.

    • Slide the expansion bay out of the laptop and remove it.

    • The bay should slide out easily. If you feel any resistance, check if the screws holding it in place are fully loosened.

  29. Framework Laptop 16" Mainboard Replacement, Disconnect the fingerprint sensor: шаг 29, изображение 1 из 3 Framework Laptop 16" Mainboard Replacement, Disconnect the fingerprint sensor: шаг 29, изображение 2 из 3 Framework Laptop 16" Mainboard Replacement, Disconnect the fingerprint sensor: шаг 29, изображение 3 из 3
    • Use the flat end of a spudger, or a clean fingernail, to lift up the locking tab on the fingerprint sensor ZIF connector.

  30. Framework Laptop 16" Mainboard Replacement: шаг 30, изображение 1 из 2 Framework Laptop 16" Mainboard Replacement: шаг 30, изображение 2 из 2
    Инструмент, используемый на этом этапе:
    Tweezers
    $4.99
    Купить
    • Use tweezers, or your fingers, to grip the blue pull tab and slide the fingerprint sensor cable straight out of its socket.

  31. Framework Laptop 16" Mainboard Replacement: шаг 31, изображение 1 из 3 Framework Laptop 16" Mainboard Replacement: шаг 31, изображение 2 из 3 Framework Laptop 16" Mainboard Replacement: шаг 31, изображение 3 из 3
    • The fingerprint sensor cable is lightly adhered to the laptop frame.

    • Use your fingers to peel the fingerprint sensor cable away from the frame and separate the adhesive.

    • During reassembly, if your adhesive is still sticky, press the cable to the frame to re-adhere it. Otherwise, use double-sided tape to replace the adhesive.

  32. Framework Laptop 16" Mainboard Replacement, Remove the ventilation plate: шаг 32, изображение 1 из 3 Framework Laptop 16" Mainboard Replacement, Remove the ventilation plate: шаг 32, изображение 2 из 3 Framework Laptop 16" Mainboard Replacement, Remove the ventilation plate: шаг 32, изображение 3 из 3
    • The ventilation plate is held in place with magnets.

    • Lift the bottom of the ventilation plate and pull it away from the laptop until the magnets release.

    • Remove the ventilation plate.

  33. Framework Laptop 16" Mainboard Replacement, Disconnect the speaker: шаг 33, изображение 1 из 2 Framework Laptop 16" Mainboard Replacement, Disconnect the speaker: шаг 33, изображение 2 из 2
    • Lift the speaker cable connector by its black pull tab and disconnect it.

  34. Framework Laptop 16" Mainboard Replacement, Disconnect the display: шаг 34, изображение 1 из 3 Framework Laptop 16" Mainboard Replacement, Disconnect the display: шаг 34, изображение 2 из 3 Framework Laptop 16" Mainboard Replacement, Disconnect the display: шаг 34, изображение 3 из 3
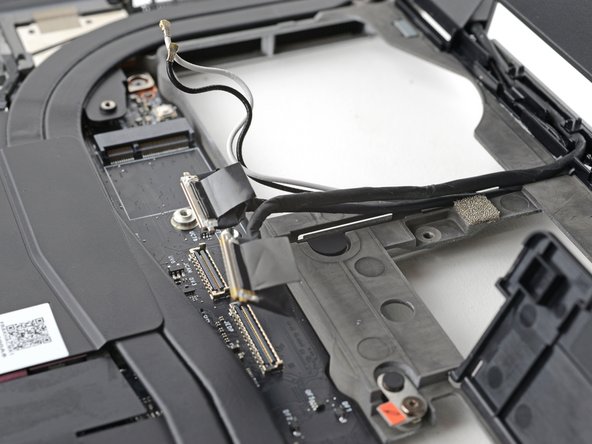
    • Lift the two display connectors by their black pull tabs to disconnect them.

  35. Framework Laptop 16" Mainboard Replacement, Reroute the cables: шаг 35, изображение 1 из 3 Framework Laptop 16" Mainboard Replacement, Reroute the cables: шаг 35, изображение 2 из 3 Framework Laptop 16" Mainboard Replacement, Reroute the cables: шаг 35, изображение 3 из 3
    • Lift the display and Wi-Fi card cables out of their slot in the frame enough to give room for the mainboard to lift straight up.

    • During reassembly, make sure the cables are routed properly in their slot so the midframe can sit flat on the frame.

  36. Framework Laptop 16" Mainboard Replacement, Remove the mainboard screws: шаг 36, изображение 1 из 3 Framework Laptop 16" Mainboard Replacement, Remove the mainboard screws: шаг 36, изображение 2 из 3 Framework Laptop 16" Mainboard Replacement, Remove the mainboard screws: шаг 36, изображение 3 из 3
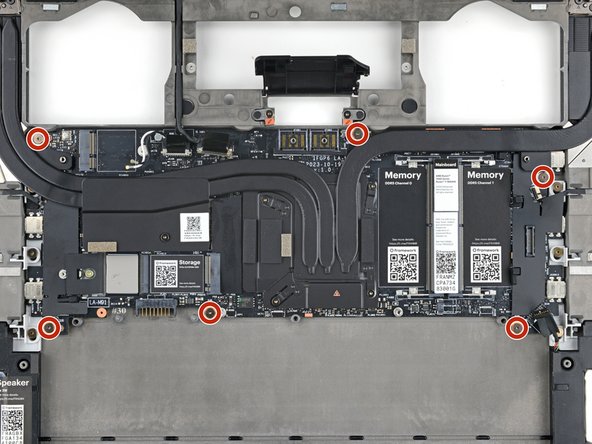
    • Lift up the interposer door to reveal the screw underneath.

    • The mainboard screws are ordered from 1–6. You don't have to follow the order, but you can use it to help keep track of the screws you've removed.

    • Use a T5 Torx screwdriver to remove the six 2 mm‑long screws securing the mainboard.

  37. Framework Laptop 16" Mainboard Replacement, Remove the mainboard: шаг 37, изображение 1 из 3 Framework Laptop 16" Mainboard Replacement, Remove the mainboard: шаг 37, изображение 2 из 3 Framework Laptop 16" Mainboard Replacement, Remove the mainboard: шаг 37, изображение 3 из 3
    • Grab the mainboard by the curving pipes of its heatsink.

    • Lift the mainboard off its alignment pegs and remove it.

    • During reassembly, make sure all of the cables are above the mainboard before securing it back to the frame.

Заключение

To reassemble your device, follow these instructions in reverse order.

Take your e-waste to an R2 or e-Stewards certified recycler.

Repair didn’t go as planned? Try some basic troubleshooting, or ask our Answers Community for help.

Alex Diaz-Kokaisl

Участник с: 01/16/22

125 007 Репутация

Автор 582 руководств

Команда

iFixit Участник iFixit

Staff

136 членов

Автор 17 430 руководств

0 Комментариев

Добавить комментарий

Просмотр статистики:

За последние 24часов: 1

За последние 7 дней: 25

За последние 30 дней: 91

За всё время: 238