Перейти к основному содержанию

Garmin Vívoactive 4 Housing Replacement

Выберете то, что вам нужно

  1. Garmin Vívoactive 4 Housing Replacement, Watch Band: шаг 1, изображение 1 из 1
    • Flip the watch on its back to reveal the watch band connection pins.

  2. Garmin Vívoactive 4 Housing Replacement, Remove Bands: шаг 2, изображение 1 из 3 Garmin Vívoactive 4 Housing Replacement, Remove Bands: шаг 2, изображение 2 из 3 Garmin Vívoactive 4 Housing Replacement, Remove Bands: шаг 2, изображение 3 из 3
    • Wedge your fingernail or the tip of a spudger underneath the watch band's small metal pin.

    • Push on the pin to release the strap from it's hinge.

    • Pull the strap away from the watch to disconnect it.

    • The strap will not pull away if the pin isn't fully pushed in.

  3. Garmin Vívoactive 4 Housing Replacement: шаг 3, изображение 1 из 1
    • With both straps removed, a new replacement watch band may be inserted.

  4. Garmin Vívoactive 4 Housing Replacement, Screen: шаг 4, изображение 1 из 1
    • Use a heatgun to loosen the adhesive beneath the screen, it should take a 5-10 minutes for adhesive to loosen.

    • Handle the watch with care to avoid burning yourself after it has been heated. Review the How to Use a Heat Gun to Soften Adhesive guide.

  5. Garmin Vívoactive 4 Housing Replacement: шаг 5, изображение 1 из 2 Garmin Vívoactive 4 Housing Replacement: шаг 5, изображение 2 из 2
    • Wedge a thin opening tool or your iFixit Jimmy in between the seam where the screen and the watch’s housing connect.

    • Pry the screen off the device.

    • There is a cable underneath the screen that needs to be disconnected - be careful not to rip it.

    • Work quickly so the adhesive doesn’t cool too much.

  6. Garmin Vívoactive 4 Housing Replacement: шаг 6, изображение 1 из 3 Garmin Vívoactive 4 Housing Replacement: шаг 6, изображение 2 из 3 Garmin Vívoactive 4 Housing Replacement: шаг 6, изображение 3 из 3
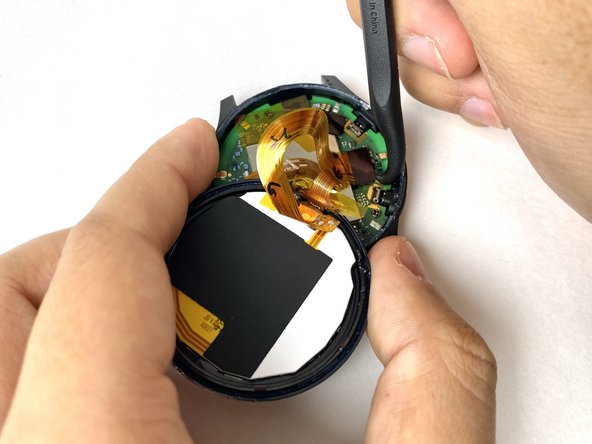
    • Carefully disconnect both cables from the motherboard by placing the tip of your spudger under the edge of the connector, and prying the connector straight up from its socket.

  7. Garmin Vívoactive 4 Housing Replacement: шаг 7, изображение 1 из 1
    • Remove the screen.

  8. Garmin Vívoactive 4 Housing Replacement, Motherboard: шаг 8, изображение 1 из 1
    • Carefully peel off the ribbon tape that is holding down the motherboard.

  9. Garmin Vívoactive 4 Housing Replacement: шаг 9, изображение 1 из 1
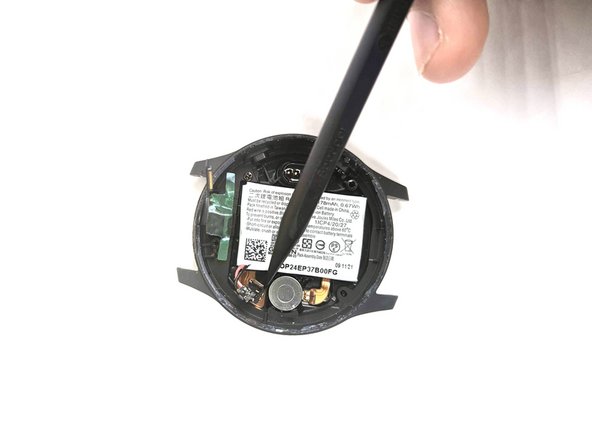
    • Place the tip of your spudger under the edge of the connector, and pry the connector straight up from its socket to disconnect the battery from the motherboard.

    • Do this carefully to avoid ripping the cable.

  10. Garmin Vívoactive 4 Housing Replacement: шаг 10, изображение 1 из 3 Garmin Vívoactive 4 Housing Replacement: шаг 10, изображение 2 из 3 Garmin Vívoactive 4 Housing Replacement: шаг 10, изображение 3 из 3
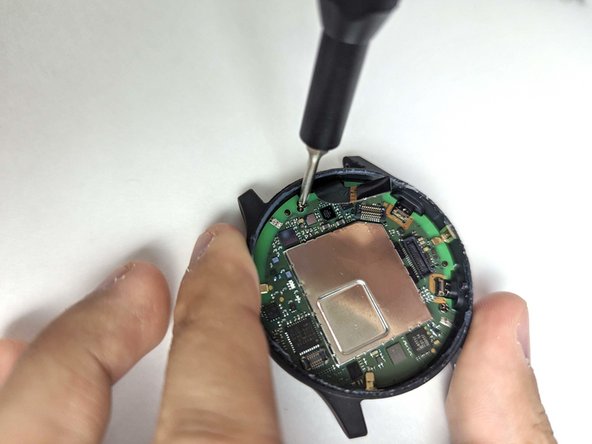
    • Use a Phillips #00 screwdriver to remove the 3.2 mm screw on the motherboard.

    • Use a Phillips #00 screwdriver to remove the 4.8 mm screw on the motherboard.

  11. Garmin Vívoactive 4 Housing Replacement: шаг 11, изображение 1 из 3 Garmin Vívoactive 4 Housing Replacement: шаг 11, изображение 2 из 3 Garmin Vívoactive 4 Housing Replacement: шаг 11, изображение 3 из 3
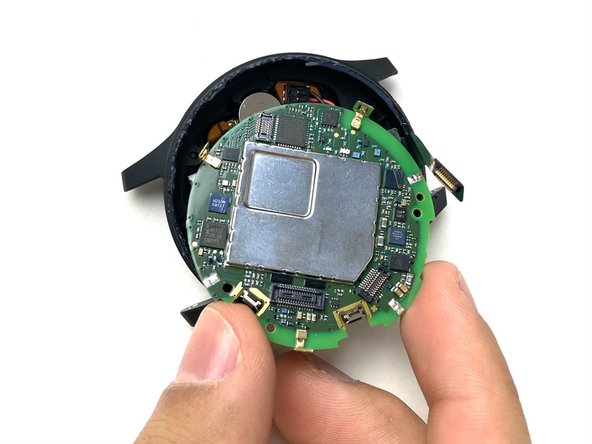
    • Pull the battery cable up to dislodge the motherboard.

    • Gently remove the motherboard from the socket.

    • The motherboard may get caught under the housing due to the clips on the edge.

  12. Garmin Vívoactive 4 Housing Replacement, Battery: шаг 12, изображение 1 из 2 Garmin Vívoactive 4 Housing Replacement, Battery: шаг 12, изображение 2 из 2
    • Use the pointed tip of a spudger to carefully push on each side of the battery connector to disconnect the battery from the motherboard.

  13. Garmin Vívoactive 4 Housing Replacement: шаг 13, изображение 1 из 3 Garmin Vívoactive 4 Housing Replacement: шаг 13, изображение 2 из 3 Garmin Vívoactive 4 Housing Replacement: шаг 13, изображение 3 из 3
    • Use a spudger to pry the battery from the case.

    • Be careful not to damage any surrounding components.

    • There is an adhesive holding the battery down. Use an iOpener if it is too difficult to remove the battery with the spudger alone.

  14. Garmin Vívoactive 4 Housing Replacement, Housing: шаг 14, изображение 1 из 1
    • From here, the only remaining part should be the housing unit itself.

    • Swap out the old watch's housing for a new replacment.

Заключение

To reassemble your device, follow these instructions in reverse order.

Jacob Byron

Участник с: 11/01/23

201 Репутация

Автор 2 руководств

Команда

UMass Dartmouth, Team 1-3, Petersen Fall 2023 Участник UMass Dartmouth, Team 1-3, Petersen Fall 2023

UMASSD-PETERSEN-F23S1G3

4 членов

Автор 6 руководств

0 Комментариев

Добавить комментарий

Просмотр статистики:

За последние 24часов: 0

За последние 7 дней: 11

За последние 30 дней: 35

За всё время: 193