Перейти к основному содержанию

How to Apply Liquid Metal in a PlayStation 5

Выберете то, что вам нужно

  1. How to Apply Liquid Metal in a PlayStation 5, Remove the stand screw: шаг 1, изображение 1 из 1
    • If your PlayStation 5 is in its vertical orientation, flip it upside down so the stand is facing up.

    • If your PlayStation 5 is in its horizontal orientation, skip to Step 6.

    • Work on a flat surface to prevent your PlayStation from falling over.

    • Use a coin or a flathead screwdriver to remove the 26.5 mm-long stand screw.

  2. How to Apply Liquid Metal in a PlayStation 5, Remove the vertical stand: шаг 2, изображение 1 из 2 How to Apply Liquid Metal in a PlayStation 5, Remove the vertical stand: шаг 2, изображение 2 из 2
    • Lift straight up to remove the stand.

  3. How to Apply Liquid Metal in a PlayStation 5, Store the stand screw: шаг 3, изображение 1 из 2 How to Apply Liquid Metal in a PlayStation 5, Store the stand screw: шаг 3, изображение 2 из 2
    • Insert the screw into the cubby on the bottom of the stand.

  4. How to Apply Liquid Metal in a PlayStation 5, Cap the screw hole: шаг 4, изображение 1 из 3 How to Apply Liquid Metal in a PlayStation 5, Cap the screw hole: шаг 4, изображение 2 из 3 How to Apply Liquid Metal in a PlayStation 5, Cap the screw hole: шаг 4, изображение 3 из 3
    Инструмент, используемый на этом этапе:
    Tweezers
    $4.99
    Купить
    • Use a pair of tweezers or your fingernail to remove the cap from the cubby.

    • Use your finger to press the cap into the screw hole.

  5. How to Apply Liquid Metal in a PlayStation 5, Close the cubby: шаг 5, изображение 1 из 3 How to Apply Liquid Metal in a PlayStation 5, Close the cubby: шаг 5, изображение 2 из 3 How to Apply Liquid Metal in a PlayStation 5, Close the cubby: шаг 5, изображение 3 из 3
    • Twist the stand counterclockwise to close the cubby.

  6. How to Apply Liquid Metal in a PlayStation 5, Remove the horizontal stand: шаг 6, изображение 1 из 2 How to Apply Liquid Metal in a PlayStation 5, Remove the horizontal stand: шаг 6, изображение 2 из 2
    • If your PlayStation 5 is in its horizontal orientation, rest it on its face with the charging port facing up.

    • Lift the stand straight up to remove it.

  7. How to Apply Liquid Metal in a PlayStation 5, Remove the right faceplate: шаг 7, изображение 1 из 3 How to Apply Liquid Metal in a PlayStation 5, Remove the right faceplate: шаг 7, изображение 2 из 3 How to Apply Liquid Metal in a PlayStation 5, Remove the right faceplate: шаг 7, изображение 3 из 3
    • Flip the device over so that the USB and ethernet ports are on the left side from your perspective.

    • Lift up the corner of the faceplate to unclip it from the case.

  8. How to Apply Liquid Metal in a PlayStation 5: шаг 8, изображение 1 из 2 How to Apply Liquid Metal in a PlayStation 5: шаг 8, изображение 2 из 2
    • While lifting up the corner, slide the faceplate towards the bottom of the device.

    • Remove the right faceplate.

  9. How to Apply Liquid Metal in a PlayStation 5, Pry up the grille: шаг 9, изображение 1 из 3 How to Apply Liquid Metal in a PlayStation 5, Pry up the grille: шаг 9, изображение 2 из 3 How to Apply Liquid Metal in a PlayStation 5, Pry up the grille: шаг 9, изображение 3 из 3
    • Insert the flat end of a spudger underneath the grille and into the gap above the fan.

    • Lift up with the spudger to pry the grille away from the case.

  10. How to Apply Liquid Metal in a PlayStation 5, Remove the grille: шаг 10, изображение 1 из 2 How to Apply Liquid Metal in a PlayStation 5, Remove the grille: шаг 10, изображение 2 из 2
    • Lift the grille away from the case to remove it.

  11. How to Apply Liquid Metal in a PlayStation 5, Remove the fan shroud screws: шаг 11, изображение 1 из 1
    Инструмент, используемый на этом этапе:
    Magnetic Project Mat
    $19.95
    Купить
    • Use a TR8 Torx security driver to remove the four screws securing the fan shroud to the case:

    • Two 23.3 mm-long screws

    • One 11.4 mm-long screw

    • One 31 mm-long screw

    • Throughout this repair, keep track of each screw and make sure it goes back exactly where it came from to avoid damaging your console.

  12. How to Apply Liquid Metal in a PlayStation 5, Remove the fan shroud: шаг 12, изображение 1 из 2 How to Apply Liquid Metal in a PlayStation 5, Remove the fan shroud: шаг 12, изображение 2 из 2
    • Lift the fan shroud straight up to remove it.

  13. How to Apply Liquid Metal in a PlayStation 5, Remove the wire cover: шаг 13, изображение 1 из 3 How to Apply Liquid Metal in a PlayStation 5, Remove the wire cover: шаг 13, изображение 2 из 3 How to Apply Liquid Metal in a PlayStation 5, Remove the wire cover: шаг 13, изображение 3 из 3
    • Insert the flat end of a spudger beneath the black wire cover and into the gap above the fan wires.

    • Pry only on the wire cover, not on the fan wires themselves.

    • Use the spudger to peel up the wire cover until you can grip it with your fingers.

  14. How to Apply Liquid Metal in a PlayStation 5: шаг 14, изображение 1 из 3 How to Apply Liquid Metal in a PlayStation 5: шаг 14, изображение 2 из 3 How to Apply Liquid Metal in a PlayStation 5: шаг 14, изображение 3 из 3
    • Use your fingers to peel off the wire cover.

  15. How to Apply Liquid Metal in a PlayStation 5, Disconnect the fan: шаг 15, изображение 1 из 2 How to Apply Liquid Metal in a PlayStation 5, Disconnect the fan: шаг 15, изображение 2 из 2
    • Use your fingers to grip the edges of the fan cable connector, and pull up to disconnect it from the motherboard.

    • Always pull cables by their connectors and not the wires themselves.

  16. How to Apply Liquid Metal in a PlayStation 5, Remove the fan: шаг 16, изображение 1 из 3 How to Apply Liquid Metal in a PlayStation 5, Remove the fan: шаг 16, изображение 2 из 3 How to Apply Liquid Metal in a PlayStation 5, Remove the fan: шаг 16, изображение 3 из 3
    • Lift the fan up and out of the case to remove it.

  17. How to Apply Liquid Metal in a PlayStation 5, Remove the SSD cover: шаг 17, изображение 1 из 1
    • Use a Phillips screwdriver to remove the 17 mm-long SSD cover screw.

  18. How to Apply Liquid Metal in a PlayStation 5: шаг 18, изображение 1 из 3 How to Apply Liquid Metal in a PlayStation 5: шаг 18, изображение 2 из 3 How to Apply Liquid Metal in a PlayStation 5: шаг 18, изображение 3 из 3
    • Use your finger to slide the SSD cover towards the top of the device to unclip it from the case.

    • Remove the SSD cover.

  19. How to Apply Liquid Metal in a PlayStation 5, Remove the optical drive wire: шаг 19, изображение 1 из 2 How to Apply Liquid Metal in a PlayStation 5, Remove the optical drive wire: шаг 19, изображение 2 из 2
    • Use your fingers to grip the edges of the optical drive cable connector, and pull up to disconnect it from the motherboard.

    • Always pull cables by their connectors and not the wires themselves.

  20. How to Apply Liquid Metal in a PlayStation 5: шаг 20, изображение 1 из 2 How to Apply Liquid Metal in a PlayStation 5: шаг 20, изображение 2 из 2
    • Use your fingers to grip the edges of the optical drive cable connector, and pull up to disconnect it from the optical drive.

  21. How to Apply Liquid Metal in a PlayStation 5, Remove the tamper-evident sticker: шаг 21, изображение 1 из 3 How to Apply Liquid Metal in a PlayStation 5, Remove the tamper-evident sticker: шаг 21, изображение 2 из 3 How to Apply Liquid Metal in a PlayStation 5, Remove the tamper-evident sticker: шаг 21, изображение 3 из 3
    Инструмент, используемый на этом этапе:
    Tweezers
    $4.99
    Купить
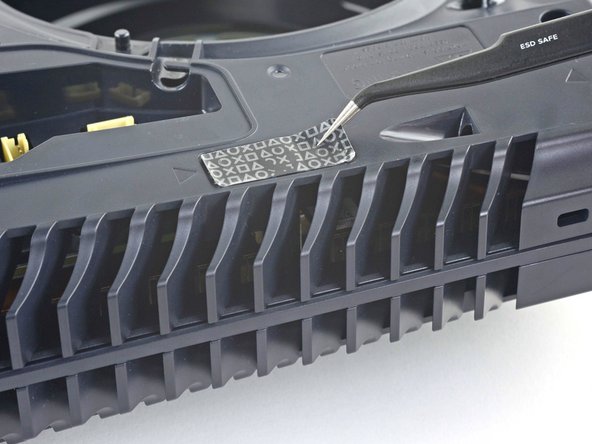
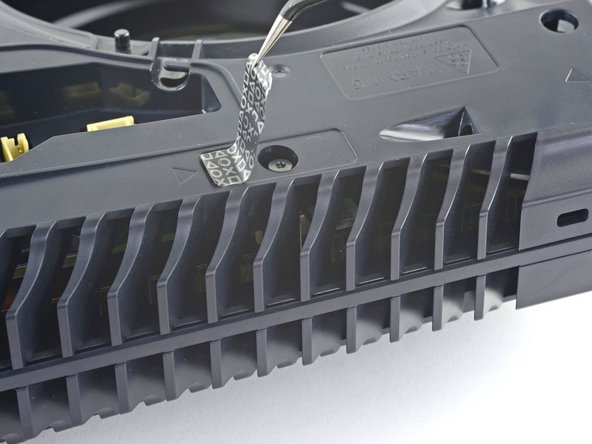
    • Use a pair of tweezers to remove the tamper-evident sticker covering the remaining case screw.

    • If your PlayStation 5 hasn't been opened before, this sticker will be completely black. The pattern will appear after you remove it.

    • Technically, these are tamper-evident stickers—but don't worry—Sony can't legally void your warranty, as long as you don't damage anything. Have fun!

  22. How to Apply Liquid Metal in a PlayStation 5, Remove the case screws: шаг 22, изображение 1 из 1
    • Use a T8 Torx driver to remove the eleven screws securing the case:

    • Six 18.6 mm-long screws

    • Two 23.3 mm-long screws

    • Two 43.2 mm-long screws

    • One 7.3 mm-long screw

  23. How to Apply Liquid Metal in a PlayStation 5, Remove the case: шаг 23, изображение 1 из 2 How to Apply Liquid Metal in a PlayStation 5, Remove the case: шаг 23, изображение 2 из 2
    • Lift the case straight up to remove it.

  24. How to Apply Liquid Metal in a PlayStation 5, Remove the optical drive ribbon cable: шаг 24, изображение 1 из 3 How to Apply Liquid Metal in a PlayStation 5, Remove the optical drive ribbon cable: шаг 24, изображение 2 из 3 How to Apply Liquid Metal in a PlayStation 5, Remove the optical drive ribbon cable: шаг 24, изображение 3 из 3
    • Use the flat end of a spudger to press down on the optical drive connector's metal locking tab.

    • With the metal tab depressed, use a pair of tweezers to pull the blue pull tab directly away from the connector to disconnect the cable from the optical drive.

    • Pull only on the pull tab, not the cable itself.

  25. How to Apply Liquid Metal in a PlayStation 5, Remove the optical drive: шаг 25, изображение 1 из 2 How to Apply Liquid Metal in a PlayStation 5, Remove the optical drive: шаг 25, изображение 2 из 2
    • Lift the optical drive away from the device to remove it.

  26. How to Apply Liquid Metal in a PlayStation 5, Remove the optical drive ribbon cable: шаг 26, изображение 1 из 3 How to Apply Liquid Metal in a PlayStation 5, Remove the optical drive ribbon cable: шаг 26, изображение 2 из 3 How to Apply Liquid Metal in a PlayStation 5, Remove the optical drive ribbon cable: шаг 26, изображение 3 из 3
    Инструмент, используемый на этом этапе:
    Tweezers
    $4.99
    Купить
    • Use the flat end of a spudger to press down on the optical drive connector's metal locking tab.

    • With the metal tab depressed, use a pair of tweezers to pull the blue pull tab directly away from the connector to disconnect the cable from the motherboard.

  27. How to Apply Liquid Metal in a PlayStation 5, Remove the power and eject button ribbon cable: шаг 27, изображение 1 из 2 How to Apply Liquid Metal in a PlayStation 5, Remove the power and eject button ribbon cable: шаг 27, изображение 2 из 2
    • Use a pair of tweezers to pull the blue pull tab directly away from the connector to disconnect the power and eject button ribbon cable.

  28. How to Apply Liquid Metal in a PlayStation 5, Remove the LED ribbon cable: шаг 28, изображение 1 из 2 How to Apply Liquid Metal in a PlayStation 5, Remove the LED ribbon cable: шаг 28, изображение 2 из 2
    • Use a pair of tweezers to pull the blue pull tab directly away from the connector to disconnect the LED ribbon cable.

  29. How to Apply Liquid Metal in a PlayStation 5, Remove the antenna wires: шаг 29, изображение 1 из 3 How to Apply Liquid Metal in a PlayStation 5, Remove the antenna wires: шаг 29, изображение 2 из 3 How to Apply Liquid Metal in a PlayStation 5, Remove the antenna wires: шаг 29, изображение 3 из 3
    • Use a pair of tweezers to grip the white Wi-Fi antenna wire at its metal base, as close to the connector as possible.

    • Lift the wire's connector straight up to disconnect it from the motherboard.

    • Repeat for the black Wi-Fi antenna wire.

    • Some board revisions may not have these antenna wires. If your board is missing these connectors, skip this step.

  30. How to Apply Liquid Metal in a PlayStation 5: шаг 30, изображение 1 из 3 How to Apply Liquid Metal in a PlayStation 5: шаг 30, изображение 2 из 3 How to Apply Liquid Metal in a PlayStation 5: шаг 30, изображение 3 из 3
    • Use a pair of tweezers to grip the black or blue power supply antenna wire at its metal base, as close to the connector as possible.

    • Lift the wire's connector straight up to disconnect it from the motherboard.

    • Repeat for the white power supply antenna wire.

  31. How to Apply Liquid Metal in a PlayStation 5, Remove the white stickers: шаг 31, изображение 1 из 3 How to Apply Liquid Metal in a PlayStation 5, Remove the white stickers: шаг 31, изображение 2 из 3 How to Apply Liquid Metal in a PlayStation 5, Remove the white stickers: шаг 31, изображение 3 из 3
    • Use a pair of tweezers to peel back the white sticker holding the antenna wires to the top shield plate.

    • Remove the antenna wires from underneath the sticker.

    • Press the white sticker back down onto the top shield plate so it can be reused.

  32. How to Apply Liquid Metal in a PlayStation 5: шаг 32, изображение 1 из 3 How to Apply Liquid Metal in a PlayStation 5: шаг 32, изображение 2 из 3 How to Apply Liquid Metal in a PlayStation 5: шаг 32, изображение 3 из 3
    • Repeat the previous step to peel back the four remaining stickers.

  33. How to Apply Liquid Metal in a PlayStation 5: шаг 33, изображение 1 из 3 How to Apply Liquid Metal in a PlayStation 5: шаг 33, изображение 2 из 3 How to Apply Liquid Metal in a PlayStation 5: шаг 33, изображение 3 из 3
    • Use a pair of tweezers to peel back the white sticker holding the LED ribbon cable to the heat sink.

    • Remove the LED ribbon cable from underneath the sticker.

    • Press the white sticker back down onto the heat sink so it can be reused.

  34. How to Apply Liquid Metal in a PlayStation 5, Remove the top shield plate screws: шаг 34, изображение 1 из 1
    • Use a T8 Torx driver to remove the forty-two screws securing the top shield plate:

    • Forty-one 7.3 mm-long screws

    • One 43.2 mm-long screw

  35. How to Apply Liquid Metal in a PlayStation 5, Remove the top shield plate: шаг 35, изображение 1 из 3 How to Apply Liquid Metal in a PlayStation 5, Remove the top shield plate: шаг 35, изображение 2 из 3 How to Apply Liquid Metal in a PlayStation 5, Remove the top shield plate: шаг 35, изображение 3 из 3
    • Lift the top shield plate off of the motherboard to remove it.

    • During reassembly, this is a good point to replace any thermal pads on the top of the main board, if necessary. The pads may be stuck to both the top shield plate and the main board.

    • It's important that the replacement pads are the same thickness as the originals, otherwise the foam around the APU may not seal properly.

  36. How to Apply Liquid Metal in a PlayStation 5, Disconnect the USB board: шаг 36, изображение 1 из 3 How to Apply Liquid Metal in a PlayStation 5, Disconnect the USB board: шаг 36, изображение 2 из 3 How to Apply Liquid Metal in a PlayStation 5, Disconnect the USB board: шаг 36, изображение 3 из 3
    • Use your finger to depress the metal locking tab on the USB board cable's board connector.

    • With the metal tab depressed, place the flat end of a spudger against the insulating foam pad on the ribbon cable and pull it directly away from the connector to disconnect it.

  37. How to Apply Liquid Metal in a PlayStation 5, Remove the main board screws: шаг 37, изображение 1 из 2 How to Apply Liquid Metal in a PlayStation 5, Remove the main board screws: шаг 37, изображение 2 из 2
    • Use a Phillips screwdriver to remove the 11 mm‑long SSD screw.

    • Be careful not to lose the small spacer under the screw.

    • Use a Phillips screwdriver to remove the two 11.8 mm‑long APU bracket screws.

    • Use a TR8 Torx security screwdriver to remove the two remaining 7.3 mm‑long main board screws.

  38. How to Apply Liquid Metal in a PlayStation 5: шаг 38, изображение 1 из 3 How to Apply Liquid Metal in a PlayStation 5: шаг 38, изображение 2 из 3 How to Apply Liquid Metal in a PlayStation 5: шаг 38, изображение 3 из 3
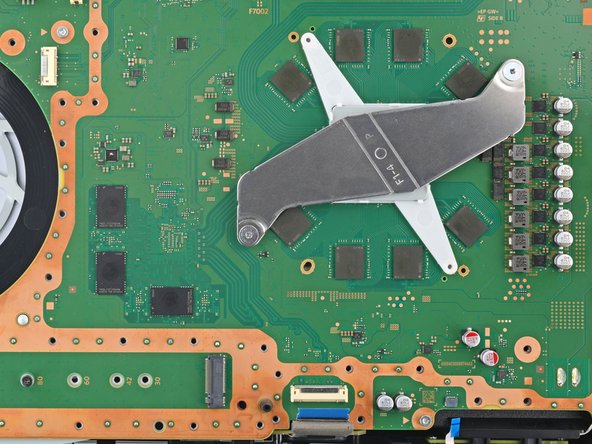
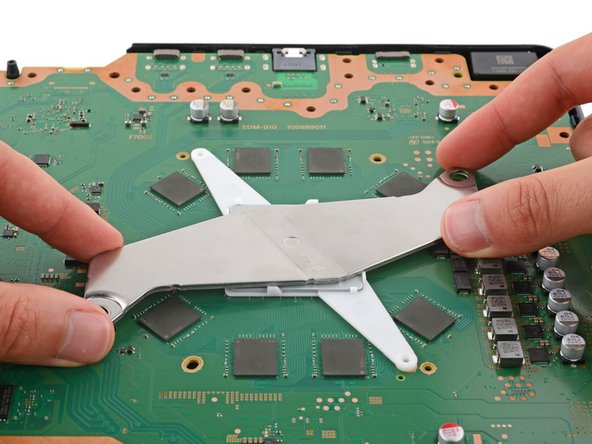
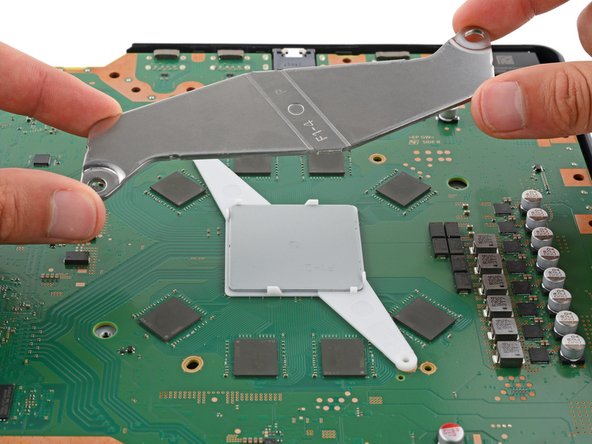
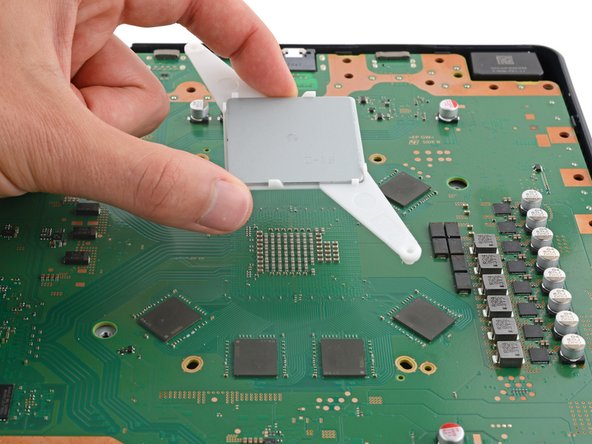
    • Lift and remove both APU brackets from the board.

    • During reassembly:

    • Put the bracket with plastic arms on first so the pegs go into their cutouts.

    • Then, put the metal bracket onto the plastic one so they're perpendicular and the screw holes line up.

  39. How to Apply Liquid Metal in a PlayStation 5, Separate the main board: шаг 39, изображение 1 из 3 How to Apply Liquid Metal in a PlayStation 5, Separate the main board: шаг 39, изображение 2 из 3 How to Apply Liquid Metal in a PlayStation 5, Separate the main board: шаг 39, изображение 3 из 3
    • Don't try to fully remove the motherboard during this step—the corner near the power button is still secured by metal prongs, which will be disconnected in the next step.

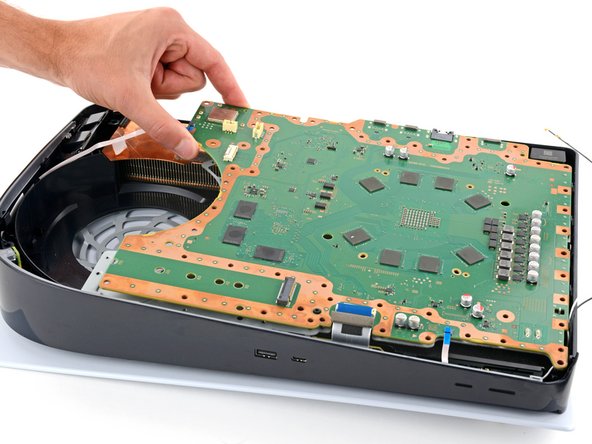
    • Gently lift the edge of the motherboard with the large cutout to partially separate it from the bottom shield plate.

    • With the board lifted, insert the flat end of a spudger between the board and the bottom shield plate and gently twist to separate them. Work your way around the perimeter of the board.

    • Many small thermal pads bond the main board to the metal shield plate underneath. Depending on the age of your PlayStation and the condition of the pads, it may take significant force to separate the board.

  40. How to Apply Liquid Metal in a PlayStation 5: шаг 40, изображение 1 из 3 How to Apply Liquid Metal in a PlayStation 5: шаг 40, изображение 2 из 3 How to Apply Liquid Metal in a PlayStation 5: шаг 40, изображение 3 из 3
    • The power supply is connected to the bottom of the main board assembly by metal prongs that plug into the bottom left corner.

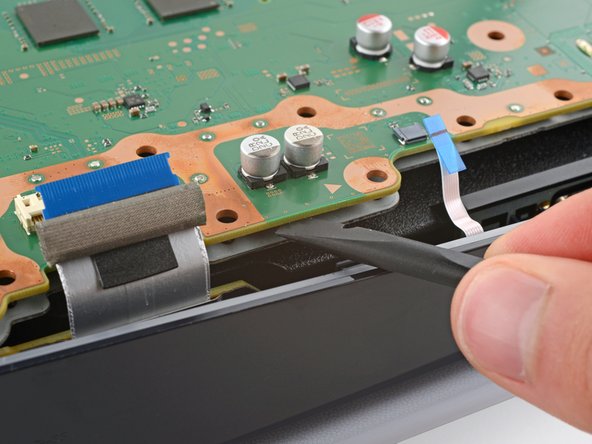
    • Insert the flat end of a spudger between the board and the lower shield plate, by the two parallel solder joints near the corner with the power button.

    • Twist the spudger to lift the two prongs under the board out of their socket.

    • You should feel the prongs slide out.

    • During reassembly, press down on the corner of the board to fully seat the prongs in the power supply—you should feel them slide into place.

  41. How to Apply Liquid Metal in a PlayStation 5, Remove the main board: шаг 41, изображение 1 из 3 How to Apply Liquid Metal in a PlayStation 5, Remove the main board: шаг 41, изображение 2 из 3 How to Apply Liquid Metal in a PlayStation 5, Remove the main board: шаг 41, изображение 3 из 3
    • Remove the main board, flip it over, and lay it on a clean cloth, so the APU is facing up.

    • During reassembly:

    • Make sure all cables that connect to the board are out of the way so they don't get trapped underneath.

    • Carefully flip the board over so the APU is on the bottom, making sure no liquid metal spills.

    • Keep the board level and lower it into place.

  42. How to Apply Liquid Metal in a PlayStation 5, Remove the old liquid metal from the heatsink: шаг 42, изображение 1 из 3 How to Apply Liquid Metal in a PlayStation 5, Remove the old liquid metal from the heatsink: шаг 42, изображение 2 из 3 How to Apply Liquid Metal in a PlayStation 5, Remove the old liquid metal from the heatsink: шаг 42, изображение 3 из 3
    Инструмент, используемый на этом этапе:
    Dispensing Syringe Kit 9 pieces
    $8.99
    Купить
    • Wear gloves to protect your skin from the liquid metal.

    • If you have a disposable syringe, you can use it to suck up any large pools of liquid metal. Don't use the syringe containing your new liquid metal.

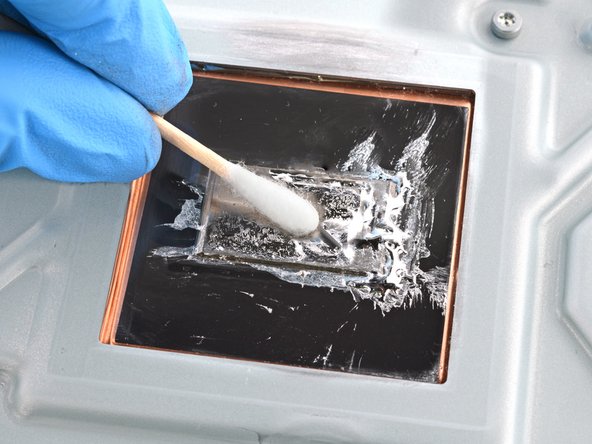
    • Starting with the heatsink: apply a few drops of highly-concentrated (greater than 90%) isopropyl alcohol to a cotton swab and carefully clean up all of the liquid metal from the heatsink surface.

    • Removing the liquid metal can be tricky—it spreads and smears easily. Switch to new cotton swabs and apply more alcohol as necessary.

    • Use the same cleaning process to thoroughly clean up all of the liquid metal residue.

    • The surface needs to be completely clean for the new liquid metal to work properly.

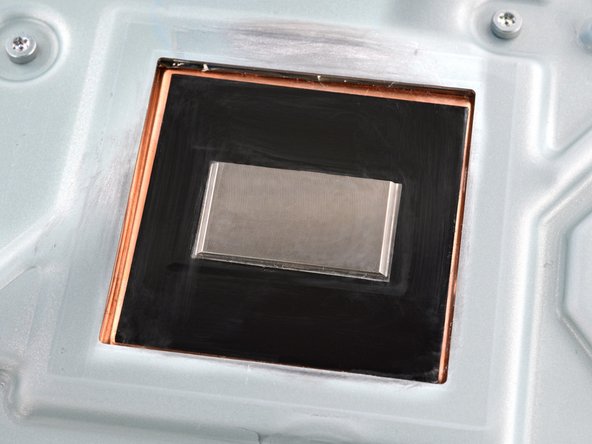
    • Let the heatsink dry completely.

  43. How to Apply Liquid Metal in a PlayStation 5, Remove the old liquid metal from the APU: шаг 43, изображение 1 из 2 How to Apply Liquid Metal in a PlayStation 5, Remove the old liquid metal from the APU: шаг 43, изображение 2 из 2
    • Don't remove the foam barrier that surrounds the APU.

    • Just as you did for the heatsink, clean and remove all of the old liquid metal and its residue from the APU.

    • Don't let any of the liquid metal drip onto the board. Liquid metal is conductive and could cause a short. The foam barrier keeps the liquid metal from leaking out.

    • This is a good point to replace any thermal pads on the bottom of the main board, if necessary. The pads might be stuck to both the bottom shield plate and the main board.

    • Make sure your replacement pads are the same thickness as the originals, or the foam around the APU may not seal properly.

  44. How to Apply Liquid Metal in a PlayStation 5, Apply new liquid metal: шаг 44, изображение 1 из 3 How to Apply Liquid Metal in a PlayStation 5, Apply new liquid metal: шаг 44, изображение 2 из 3 How to Apply Liquid Metal in a PlayStation 5, Apply new liquid metal: шаг 44, изображение 3 из 3
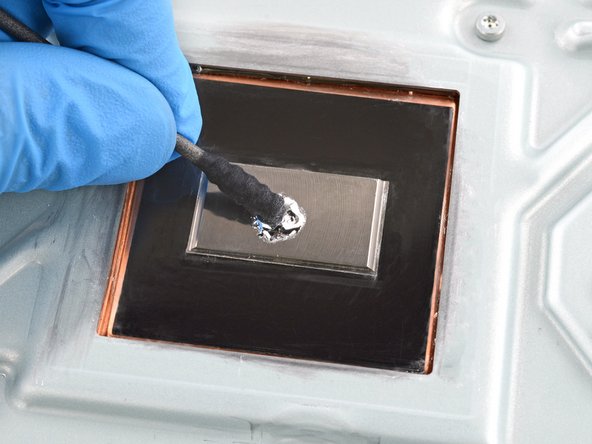
    • Apply a small drop of liquid metal to the heatsink (not the APU)—about the size of a matchstick head.

    • If your liquid metal syringe has multiple applicator heads, use the one with a small, needle-like tip.

    • Use the spreader that came with your liquid metal or a new cotton swab to lightly push down on and evenly spread the liquid metal across the entire surface.

    • If there's excess liquid metal anywhere, use the syringe to suck it back up.

  45. How to Apply Liquid Metal in a PlayStation 5: шаг 45, изображение 1 из 2 How to Apply Liquid Metal in a PlayStation 5: шаг 45, изображение 2 из 2
    • Your cotton swab from the previous step should still have some liquid metal left on it.

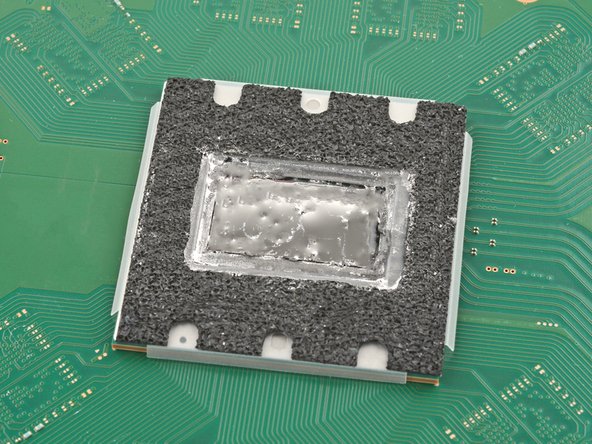
    • Use the same cotton swab to spread a thin layer of liquid metal evenly onto the APU. If you need more liquid metal, lightly dab the cotton swab on the heatsink to transfer some, or apply a very small drop from the syringe.

    • The main board is now ready for reassembly.

Заключение

To reassemble your device, follow these instructions in reverse order, starting with this step.

Take your e-waste to an R2 or e-Stewards certified recycler.

Repair didn’t go as planned? Try some basic troubleshooting, or ask our PlayStation 5 Answers community for help.

Spencer Day

Участник с: 09/14/22

55 149 Репутация

Автор 408 руководств

Команда

iFixit Участник iFixit

Staff

136 членов

Автор 17 410 руководств

0 Комментариев

Добавить комментарий

Просмотр статистики:

За последние 24часов: 20

За последние 7 дней: 111

За последние 30 дней: 292

За всё время: 345