Перейти к основному содержанию

How to Replace the SSD in your Mac mini (2024)

Выберете то, что вам нужно

  1. How to Replace the SSD in your Mac mini (2024), Before you begin: шаг 1, изображение 1 из 2 How to Replace the SSD in your Mac mini (2024), Before you begin: шаг 1, изображение 2 из 2
    • Fully shut down your Mac mini and unplug all cables from it.

    • Flip over your Mac mini and place it on a clean, flat surface to avoid scratching the chassis.

  2. How to Replace the SSD in your Mac mini (2024), Create a gap: шаг 2, изображение 1 из 3 How to Replace the SSD in your Mac mini (2024), Create a gap: шаг 2, изображение 2 из 3 How to Replace the SSD in your Mac mini (2024), Create a gap: шаг 2, изображение 3 из 3
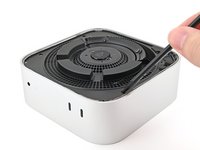
    • Insert a Jimmy into the gap between the bottom cover and the chassis.

    • Pry up the bottom cover to create a gap.

    • Keep the Jimmy inserted under the bottom cover.

  3. How to Replace the SSD in your Mac mini (2024), Insert an opening pick: шаг 3, изображение 1 из 3 How to Replace the SSD in your Mac mini (2024), Insert an opening pick: шаг 3, изображение 2 из 3 How to Replace the SSD in your Mac mini (2024), Insert an opening pick: шаг 3, изображение 3 из 3
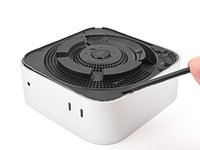
    • Insert an opening pick into the gap created by the Jimmy.

    • Remove the Jimmy.

  4. How to Replace the SSD in your Mac mini (2024), Release the clips: шаг 4, изображение 1 из 3 How to Replace the SSD in your Mac mini (2024), Release the clips: шаг 4, изображение 2 из 3 How to Replace the SSD in your Mac mini (2024), Release the clips: шаг 4, изображение 3 из 3
    • Slide the opening pick along the bottom cover until you feel it snag on a clip.

    • There are four clips total—one at each corner of the bottom cover.

    • Twist the pick to lift the clip out of its slot.

  5. How to Replace the SSD in your Mac mini (2024): шаг 5, изображение 1 из 3 How to Replace the SSD in your Mac mini (2024): шаг 5, изображение 2 из 3 How to Replace the SSD in your Mac mini (2024): шаг 5, изображение 3 из 3
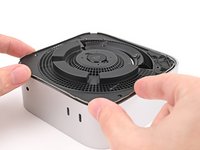
    • Continue sliding and prying with the pick along the perimeter of the bottom cover to release the remaining clips.

    • Don't insert the pick more than an inch when sliding near the power button, as you risk damaging the cable.

    • During reassembly, press along the perimeter of the bottom until you hear and feel all four clips click back into place.

  6. How to Replace the SSD in your Mac mini (2024): шаг 6, изображение 1 из 2 How to Replace the SSD in your Mac mini (2024): шаг 6, изображение 2 из 2
    • Don't remove the bottom cover yet, as it's still connected to the Mac mini with a cable.

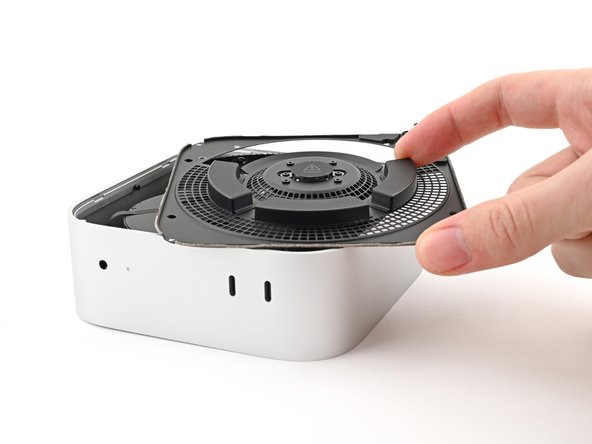
    • Lift the edge of the bottom cover opposite the power button and flip it over to expose the power button cable.

  7. How to Replace the SSD in your Mac mini (2024), Disconnect the power button: шаг 7, изображение 1 из 3 How to Replace the SSD in your Mac mini (2024), Disconnect the power button: шаг 7, изображение 2 из 3 How to Replace the SSD in your Mac mini (2024), Disconnect the power button: шаг 7, изображение 3 из 3
    • Grip the power button cable close to the head and pull it away from its socket to disconnect it.

  8. How to Replace the SSD in your Mac mini (2024), Remove the bottom cover: шаг 8, изображение 1 из 1
    • Remove the bottom cover.

  9. How to Replace the SSD in your Mac mini (2024), Remove the inner plate screws: шаг 9, изображение 1 из 2 How to Replace the SSD in your Mac mini (2024), Remove the inner plate screws: шаг 9, изображение 2 из 2
    Инструмент, используемый на этом этапе:
    FixMat
    $36.95
    • Throughout this repair, keep track of each screw and make sure it goes back exactly where it came from.

    • While the Mac mini uses Torx Plus screws, standard Torx bits work. Make sure to apply constant, downward force to prevent stripping.

    • Use a T5 Torx screwdriver to remove the eight 3.4 mm‑long screws securing the inner plate.

  10. How to Replace the SSD in your Mac mini (2024), Separate the inner plate: шаг 10, изображение 1 из 3 How to Replace the SSD in your Mac mini (2024), Separate the inner plate: шаг 10, изображение 2 из 3 How to Replace the SSD in your Mac mini (2024), Separate the inner plate: шаг 10, изображение 3 из 3
    • Insert the point of a spudger into one of the clips' slots on the inner plate.

    • Pry up the inner plate enough so you can grip the edge along the same side as the headphone jack.

  11. How to Replace the SSD in your Mac mini (2024): шаг 11, изображение 1 из 2 How to Replace the SSD in your Mac mini (2024): шаг 11, изображение 2 из 2
    • Pull the inner plate away from the chassis to slide it out from under the lip on the heat sink.

    • During reassembly, slide the inner plate back under the heat sink and press along its edges to secure it in the chassis.

  12. How to Replace the SSD in your Mac mini (2024): шаг 12, изображение 1 из 3 How to Replace the SSD in your Mac mini (2024): шаг 12, изображение 2 из 3 How to Replace the SSD in your Mac mini (2024): шаг 12, изображение 3 из 3
    • Don't remove the inner plate, as it's still connected to the Mac mini by a cable.

    • Lift the inner plate and flip it over the edge of the chassis. Let it rest against the chassis.

  13. How to Replace the SSD in your Mac mini (2024), Remove the fan screws: шаг 13, изображение 1 из 2 How to Replace the SSD in your Mac mini (2024), Remove the fan screws: шаг 13, изображение 2 из 2
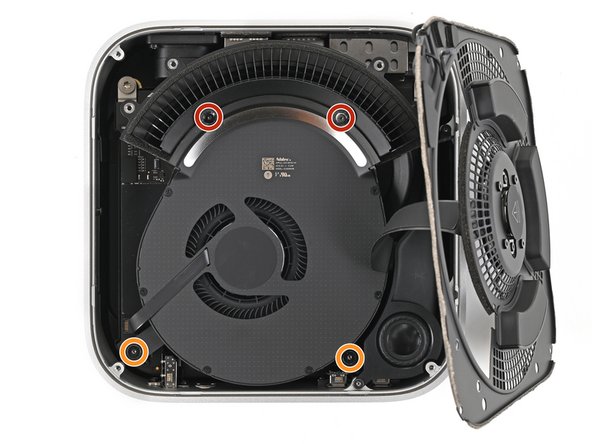
    • Remove the four screws securing the fan:

    • Two 2.4 mm‑long Torx Plus 3IP screws

    • Two 7.9 mm‑long Torx Plus 5IP screws

  14. How to Replace the SSD in your Mac mini (2024), Reposition the fan: шаг 14, изображение 1 из 3 How to Replace the SSD in your Mac mini (2024), Reposition the fan: шаг 14, изображение 2 из 3 How to Replace the SSD in your Mac mini (2024), Reposition the fan: шаг 14, изображение 3 из 3
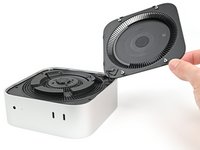
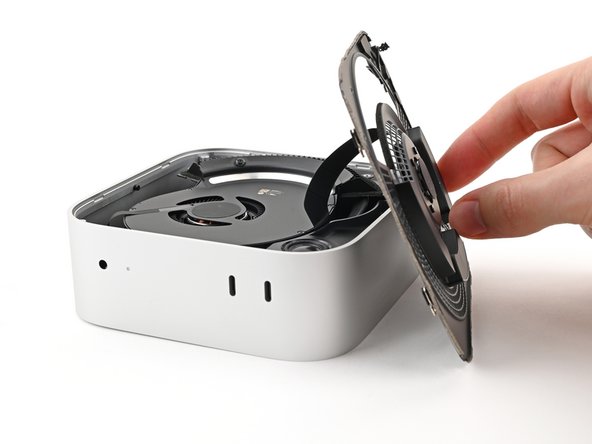
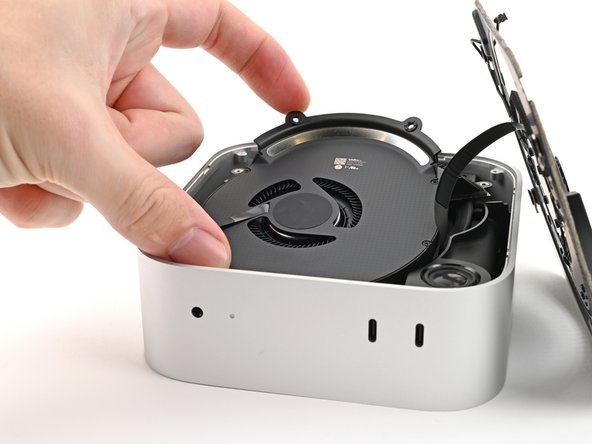
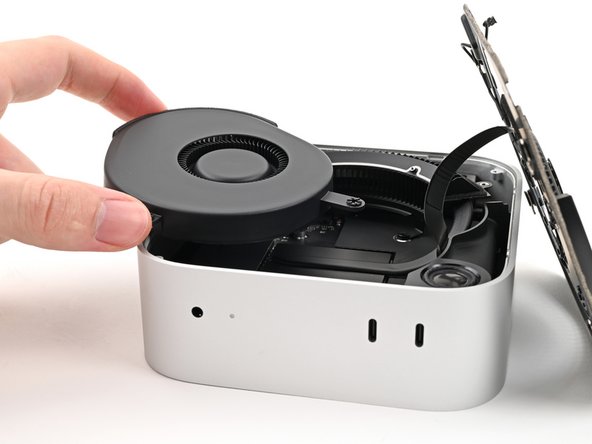
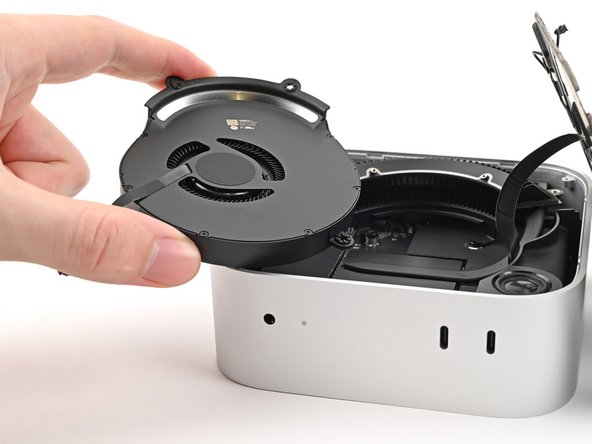
    • Lift the fan out of its recess in the chassis and flip it over to expose its wire and connector.

    • Let the fan rest on the chassis and heat sink.

  15. How to Replace the SSD in your Mac mini (2024), Disconnect the fan: шаг 15, изображение 1 из 3 How to Replace the SSD in your Mac mini (2024), Disconnect the fan: шаг 15, изображение 2 из 3 How to Replace the SSD in your Mac mini (2024), Disconnect the fan: шаг 15, изображение 3 из 3
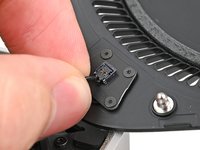
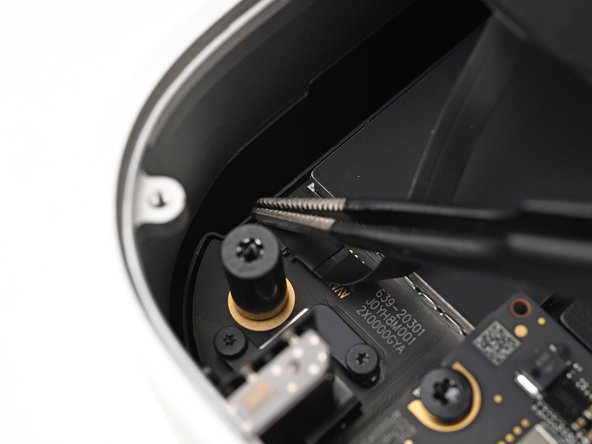
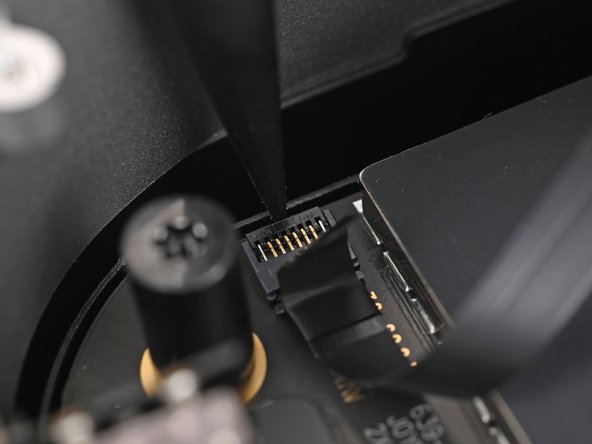
    • Use tweezers to peel back the tape covering the fan ZIF connector.

  16. How to Replace the SSD in your Mac mini (2024): шаг 16, изображение 1 из 2 How to Replace the SSD in your Mac mini (2024): шаг 16, изображение 2 из 2
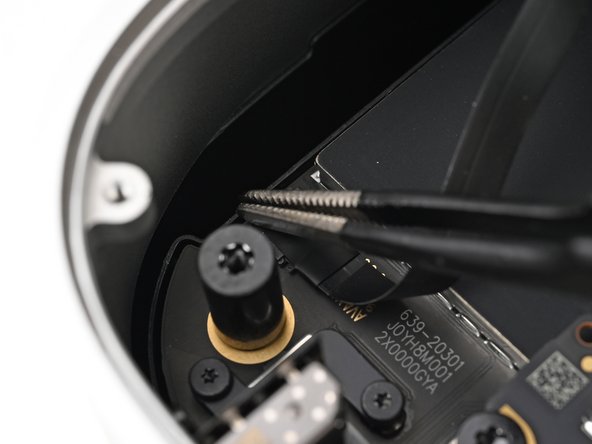
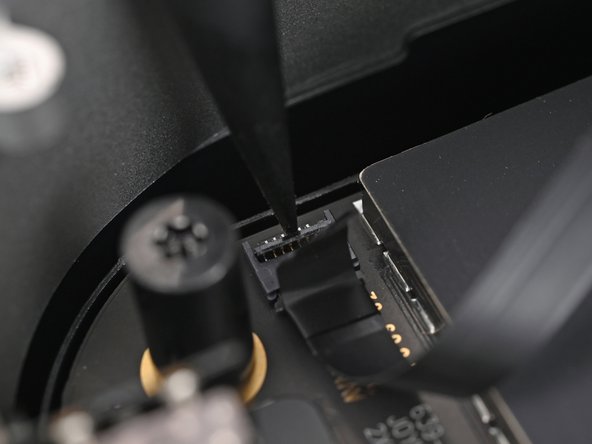
    • Use the point of a spudger, or your fingernail, to flip up the locking tab on the fan ZIF connector.

  17. How to Replace the SSD in your Mac mini (2024): шаг 17, изображение 1 из 2 How to Replace the SSD in your Mac mini (2024): шаг 17, изображение 2 из 2
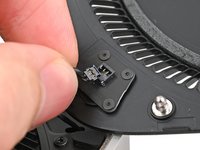
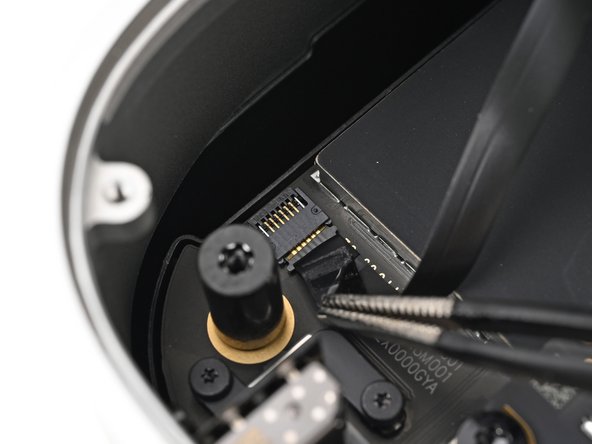
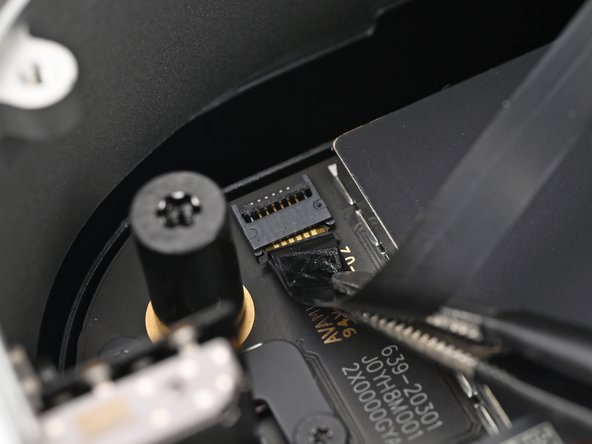
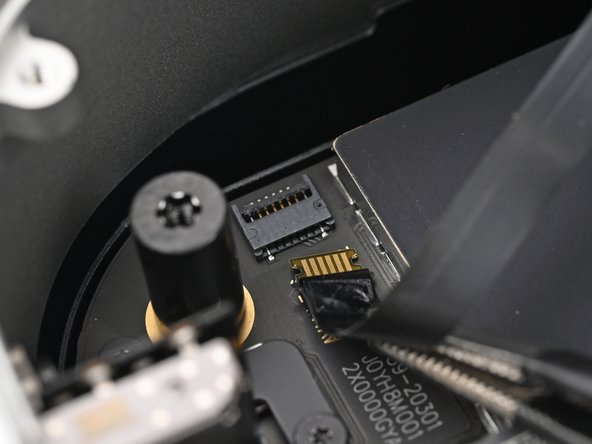
    • Use tweezers, or your fingers, to slide the ZIF connector straight out of its socket.

  18. How to Replace the SSD in your Mac mini (2024), Remove the fan: шаг 18, изображение 1 из 1
    • Remove the fan.

  19. How to Replace the SSD in your Mac mini (2024), Remove the SSD screw: шаг 19, изображение 1 из 2 How to Replace the SSD in your Mac mini (2024), Remove the SSD screw: шаг 19, изображение 2 из 2
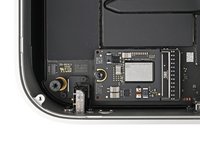
    • Use a Torx Plus 8IP screwdriver to remove the 4.1 mm‑long screw securing the SSD.

  20. How to Replace the SSD in your Mac mini (2024), Remove the SSD: шаг 20, изображение 1 из 3 How to Replace the SSD in your Mac mini (2024), Remove the SSD: шаг 20, изображение 2 из 3 How to Replace the SSD in your Mac mini (2024), Remove the SSD: шаг 20, изображение 3 из 3
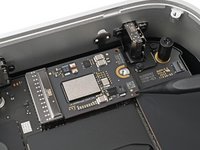
    • Insert the point of a spudger into one of the holes along the bottom edge of the SSD.

    • Use the spudger to pull the SSD away from its socket, alternating sides as necessary, until it's fully disconnected.

  21. How to Replace the SSD in your Mac mini (2024): шаг 21, изображение 1 из 2 How to Replace the SSD in your Mac mini (2024): шаг 21, изображение 2 из 2
    • Grip the corner of the SSD, tilt it up against the headphone jack, and lift it out of its socket.

    • During reassembly, insert the SSD at an angle and gently wiggle it into place until it sits flat to the logic board.

Заключение

To reassemble your device, follow these instructions in reverse order.

Take your e-waste to an R2 or e-Stewards certified recycler.

Repair didn’t go as planned? Try some basic troubleshooting, or ask our Mac mini (2024) Answers Community for help.

11 человек успешно провели ремонт по этому руководству.

Alex Diaz-Kokaisl

Участник с: 01/16/22

161 942 Репутация

Автор 769 руководств

Команду

iFixit Участник iFixit

Staff

118 членов

Автор 19 410 руководств

10 Комментариев

"Apple's unique SSDs aren't sold by Apple and aren't currently available by a third party." is no longer correct. https://expandmacmini.com has tested options to upgrade SSD to 2TB.

Alpha - Ответить

Thanks, as always, for such a wonderful job in explanation and photos as to how this disassembly and upgrade of the M4 Mac Mini. I and many others thank you for this work that you do so well. I have just purchased an M4 Mini with only 256 GB internal drive, although, I did opt for an upgrade of the RAM to 32 GB; but, as everyone knows, and extra $500 as a charge from Apple for this much extra RAM makes for quite an expensive addition to the cost. But, now that I have an option to upgrade the internal drive to 2 TB, my Mini will be really powerful, with lots of room to spare!

Bruce - Ответить

After the installation, (or prior to?) how does one install the OS? Thank you

Jim Willett - Ответить

Добавить комментарий

Статистика просмотров:

За последние 24 час(ов): 347

За последние 7 дней: 1,771

За последние 30 дней: 7,298

За всё время: 21,589