Введение
Use this guide to replace a worn-out or dead battery in your Huawei Mate 20 Pro.
Opening the Huawei Mate 20 Pro will damage the waterproof sealing on the device. If you do not replace the adhesive seals, your phone will function normally but will lose its water-protection.
If your battery is swollen, take appropriate precautions. For your safety, discharge your battery below 25% before disassembling your phone. This reduces the risk of a dangerous thermal event if the battery is accidentally damaged during the repair.
Although it is possible to remove the battery without removing the main flex cable with the charging port, we recommend to do so to avoid damage to surrounding components.
You’ll need replacement adhesive to reattach components when reassembling the device.
Выберете то, что вам нужно
-
-
Before you begin, switch off your phone.
-
Apply a heated iOpener to the back of the phone to loosen the adhesive beneath the back cover. Apply the iOpener for at least two minutes.
-
-
-
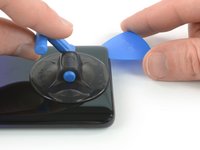
Secure a suction handle to the bottom of the back cover, as close to the edge as possible.
-
Lift the back cover with the suction handle to create a small gap between the cover and the frame.
-
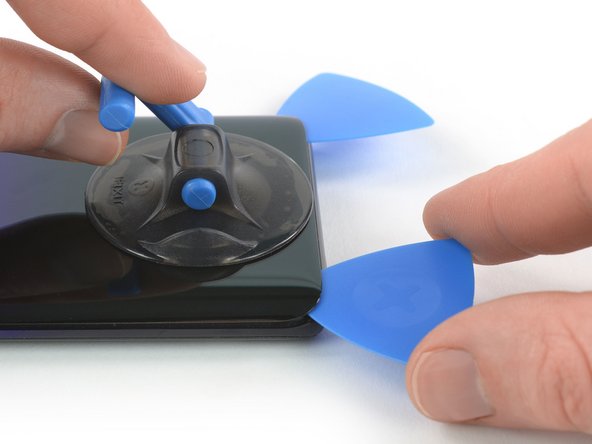
Insert an opening pick into the gap.
-
Slide the opening pick to the bottom right corner.
-
-
-
Insert a second opening pick and slide it to the bottom left corner to cut the adhesive.
-
Leave the opening picks in place to prevent the adhesive from resealing.
-
-
-
Insert a third opening pick at the bottom left corner.
-
Slide the tip of the opening pick from the bottom left corner along the side of the phone to cut the adhesive.
-
Leave the opening pick in its place at the top left corner to prevent the adhesive from resealing.
-
-
-
If the adhesive becomes hard to cut, it has most likely cooled down. Use your iOpener to reheat it.
-
Insert a fourth opening pick under the top left corner of the back cover.
-
Slide the opening pick along the top edge of the phone to cut the adhesive.
-
Leave the opening pick in the top right corner to prevent the adhesive from resealing.
-
-
-
Insert a fifth opening pick at the top right corner of the phone.
-
Slide the opening pick along the right side to cut the remaining adhesive.
-
-
-
Remove the eight Phillips #00 screws (4.3 mm length).
Hallo, es sind nur 7 Kreuzschlitzschrauben à 4.3mm. Eine (die zweite von unten links nach rechts) ist massiv kürzer und silbern.Gruss Jörg
-
-
-
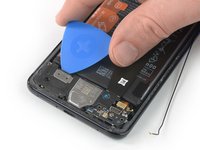
Slide an opening pick under the black adhesive at the bottom left of the charging coil.
-
Carefully slide the opening from the left to the right side to loosen the adhesive.
-
-
-
Insert an opening pick under the bottom left corner of the motherboard cover.
-
Use the opening pick to pry up the motherboard cover.
-
-
-
-
Use a spudger to pry up and disconnect the flash assembly flex cable.
-
Remove the motherboard cover including the NFC and charging coil.
-
-
-
Use a spudger to pry up and disconnect the battery connector.
-
-
-
Remove the three Phillips #00 screws (4.3 mm length).
-
If you want to remove or replace the loudspeaker, daughterboard, battery, or the OLED screen, remove the four Phillips #00 screws (4.3 mm length) which hold down the loudspeaker assembly.
-
-
Инструмент, используемый на этом этапе:Tweezers$4.99
-
Slide an opening pick under the top right corner of the daughterboard cover.
-
Use the opening pick to pry up the daughterboard cover. Remove the daughterboard cover with tweezers.
-
-
-
Use a Spudger to pry up and disconnect the interconnect flex cable from the daughterboard.
-
-
-
Use a Spudger to pry up and disconnect the interconnect flex cable from the motherboard.
-
Remove the interconnect flex cable.
-
-
Инструмент, используемый на этом этапе:Tweezers$4.99
-
Use a pair of tweezers to pry up and disconnect the connector of the black coax cable from the daughterboard.
-
Unroute the black coax cable from the metal clip on the daughterboard and fold it to the side.
-
-
-
Slide an opening underneath the top left corner of the loudspeaker cover.
-
Use the opening pick to pry up the loudspeaker and daughterboard assembly.
This part is difficult to remove, does not come out easily.
Turns out that you have to remove the 4 orange screws of step 14.
Not sure why there is a IF statement on this step.
-
-
-
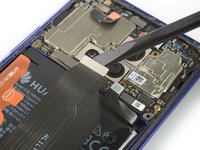
Use a spudger to pry up and disconnect the main flex cable from the motherboard.
-
-
-
Use a spudger to pry up and disconnect the main flex cable from the left daughterboard.
-
-
-
Slide the flat end of a spudger under the right side of the main flex cable next to the charging port.
-
Use the spudger to pry up the main flex cable and to lever the charging port out of its recess.
-
-
-
Remove the main flex cable including the charging port by lifting it upwards and then pulling it in the direction of the motherboard.
-
-
-
Peel the orange adhesive strip labeled with a 1 off the battery. The orange adhesive tape will rip along a small perforated line.
-
-
-
Peel the orange adhesive strip labeled with a 2 off the battery. The orange adhesive tape will rip along a small perforated line.
-
-
-
Peel the orange adhesive strip labeled with a 3 off the battery.
-
Pull up the orange adhesive strip to lift the battery out of its recess.
-
-
-
Swing the battery up to an upright position.
-
Peel the battery off the remaining adhesive.
-
Remove the battery.
-


To reassemble your device, follow these instructions in reverse order. Apply new adhesive where necessary after cleaning the relevant areas with isopropyl alcohol (>90%).
For optimal performance, calibrate your newly installed battery: Charge it to 100%, and keep charging it for at least two more hours. Then, use it until it shuts off due to low battery. Finally, charge it uninterrupted to 100%
Take your e-waste to an R2 or e-Stewards certified recycler.
Repair didn’t go as planned? Check out our Answers community for troubleshooting help.
Отменить: Я не выполнил это руководство.
15 человек успешно провели ремонт по этому руководству.


17 Комментариев
I have tried this with two new batteries now. I believe the device was water damaged by plugging the charger in while there was moisture in the port. The existing battery works but doesn't fast charge and gets very hot when charging, the battery also drains extremely quickly. Everytime insert a new battery the phone just get stuck in a boot loop, bringing up the Huawei powered by android screen before restarting, I have also replaced the charging port in hopes that may of been damaged and was causing the issue but this didn't work either. Any suggestion?
Excellent Step by step guide thank you
Sorry what do you mean by “reusing the board at the base of the battery body”?
Hi, I had the same issue that the phone did not accept the new battery. Luckily I found a workaround in a German newsgroup: 1) Boot up the device using the original Battery 2) connect an USB charger to the mobile 3) Disconnect the original batery and connect the new one ( you have to be quite fast, if the phone shuts down during the change you have to go back to step 1) 4) charge the phone for about 10 minutes and check if the batteryindicator moves up. 5) restart the phone and double check that the new battery is accepted. I’ve tested this method and it worked for me.
You saved my life, I saw it in the German website but it was not that easy explained
Please show us or explain a bit better how to do this?? I tried it but the phone dies immediately if you remove the battery plug
Oh my gosh! After I tried out every suggestion I found on the internet, this eventually worked for me too! But I put a spin on it. To reduce energy consumption and keep it alive during the switch, I unplugged the screen! Beforehand, my phone died the moment I took off the battery cable. But having the screen not attached, it worked. So happy. By the way, the screen is the yellow/reddish cable that comes from underneath the battery and attaches below the lower-left camera. Having tried out the other methods suggested online, I must say that I also left my phone charging for some hours while it continuously rebooted, and I did a factory reset beforehand. But I don't think that was necessary
axeld.90 -
How did you do it the phone dies
Could you maybe post a link of the original website showing how to do this?
I changed the battery without any problems but the phone gets stuck in bootlooping as I feared... When I let the phone bootlooping while being charged, it eventually starts but it can take a while… And then if I shut down the phone, or let the battery discharged totally, I have to do the whole thing again. Is there a way with a booted phone to change the battery ID so that the phone thinks it’s the old battery inside to prevent bootlooping? Also, can someone elaborate the hardware fix “I solved it by reusing the board at the base of the battery body” ?
Thank you for your help
Yeah I tried and just gave up, old battery still works fine with about 2/3 capacity so I popped it back in. I highly suspect that with the new HarmonyOS the trick they posted about in 2021 is patched. This is a known issue, I guess it's time to change brands for the next phone oh well.
What I tried was following all the steps outlined by the other person, while it seems to work at first the phone refuses to boot after the flashlight is plugged back in and the metal cover plate is installed on top of the motherboard.
More complicated instructions in Chinese, really feel like ifixit needs to put a warning at the top of this tutorial...