Перейти к основному содержанию

Lenovo IdeaPad 310-15IKB Motherboard Replacement

Выберете то, что вам нужно

  1. Lenovo IdeaPad 310-15IKB Motherboard Replacement, Unfasten the lower case: шаг 1, изображение 1 из 2 Lenovo IdeaPad 310-15IKB Motherboard Replacement, Unfasten the lower case: шаг 1, изображение 2 из 2
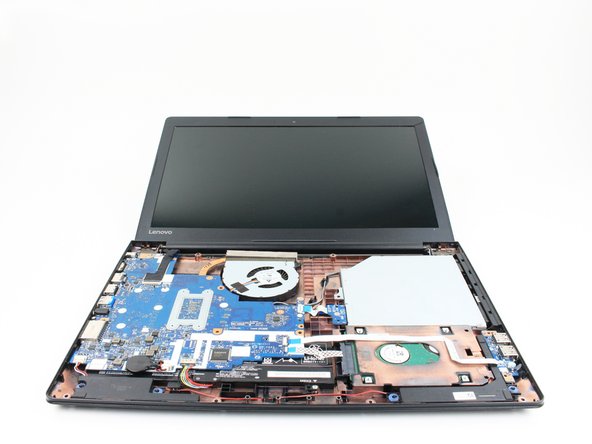
    • Flip the laptop over with the hinge facing away from you.

    • Use a Phillips screwdriver to remove the twelve 6.5 mm screws that secure the lower case and the right panel.

    • It's not necessary to remove the lower left panel unless you intend to replace the HDD.

  2. Lenovo IdeaPad 310-15IKB Motherboard Replacement, Remove the right panel: шаг 2, изображение 1 из 3 Lenovo IdeaPad 310-15IKB Motherboard Replacement, Remove the right panel: шаг 2, изображение 2 из 3 Lenovo IdeaPad 310-15IKB Motherboard Replacement, Remove the right panel: шаг 2, изображение 3 из 3
    • Insert the flat end of a spudger into the notch on the upper left corner of the right panel.

    • Pry the panel up to release the retaining clips that secure the panel.

    • Remove the panel.

  3. Lenovo IdeaPad 310-15IKB Motherboard Replacement, Unfasten the motherboard: шаг 3, изображение 1 из 1
    • Use a Phillips screwdriver to remove the three 6.6 mm screws that secure the motherboard to the lower case.

  4. Lenovo IdeaPad 310-15IKB Motherboard Replacement, Disconnect the fan cable: шаг 4, изображение 1 из 2 Lenovo IdeaPad 310-15IKB Motherboard Replacement, Disconnect the fan cable: шаг 4, изображение 2 из 2
    • Use tweezers or your fingernails to lift the fan cable connector directly up and out of its motherboard socket.

  5. Lenovo IdeaPad 310-15IKB Motherboard Replacement, Release the ZIF connectors: шаг 5, изображение 1 из 3 Lenovo IdeaPad 310-15IKB Motherboard Replacement, Release the ZIF connectors: шаг 5, изображение 2 из 3 Lenovo IdeaPad 310-15IKB Motherboard Replacement, Release the ZIF connectors: шаг 5, изображение 3 из 3
    • Use the flat end of a spudger or a fingernail to flip up the ZIF locking flaps on the keyboard and trackpad connectors.

  6. Lenovo IdeaPad 310-15IKB Motherboard Replacement, Disconnect the keyboard ribbon cable: шаг 6, изображение 1 из 3 Lenovo IdeaPad 310-15IKB Motherboard Replacement, Disconnect the keyboard ribbon cable: шаг 6, изображение 2 из 3 Lenovo IdeaPad 310-15IKB Motherboard Replacement, Disconnect the keyboard ribbon cable: шаг 6, изображение 3 из 3
    • Use blunt tweezers to pull the keyboard ribbon cable directly out of its socket.

  7. Lenovo IdeaPad 310-15IKB Motherboard Replacement, Disconnect the trackpad ribbon cable: шаг 7, изображение 1 из 2 Lenovo IdeaPad 310-15IKB Motherboard Replacement, Disconnect the trackpad ribbon cable: шаг 7, изображение 2 из 2
    • Use blunt tweezers to pull the trackpad ribbon cable directly out of its port.

    • Grip and pull the blue pull tab, not the entire ribbon cable.

  8. Lenovo IdeaPad 310-15IKB Motherboard Replacement, Disconnect the wireless card cables: шаг 8, изображение 1 из 3 Lenovo IdeaPad 310-15IKB Motherboard Replacement, Disconnect the wireless card cables: шаг 8, изображение 2 из 3 Lenovo IdeaPad 310-15IKB Motherboard Replacement, Disconnect the wireless card cables: шаг 8, изображение 3 из 3
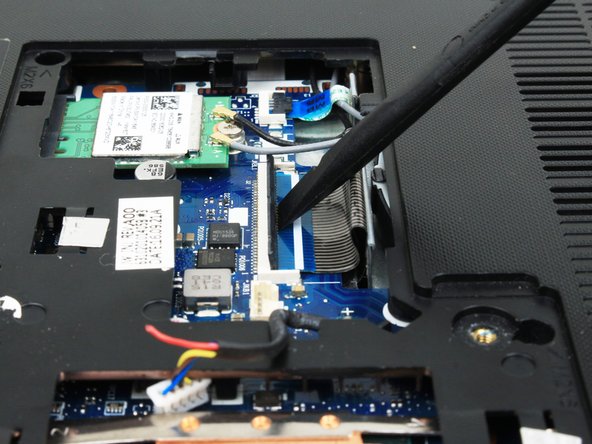
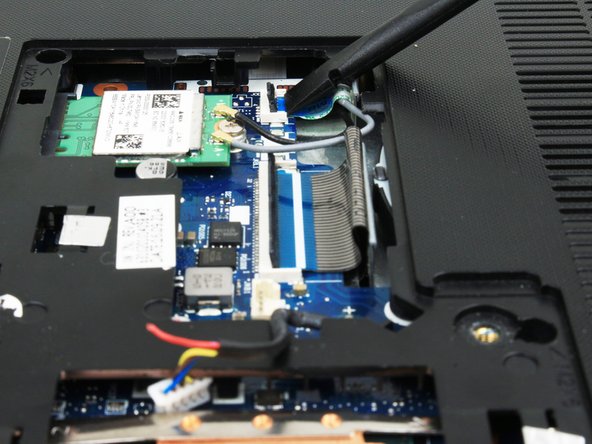
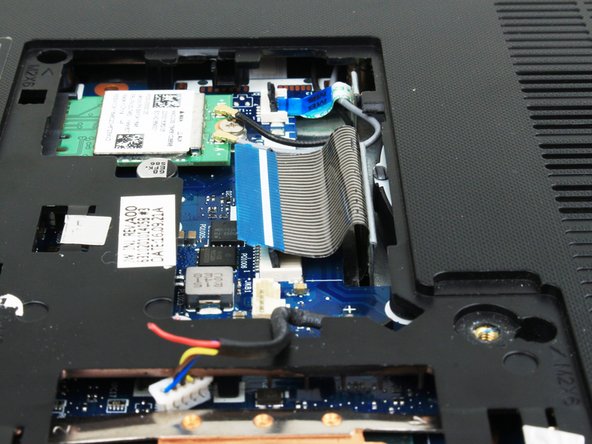
    • Use the pointed tip of a spudger to gently pry up and disconnect the two antenna cables from the wireless card.

  9. Lenovo IdeaPad 310-15IKB Motherboard Replacement, Open the laptop lid: шаг 9, изображение 1 из 2 Lenovo IdeaPad 310-15IKB Motherboard Replacement, Open the laptop lid: шаг 9, изображение 2 из 2
    • Flip the laptop over and open the lid.

  10. Lenovo IdeaPad 310-15IKB Motherboard Replacement, Unclip the left edge: шаг 10, изображение 1 из 3 Lenovo IdeaPad 310-15IKB Motherboard Replacement, Unclip the left edge: шаг 10, изображение 2 из 3 Lenovo IdeaPad 310-15IKB Motherboard Replacement, Unclip the left edge: шаг 10, изображение 3 из 3
    • The keyboard assembly is secured to the lower case by plastic retaining clips. You'll hear and feel them release as you work.

    • Insert the tip of an opening pick into the seam between the top left corner of the lower case and keyboard assembly.

    • Slide the opening pick down to the bottom left corner to release the clips.

  11. Lenovo IdeaPad 310-15IKB Motherboard Replacement, Unclip the front edge: шаг 11, изображение 1 из 3 Lenovo IdeaPad 310-15IKB Motherboard Replacement, Unclip the front edge: шаг 11, изображение 2 из 3 Lenovo IdeaPad 310-15IKB Motherboard Replacement, Unclip the front edge: шаг 11, изображение 3 из 3
    • Insert the tip of an opening pick into the seam between the lower left side of the palm rest and the lower case.

    • Slide the opening pick to the right to release the clips that secure the front edge.

  12. Lenovo IdeaPad 310-15IKB Motherboard Replacement, Unclip the right edge: шаг 12, изображение 1 из 3 Lenovo IdeaPad 310-15IKB Motherboard Replacement, Unclip the right edge: шаг 12, изображение 2 из 3 Lenovo IdeaPad 310-15IKB Motherboard Replacement, Unclip the right edge: шаг 12, изображение 3 из 3
    • Insert the tip of an opening pick into the bottom right seam between the chassis and keyboard assembly.

    • Slide the pick toward the top right corner to release the remaining retaining clips.

  13. Lenovo IdeaPad 310-15IKB Motherboard Replacement, Remove the keyboard assembly: шаг 13, изображение 1 из 3 Lenovo IdeaPad 310-15IKB Motherboard Replacement, Remove the keyboard assembly: шаг 13, изображение 2 из 3 Lenovo IdeaPad 310-15IKB Motherboard Replacement, Remove the keyboard assembly: шаг 13, изображение 3 из 3
    • Lift the keyboard assembly off of the chassis.

  14. Lenovo IdeaPad 310-15IKB Motherboard Replacement, Disconnect the battery: шаг 14, изображение 1 из 3 Lenovo IdeaPad 310-15IKB Motherboard Replacement, Disconnect the battery: шаг 14, изображение 2 из 3 Lenovo IdeaPad 310-15IKB Motherboard Replacement, Disconnect the battery: шаг 14, изображение 3 из 3
    • Use two opening tools or your fingernails to gently "walk" the battery connection directly out of its motherboard socket.

  15. Lenovo IdeaPad 310-15IKB Motherboard Replacement, Unfasten the motherboard: шаг 15, изображение 1 из 1
    • Use a Phillips screwdriver to remove the four 3.3 mm screws that secure the motherboard to the lower case.

  16. Lenovo IdeaPad 310-15IKB Motherboard Replacement, Release the display cable ZIF connector: шаг 16, изображение 1 из 2 Lenovo IdeaPad 310-15IKB Motherboard Replacement, Release the display cable ZIF connector: шаг 16, изображение 2 из 2
    • Use the flat end of a spudger to flip up the ZIF locking flap that secures the display cable.

  17. Lenovo IdeaPad 310-15IKB Motherboard Replacement, Disconnect the display cable: шаг 17, изображение 1 из 2 Lenovo IdeaPad 310-15IKB Motherboard Replacement, Disconnect the display cable: шаг 17, изображение 2 из 2
    • Use blunt tweezers to pull the display cable directly out of its motherboard socket.

  18. Lenovo IdeaPad 310-15IKB Motherboard Replacement, Unseat the display cable: шаг 18, изображение 1 из 3 Lenovo IdeaPad 310-15IKB Motherboard Replacement, Unseat the display cable: шаг 18, изображение 2 из 3 Lenovo IdeaPad 310-15IKB Motherboard Replacement, Unseat the display cable: шаг 18, изображение 3 из 3
    • Use tweezers to lift the display cable vertically to unseat it from the motherboard.

    • The display cable is attached to the motherboard with a mild adhesive. Lift gently to avoid damaging the cable.

  19. Lenovo IdeaPad 310-15IKB Motherboard Replacement, Disconnect the speaker cable: шаг 19, изображение 1 из 3 Lenovo IdeaPad 310-15IKB Motherboard Replacement, Disconnect the speaker cable: шаг 19, изображение 2 из 3 Lenovo IdeaPad 310-15IKB Motherboard Replacement, Disconnect the speaker cable: шаг 19, изображение 3 из 3
    • Use the pointed end of a spudger or your fingernails to gently "walk" the speaker cable directly out of its motherboard socket.

  20. Lenovo IdeaPad 310-15IKB Motherboard Replacement, Release the HDD and I/O board ribbon cables: шаг 20, изображение 1 из 3 Lenovo IdeaPad 310-15IKB Motherboard Replacement, Release the HDD and I/O board ribbon cables: шаг 20, изображение 2 из 3 Lenovo IdeaPad 310-15IKB Motherboard Replacement, Release the HDD and I/O board ribbon cables: шаг 20, изображение 3 из 3
    • Use the flat end of a spudger to flip up each of the two ZIF locking flaps that secure the HDD and I/O board ribbon cables to the motherboard.

  21. Lenovo IdeaPad 310-15IKB Motherboard Replacement, Disconnect the HDD and I/O board ribbon cables: шаг 21, изображение 1 из 3 Lenovo IdeaPad 310-15IKB Motherboard Replacement, Disconnect the HDD and I/O board ribbon cables: шаг 21, изображение 2 из 3 Lenovo IdeaPad 310-15IKB Motherboard Replacement, Disconnect the HDD and I/O board ribbon cables: шаг 21, изображение 3 из 3
    • Use blunt tweezers to disconnect the the HDD and I/O board ribbon cables from their motherboard ports.

    • Grip and pull the blue pull tabs, not the entire ribbon cable.

  22. Lenovo IdeaPad 310-15IKB Motherboard Replacement, Disconnect the optical drive ribbon cable: шаг 22, изображение 1 из 3 Lenovo IdeaPad 310-15IKB Motherboard Replacement, Disconnect the optical drive ribbon cable: шаг 22, изображение 2 из 3 Lenovo IdeaPad 310-15IKB Motherboard Replacement, Disconnect the optical drive ribbon cable: шаг 22, изображение 3 из 3
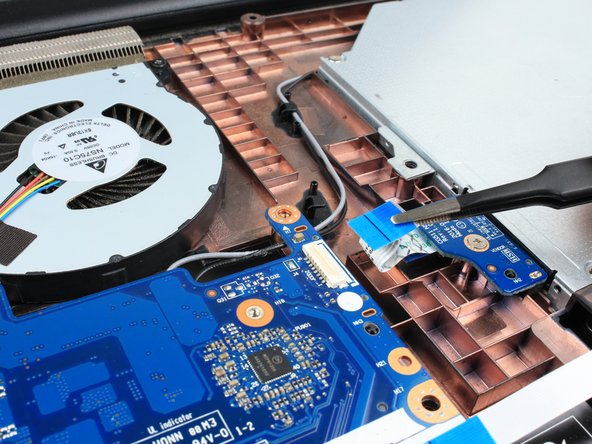
    • Use the flat end of a spudger to flip up the ZIF locking flap that secures the optical drive ribbon cable.

    • Use blunt tweezers to gently pull the optical drive ribbon cable directly out of its motherboard port.

    • Grip and pull the blue pull tab, not the entire ribbon cable.

  23. Lenovo IdeaPad 310-15IKB Motherboard Replacement, Remove the motherboard: шаг 23, изображение 1 из 3 Lenovo IdeaPad 310-15IKB Motherboard Replacement, Remove the motherboard: шаг 23, изображение 2 из 3 Lenovo IdeaPad 310-15IKB Motherboard Replacement, Remove the motherboard: шаг 23, изображение 3 из 3
    • Slightly lift the right side of the motherboard.

    • Slide the motherboard a few millimeters to the right to unseat the ports from the lower case.

    • Grasp both sides of the motherboard and lift it up and out.

Заключение

To reassemble your device, follow these instructions in reverse order.

Take your e-waste to an R2 or e-Stewards certified recycler.

Repair didn’t go as planned? Try some basic troubleshooting, or ask our answers community for help.

Connor Bassolino

Участник с: 03/29/22

6 537 Репутация

Автор 28 руководств

Команда

iFixit Участник iFixit

Staff

135 членов

Автор 16 817 руководств

0 Комментариев

Добавить комментарий

Просмотр статистики:

За последние 24часов: 1

За последние 7 дней: 4

За последние 30 дней: 28

За всё время: 411